
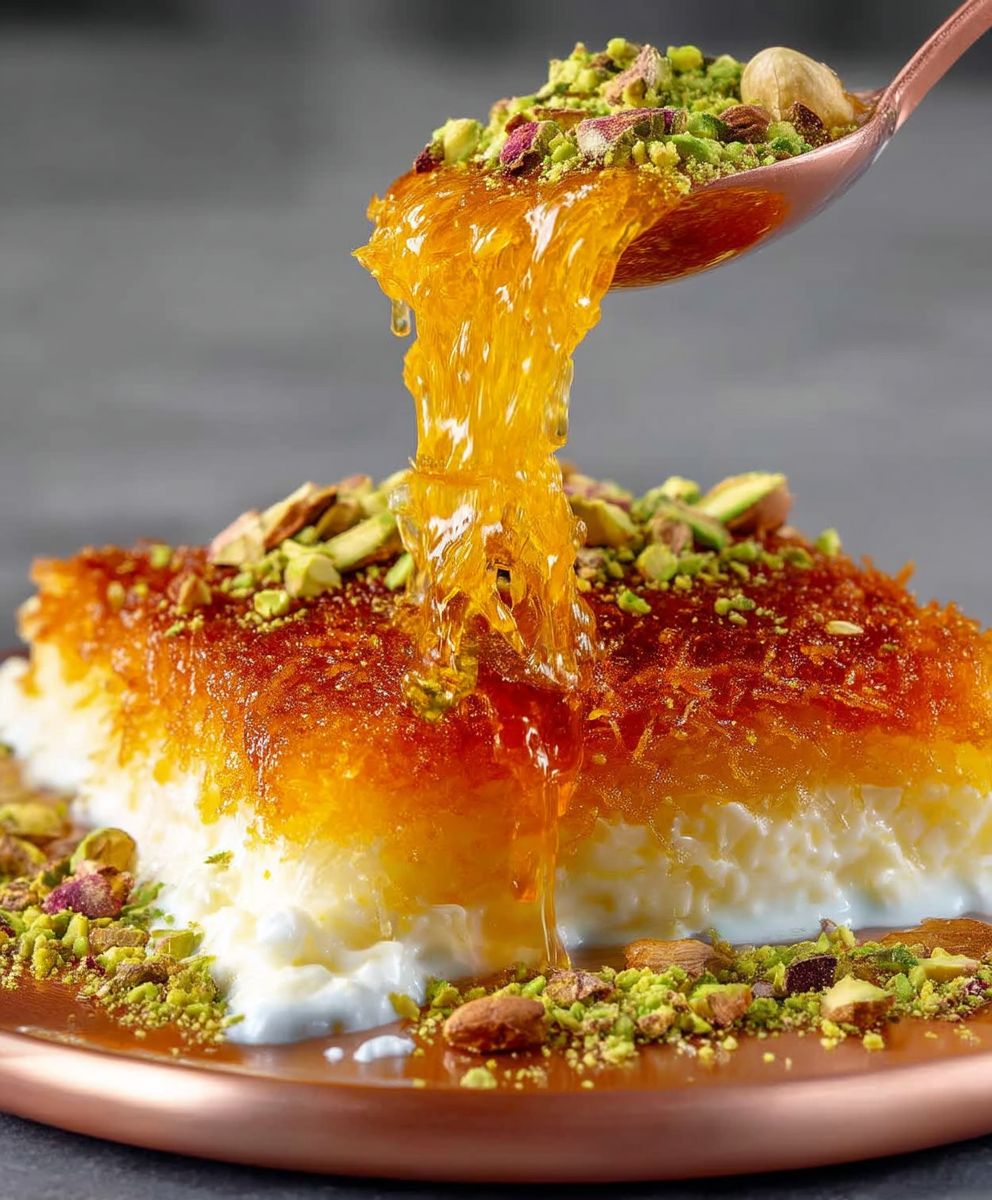
Turkish Kunefe, a dessert that transcends mere sweetness, is a culinary experience. Imagine this: delicate strands of crispy, golden kaday?f embracing a warm, gooey layer of cheese, all drenched in a fragrant, rose-infused syrup. Are you drooling yet? I know I am just thinking about it!
Kunefe, also spelled Künefe, boasts a rich history deeply intertwined with the culinary traditions of the Middle East, particularly Turkey and the Levant. Its origins can be traced back centuries, evolving from simple cheese pastries to the decadent treat we know and love today. It’s more than just a dessert; it’s a symbol of hospitality and celebration, often shared during special occasions and family gatherings.
What makes Turkish Kunefe so irresistible? It’s the symphony of textures and flavors that dance on your palate. The crispy, buttery kaday?f provides a delightful contrast to the soft, melting cheese. The sweet syrup, infused with rosewater or orange blossom, adds a touch of floral elegance that elevates the entire experience. Beyond its exquisite taste, kunefe is also relatively simple to prepare at home, making it a perfect dessert to impress your guests or simply indulge in a moment of sweet bliss. So, let’s embark on a culinary journey and learn how to create this authentic Turkish delight in your own kitchen!

Ingredients:
- For the Kadayif Dough:
- 500g unsalted kadayif dough (shredded phyllo dough)
- 150g unsalted butter, melted
- 2 tablespoons granulated sugar
- 1/4 teaspoon orange food coloring (optional, for a richer color)
- For the Cheese Filling:
- 500g unsalted fresh cheese (such as mozzarella, or a mix of mozzarella and a traditional Turkish cheese like Dil Peyniri or Lor Peyniri if available). Important: The cheese must be low-moisture and unsalted. If using mozzarella, press out excess moisture.
- For the Syrup:
- 2 cups granulated sugar
- 1 cup water
- 1 tablespoon lemon juice
- 1/2 teaspoon rose water (optional, for fragrance)
- For Garnish:
- Ground pistachios, for sprinkling
Preparing the Syrup:
The syrup needs to be prepared first as it needs time to cool down completely before pouring it over the hot kunefe. Trust me, this step is crucial!
- In a medium saucepan, combine the sugar and water.
- Bring the mixture to a boil over medium heat, stirring occasionally until the sugar is completely dissolved.
- Once boiling, reduce the heat to low and let it simmer for about 10-12 minutes. You want the syrup to thicken slightly. To test, dip a spoon into the syrup and let a drop cool slightly. It should be thicker than water but not too thick like honey.
- Add the lemon juice and rose water (if using). The lemon juice prevents the syrup from crystallizing. Stir well and simmer for another minute.
- Remove the saucepan from the heat and let the syrup cool completely. You can even prepare this a day ahead and store it in the refrigerator.
Preparing the Kadayif Dough:
This step is all about ensuring the kadayif is evenly coated with butter and sugar, which will give it that beautiful golden-brown color and crispy texture.
- If your kadayif dough is in long strands, gently separate and fluff it with your hands. You want it to be loose and easy to work with. Don’t chop it too finely, just break up any large clumps.
- In a large bowl, combine the melted butter, granulated sugar, and orange food coloring (if using). Mix well.
- Add the kadayif dough to the bowl and, using your hands, thoroughly coat the dough with the butter mixture. Make sure every strand is coated. This is a bit messy, but it’s essential for even browning.
Assembling the Kunefe:
Now comes the fun part putting everything together! The key here is to create a good base and a secure top layer to hold the cheese in place.
- Preheat your oven to 350°F (175°C).
- Grease two 8-inch round baking pans (or one larger pan) with butter or tahini. Tahini adds a nice nutty flavor, but butter works just fine.
- Divide the buttered kadayif dough in half.
- Take one half of the kadayif dough and press it firmly and evenly into the bottom of one of the prepared baking pans. You want to create a compact layer that will support the cheese. Use your hands or the bottom of a measuring cup to press it down firmly. This is important for a good crust.
- Spread the cheese evenly over the kadayif base, leaving a small border around the edges. This prevents the cheese from oozing out during baking.
- Take the remaining kadayif dough and gently spread it over the cheese, covering it completely. Again, press down gently but firmly to create a compact top layer.
Baking the Kunefe:
Patience is key here! You want the kunefe to be golden brown and crispy. Keep a close eye on it to prevent burning.
- Bake in the preheated oven for 25-35 minutes, or until the kunefe is golden brown and crispy on top. The baking time may vary depending on your oven, so keep an eye on it.
- While the kunefe is baking, you can gently rotate the pan halfway through to ensure even browning.
- Once the kunefe is golden brown, remove it from the oven.
Serving the Kunefe:
This is the most important part! The kunefe needs to be soaked in the cold syrup immediately after baking. This is what gives it that signature sweetness and slightly soggy, yet crispy texture.
- Immediately after removing the kunefe from the oven, pour the cold syrup evenly over the hot kunefe. You should hear a sizzling sound as the syrup soaks into the dough.
- Let the kunefe soak in the syrup for at least 5-10 minutes. This allows the syrup to penetrate the dough and cheese.
- Using a spatula, carefully loosen the kunefe from the sides of the pan.
- Invert the kunefe onto a serving plate. If you used two pans, you can simply place one on top of the other and flip them together.
- Sprinkle generously with ground pistachios.
- Serve immediately while hot and the cheese is still gooey. Kunefe is best enjoyed fresh!
Tips for Success:
- Cheese Choice: The most important factor is that the cheese is unsalted. If you can’t find unsalted mozzarella, soak regular mozzarella in water for a few hours, changing the water frequently, to remove some of the salt.
- Kadayif Dough: If your kadayif dough is frozen, thaw it completely before using.
- Butter: Use good quality unsalted butter for the best flavor.
- Syrup Consistency: The syrup should be thick enough to coat the kunefe but not so thick that it crystallizes.
- Baking Time: Keep a close eye on the kunefe while it’s baking to prevent burning. The baking time may vary depending on your oven.
- Serving: Kunefe is best served immediately while hot and the cheese is still gooey.
- Variations: You can add a layer of kaymak (clotted cream) between the cheese and the top layer of kadayif for an extra decadent treat.
- Pan Size: Using the correct pan size is important for even cooking. If your pan is too small, the kunefe will be too thick and may not cook through properly. If your pan is too large, the kunefe will be too thin and may dry out.
- Pressing the Kadayif: Pressing the kadayif firmly into the pan is crucial for creating a good crust. Don’t be afraid to use some elbow grease!
- Cooling the Syrup: Make sure the syrup is completely cool before pouring it over the hot kunefe. This helps the kunefe absorb the syrup properly and prevents it from becoming soggy.
Enjoy your homemade Turkish Kunefe! Afiyet Olsun!
Conclusion:
So, there you have it! This Turkish Kunefe recipe is more than just a dessert; it’s an experience. It’s a journey to the bustling streets of Istanbul, a warm embrace of sweet cheese and crispy kadayif, and a celebration of simple ingredients transformed into something truly extraordinary. I know it might seem a little intimidating at first glance, but trust me, the results are absolutely worth the effort. The combination of the salty, slightly tangy cheese with the sweet, buttery syrup and the crunchy, golden-brown kadayif is simply divine. It’s a symphony of textures and flavors that will leave you wanting more.
Why is this a must-try? Because it’s unique! It’s not your average cake or cookie. It’s a dessert that tells a story, a dessert that’s steeped in tradition, and a dessert that’s guaranteed to impress. Plus, it’s surprisingly easy to adapt to your own preferences. Feel free to experiment with different types of cheese. While I’ve used a traditional unsalted cheese, you could try using mozzarella for a milder flavor, or even a ricotta mixture for a creamier texture. Just be sure to drain the cheese well to prevent a soggy kunefe.
Serving Suggestions and Variations:
The classic way to serve kunefe is warm, straight from the oven or pan, drizzled with plenty of that fragrant syrup. But don’t stop there! A scoop of vanilla ice cream on top adds a delightful contrast of temperatures and textures. A sprinkle of chopped pistachios adds a touch of elegance and a nutty crunch. And for a truly decadent experience, try serving it with a dollop of clotted cream or kaymak.
Looking for variations? Consider adding a hint of orange blossom water or rosewater to the syrup for a more floral aroma. You could also incorporate a layer of chopped nuts, like walnuts or almonds, between the kadayif and the cheese. For a chocolatey twist, drizzle some melted dark chocolate over the finished kunefe. The possibilities are endless!
I truly believe that everyone should experience the joy of making and eating Turkish Kunefe at least once in their lives. It’s a dessert that’s both comforting and exciting, familiar and exotic. It’s a perfect treat for a special occasion, a cozy night in, or simply when you’re craving something truly delicious.
So, what are you waiting for? Gather your ingredients, preheat your oven, and get ready to embark on a culinary adventure. I’m confident that you’ll be amazed by the results. And most importantly, don’t forget to have fun! Cooking should be a joyful experience, and this recipe is no exception.
I’m so excited for you to try this recipe! Once you’ve made your own Turkish Kunefe, I’d love to hear about your experience. Did you make any variations? What did you think of the flavor and texture? Share your photos and stories in the comments below. I can’t wait to see your creations and hear your feedback. Happy baking!
Turkish Kunefe: A Delicious Guide to This Cheesy Dessert
Kunefe is a traditional Middle Eastern dessert with shredded phyllo dough, unsalted cheese, and sweet syrup. Enjoy this crispy, cheesy, and sweet treat hot!
Ingredients
- 500g unsalted kadayif dough (shredded phyllo dough)
- 150g unsalted butter, melted
- 2 tablespoons granulated sugar
- 1/4 teaspoon orange food coloring (optional, for a richer color)
- 500g unsalted fresh cheese (such as mozzarella, or a mix of mozzarella and a traditional Turkish cheese like Dil Peyniri or Lor Peyniri if available)
- 2 cups granulated sugar
- 1 cup water
- 1 tablespoon lemon juice
- 1/2 teaspoon rose water (optional, for fragrance)
- Ground pistachios, for sprinkling
Instructions
- In a medium saucepan, combine the sugar and water.
- Bring the mixture to a boil over medium heat, stirring occasionally until the sugar is completely dissolved.
- Once boiling, reduce the heat to low and let it simmer for about 10-12 minutes. You want the syrup to thicken slightly. To test, dip a spoon into the syrup and let a drop cool slightly. It should be thicker than water but not too thick like honey.
- Add the lemon juice and rose water (if using). The lemon juice prevents the syrup from crystallizing. Stir well and simmer for another minute.
- Remove the saucepan from the heat and let the syrup cool completely. You can even prepare this a day ahead and store it in the refrigerator.
- If your kadayif dough is in long strands, gently separate and fluff it with your hands. You want it to be loose and easy to work with. Don’t chop it too finely, just break up any large clumps.
- In a large bowl, combine the melted butter, granulated sugar, and orange food coloring (if using). Mix well.
- Add the kadayif dough to the bowl and, using your hands, thoroughly coat the dough with the butter mixture. Make sure every strand is coated. This is a bit messy, but it’s essential for even browning.
- Preheat your oven to 350°F (175°C).
- Grease two 8-inch round baking pans (or one larger pan) with butter or tahini. Tahini adds a nice nutty flavor, but butter works just fine.
- Divide the buttered kadayif dough in half.
- Take one half of the kadayif dough and press it firmly and evenly into the bottom of one of the prepared baking pans. You want to create a compact layer that will support the cheese. Use your hands or the bottom of a measuring cup to press it down firmly. This is important for a good crust.
- Spread the cheese evenly over the kadayif base, leaving a small border around the edges. This prevents the cheese from oozing out during baking.
- Take the remaining kadayif dough and gently spread it over the cheese, covering it completely. Again, press down gently but firmly to create a compact top layer.
- Bake in the preheated oven for 25-35 minutes, or until the kunefe is golden brown and crispy on top. The baking time may vary depending on your oven, so keep an eye on it.
- While the kunefe is baking, you can gently rotate the pan halfway through to ensure even browning.
- Once the kunefe is golden brown, remove it from the oven.
- Immediately after removing the kunefe from the oven, pour the cold syrup evenly over the hot kunefe. You should hear a sizzling sound as the syrup soaks into the dough.
- Let the kunefe soak in the syrup for at least 5-10 minutes. This allows the syrup to penetrate the dough and cheese.
- Using a spatula, carefully loosen the kunefe from the sides of the pan.
- Invert the kunefe onto a serving plate. If you used two pans, you can simply place one on top of the other and flip them together.
- Sprinkle generously with ground pistachios.
- Serve immediately while hot and the cheese is still gooey. Kunefe is best enjoyed fresh!
Notes
- Cheese Choice: The most important factor is that the cheese is unsalted. If you can’t find unsalted mozzarella, soak regular mozzarella in water for a few hours, changing the water frequently, to remove some of the salt.
- Kadayif Dough: If your kadayif dough is frozen, thaw it completely before using.
- Butter: Use good quality unsalted butter for the best flavor.
- Syrup Consistency: The syrup should be thick enough to coat the kunefe but not so thick that it crystallizes.
- Baking Time: Keep a close eye on the kunefe while it’s baking to prevent burning. The baking time may vary depending on your oven.
- Serving: Kunefe is best served immediately while hot and the cheese is still gooey.
- Variations: You can add a layer of kaymak (clotted cream) between the cheese and the top layer of kadayif for an extra decadent treat.
- Pan Size: Using the correct pan size is important for even cooking. If your pan is too small, the kunefe will be too thick and may not cook through properly. If your pan is too large, the kunefe will be too thin and may dry out.
- Pressing the Kadayif: Pressing the kadayif firmly into the pan is crucial for creating a good crust. Don’t be afraid to use some elbow grease!
- Cooling the Syrup: Make sure the syrup is completely cool before pouring it over the hot kunefe. This helps the kunefe absorb the syrup properly and prevents it from becoming soggy.


Leave a Comment