
Homemade Potato Chips: Is there anything more satisfying than the perfect crunch of a crispy, golden potato chip? I think not! Forget the store-bought bags filled with preservatives and artificial flavors. Today, we’re diving headfirst into the world of crafting our very own, unbelievably delicious homemade potato chips, right in your kitchen.
While the exact origins of the potato chip are debated, legend has it they were born out of a culinary “tiff” in 1853. Chef George Crum, frustrated by a demanding customer who kept sending back his fried potatoes for being too thick, sarcastically sliced them paper-thin, fried them to a crisp, and voila! The Saratoga Chip was born. Whether the story is entirely true or not, it highlights the enduring appeal of a perfectly crispy potato.
People adore potato chips for their irresistible combination of salty, savory flavor and satisfying crunch. They’re the ultimate comfort food, perfect for snacking on during movie nights, picnics, or simply when you need a little pick-me-up. And when you make them yourself, you have complete control over the ingredients, ensuring a fresher, healthier, and infinitely more flavorful snack. So, are you ready to ditch the processed stuff and embark on a chip-making adventure? Let’s get started!

Ingredients:
- 4 large russet potatoes, peeled
- Vegetable oil (or peanut oil) for frying
- Salt, to taste (sea salt or kosher salt recommended)
- Optional seasonings: paprika, garlic powder, onion powder, cayenne pepper, rosemary, thyme, or your favorite spice blend
Preparing the Potatoes:
Alright, let’s get started with the most important part: prepping those potatoes! This is where the magic begins, and a little attention to detail here will make a huge difference in the final product. We want crispy, evenly cooked chips, and that starts with uniform slices.
- Wash and Peel: Give those russet potatoes a good scrub under cold water. Even though we’re peeling them, it’s good practice to remove any dirt or debris. Then, using a vegetable peeler, carefully remove the skin from each potato. Make sure you get all the eyes and any green spots, as these can taste bitter.
- Slicing the Potatoes: This is crucial! You want your potato slices to be as thin and uniform as possible. A mandoline slicer is your best friend here. If you don’t have one, a very sharp knife and a steady hand will do. Aim for slices that are about 1/16 inch thick think paper-thin. If they’re too thick, they’ll take longer to cook and might not get as crispy. If they’re too thin, they might burn easily.
Safety First! If you’re using a mandoline, always use the hand guard. Those blades are incredibly sharp, and it’s not worth risking a cut. Go slow and steady, and don’t rush the process.
- Soaking the Potato Slices: This is a step you absolutely don’t want to skip! Place the sliced potatoes in a large bowl filled with cold water. The water helps to remove excess starch from the potatoes, which is key to achieving that perfect crispy texture. Let them soak for at least 30 minutes, or even up to a couple of hours in the refrigerator. The longer they soak, the crispier they’ll be. Change the water a couple of times during the soaking process to remove even more starch.
- Drying the Potato Slices: After soaking, drain the potatoes thoroughly. Now, this is where we get serious about dryness. Spread the potato slices out in a single layer on clean kitchen towels or paper towels. Gently pat them dry with more towels. You want to remove as much moisture as possible. The drier the potatoes are before frying, the crispier they will become. You can even let them air dry for a bit after patting them dry to ensure they are super dry.
Frying the Potato Chips:
Now for the fun part frying! This is where those thinly sliced, starch-free, and super-dry potatoes transform into golden, crispy chips. Temperature control is key here, so pay close attention.
- Heating the Oil: Pour about 3-4 inches of vegetable oil (or peanut oil, which has a higher smoke point and adds a nice flavor) into a large, heavy-bottomed pot or deep fryer. Heat the oil over medium-high heat to 350°F (175°C). Use a deep-fry thermometer to monitor the temperature. Maintaining the correct temperature is crucial for even cooking and crispy chips. If the oil is too cold, the chips will absorb too much oil and become soggy. If it’s too hot, they’ll burn before they cook through.
- Frying in Batches: Carefully add the potato slices to the hot oil in batches. Don’t overcrowd the pot, as this will lower the oil temperature and result in soggy chips. Fry in small batches, about a handful at a time, ensuring the potatoes have enough room to move around.
- Cooking to Golden Perfection: Fry the potato slices for about 3-5 minutes per batch, or until they are golden brown and crispy. Use a slotted spoon or spider to gently stir the potatoes and prevent them from sticking together. Keep a close eye on them, as they can go from golden to burnt very quickly.
- Removing and Draining: Once the chips are golden brown and crispy, carefully remove them from the oil with a slotted spoon or spider and place them on a wire rack lined with paper towels. This will help to drain off any excess oil and keep them crispy.
- Maintaining Oil Temperature: Between batches, check the oil temperature and adjust the heat as needed to maintain 350°F (175°C). If the oil temperature drops too low, wait for it to heat back up before adding the next batch of potatoes.
Seasoning and Serving:
Almost there! Now it’s time to add the finishing touches and make these chips truly irresistible. Don’t be shy with the seasoning this is your chance to get creative and customize the flavor to your liking.
- Seasoning the Chips: While the chips are still hot, sprinkle them generously with salt. Sea salt or kosher salt works best, as they have a coarser texture and adhere well to the chips. You can also add other seasonings at this point, such as paprika, garlic powder, onion powder, cayenne pepper, rosemary, thyme, or your favorite spice blend. Get creative and experiment with different flavor combinations!
- Cooling and Storing: Let the chips cool completely on the wire rack before serving. This will allow them to crisp up even further. Store any leftover chips in an airtight container at room temperature. They will stay crispy for a day or two, but let’s be honest, they probably won’t last that long!
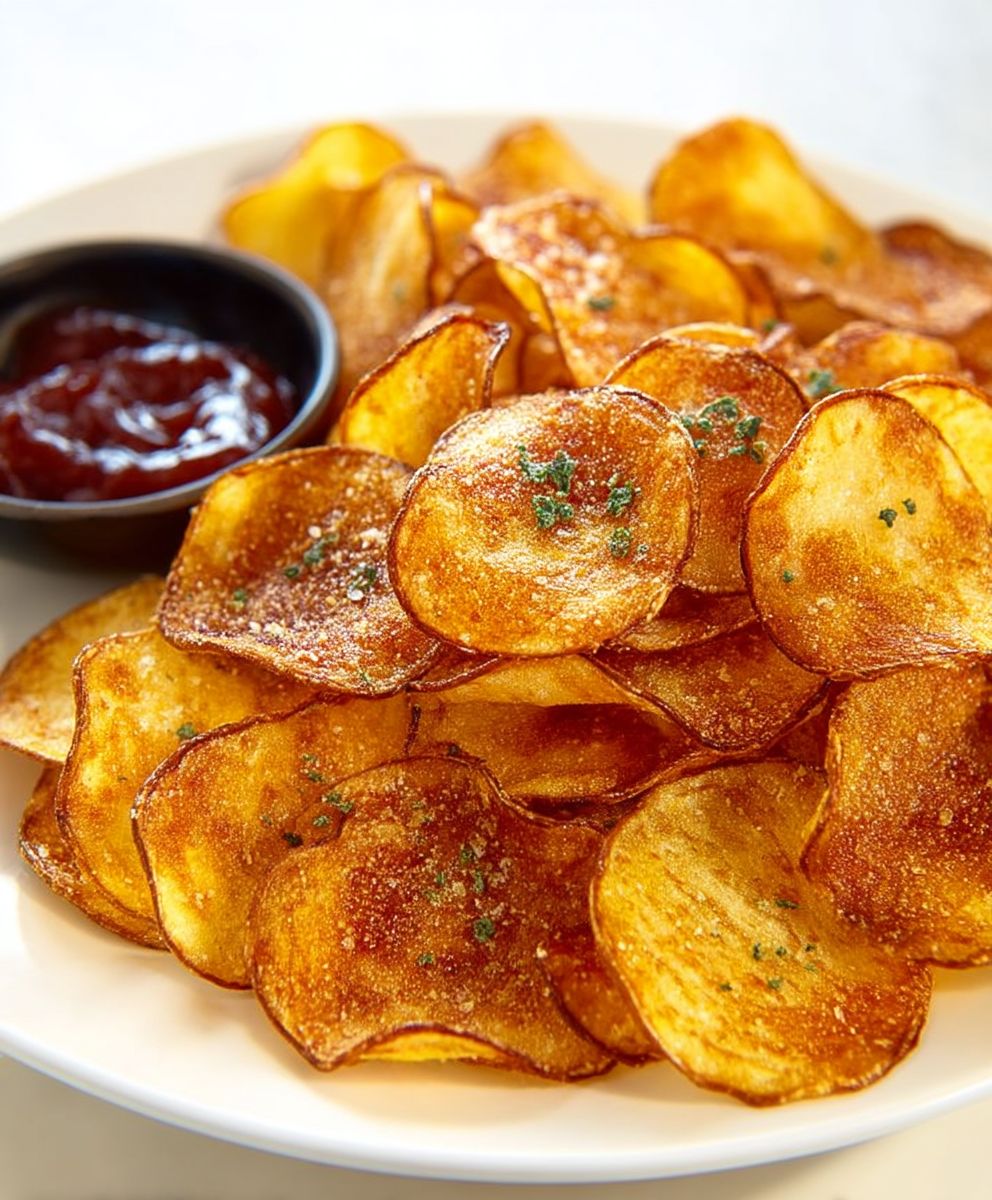
- Serving Suggestions: Serve your homemade potato chips as a snack, appetizer, or side dish. They’re delicious on their own, or you can pair them with your favorite dips, such as French onion dip, ranch dressing, or guacamole. They also make a great addition to sandwiches and burgers.
Tips for Extra Crispy Chips:
- Use the Right Potatoes: Russet potatoes are the best choice for making potato chips because they have a high starch content and low moisture content, which helps them to crisp up nicely.
- Slice Uniformly: Consistent slice thickness is key to even cooking. A mandoline slicer is highly recommended for achieving uniform slices.
- Soak Thoroughly: Don’t skip the soaking step! Soaking the potato slices in cold water removes excess starch and prevents them from sticking together during frying.
- Dry Completely: The drier the potatoes are before frying, the crispier they will become. Pat them dry with paper towels and let them air dry for a bit to remove as much moisture as possible.
- Maintain Oil Temperature: Use a deep-fry thermometer to monitor the oil temperature and adjust the heat as needed to maintain 350°F (175°C).
- Don’t Overcrowd the Pot: Fry the potato slices in small batches to prevent the oil temperature from dropping too low.
- Season Immediately: Season the chips while they are still hot so that the salt and other seasonings adhere properly.
Troubleshooting:
- Soggy Chips: If your chips are soggy, it could be due to several factors: the oil temperature was too low, the potatoes were not dried thoroughly enough, or the pot was overcrowded. Make sure to maintain the correct oil temperature, dry the potatoes completely, and fry in small batches.
- Burnt Chips: If your chips are burning, the oil temperature is likely too high. Lower the heat and monitor the temperature closely. Also, make sure you are slicing the potatoes thinly enough.
- Unevenly Cooked Chips: Unevenly cooked chips can be caused by inconsistent slice thickness. Use a mandoline slicer to ensure uniform slices.
Enjoy your homemade potato chips! They are so much better than store-bought, and you can customize them to your liking. Happy frying!
Conclusion:
So, there you have it! These Homemade Potato Chips are more than just a snack; they’re a crispy, golden invitation to rediscover the simple joy of truly delicious, homemade food. Forget the store-bought bags filled with preservatives and artificial flavors. This recipe puts you in control, allowing you to create potato chips that are perfectly tailored to your taste.
Why is this recipe a must-try? Well, besides the obvious fact that homemade always tastes better, these chips offer a level of freshness and flavor that you simply can’t find anywhere else. The satisfying crunch, the subtle saltiness, and the pure potato taste it’s an experience that will have you reaching for more every single time. Plus, it’s surprisingly easy! Once you get the hang of slicing and frying, you’ll be whipping up batches of these chips in no time.
But the fun doesn’t stop there! Think of this recipe as a blank canvas for your culinary creativity. Want to add a little spice? Sprinkle on some chili powder or cayenne pepper after frying. Craving something savory? A dusting of garlic powder or onion powder will do the trick. For a sweeter twist, try a touch of cinnamon sugar. The possibilities are endless!
Serving Suggestions and Variations:
* Classic Crunch: Serve these chips with your favorite dip French onion, ranch, or even a homemade guacamole.
* Sandwich Sidekick: Ditch the store-bought chips and pair these homemade delights with your next sandwich or burger.
* Gourmet Garnishes: Crumble these chips over salads or soups for a delightful textural contrast.
* Flavor Fiesta: Experiment with different seasonings like smoked paprika, rosemary, or even truffle salt for a truly gourmet experience.
* Sweet and Salty Sensation: Drizzle with melted chocolate and a sprinkle of sea salt for a decadent treat.
I truly believe that once you try this recipe, you’ll never go back to store-bought chips again. The satisfaction of creating something so delicious from scratch is incredibly rewarding, and the taste is simply unbeatable. It’s a perfect activity for a weekend afternoon, a fun project to do with kids, or simply a way to treat yourself to a little bit of homemade goodness.
So, what are you waiting for? Gather your potatoes, grab your mandoline (or a very sharp knife!), and get ready to embark on a chip-making adventure. I’m confident that you’ll love the results.
And now, for the most important part: I want to hear about your experience! Did you try this recipe? What variations did you create? What dips did you pair them with? Share your photos, your tips, and your stories in the comments below. I can’t wait to see what you come up with! Let’s spread the joy of homemade potato chips far and wide! Happy cooking (and snacking)! I hope you enjoy making these Homemade Potato Chips as much as I do.
Homemade Potato Chips: The Ultimate Guide to Crispy Perfection
Crispy, golden homemade potato chips made with simple ingredients. Far superior to store-bought and easily customizable with your favorite seasonings.
Ingredients
- 4 large russet potatoes, peeled
- Vegetable oil (or peanut oil) for frying
- Salt, to taste (sea salt or kosher salt recommended)
- Optional seasonings: paprika, garlic powder, onion powder, cayenne pepper, rosemary, thyme, or your favorite spice blend
Instructions
- Wash and Peel: Scrub russet potatoes under cold water. Peel, removing all eyes and green spots.
- Slicing the Potatoes: Slice potatoes as thinly and uniformly as possible (about 1/16 inch thick). A mandoline slicer is recommended (use the hand guard!).
- Soaking the Potato Slices: Place sliced potatoes in a large bowl filled with cold water. Soak for at least 30 minutes (up to 2 hours in the refrigerator), changing the water a couple of times.
- Drying the Potato Slices: Drain potatoes thoroughly. Spread in a single layer on clean kitchen towels or paper towels. Pat dry to remove as much moisture as possible. Let air dry for a bit to ensure they are super dry.
- Heating the Oil: Pour about 3-4 inches of vegetable oil (or peanut oil) into a large, heavy-bottomed pot or deep fryer. Heat over medium-high heat to 350°F (175°C). Use a deep-fry thermometer.
- Frying in Batches: Carefully add potato slices to the hot oil in batches (a handful at a time). Don’t overcrowd.
- Cooking to Golden Perfection: Fry for about 3-5 minutes per batch, until golden brown and crispy. Stir gently to prevent sticking.
- Removing and Draining: Remove chips with a slotted spoon or spider and place on a wire rack lined with paper towels to drain excess oil.
- Maintaining Oil Temperature: Between batches, check the oil temperature and adjust the heat to maintain 350°F (175°C).
- Seasoning the Chips: While still hot, sprinkle generously with salt (sea salt or kosher salt recommended). Add other seasonings as desired.
- Cooling and Storing: Let chips cool completely on the wire rack. Store leftovers in an airtight container at room temperature.
- Serving Suggestions: Serve as a snack, appetizer, or side dish. Pair with dips or add to sandwiches and burgers.
Notes
- Use the Right Potatoes: Russet potatoes are the best choice for making potato chips because they have a high starch content and low moisture content, which helps them to crisp up nicely.
- Slice Uniformly: Consistent slice thickness is key to even cooking. A mandoline slicer is highly recommended for achieving uniform slices.
- Soak Thoroughly: Don’t skip the soaking step! Soaking the potato slices in cold water removes excess starch and prevents them from sticking together during frying.
- Dry Completely: The drier the potatoes are before frying, the crispier they will become. Pat them dry with paper towels and let them air dry for a bit to remove as much moisture as possible.
- Maintain Oil Temperature: Use a deep-fry thermometer to monitor the oil temperature and adjust the heat as needed to maintain 350°F (175°C).
- Don’t Overcrowd the Pot: Fry the potato slices in small batches to prevent the oil temperature from dropping too low.
- Season Immediately: Season the chips while they are still hot so that the salt and other seasonings adhere properly.
- Soggy Chips: If your chips are soggy, it could be due to several factors: the oil temperature was too low, the potatoes were not dried thoroughly enough, or the pot was overcrowded. Make sure to maintain the correct oil temperature, dry the potatoes completely, and fry in small batches.
- Burnt Chips: If your chips are burning, the oil temperature is likely too high. Lower the heat and monitor the temperature closely. Also, make sure you are slicing the potatoes thinly enough.
- Unevenly Cooked Chips: Unevenly cooked chips can be caused by inconsistent slice thickness. Use a mandoline slicer to ensure uniform slices.


Leave a Comment