
DQ Ice Cream Cake: the very words conjure up memories of birthday parties, summer celebrations, and pure, unadulterated joy! Let’s be honest, is there anything quite as iconic as that signature fudge and crunch center nestled between layers of creamy vanilla and chocolate ice cream? I think not!
While the exact origins of the DQ Ice Cream Cake remain shrouded in a bit of delicious mystery, its popularity exploded in the latter half of the 20th century, becoming a staple at Dairy Queen locations across North America. It quickly evolved from a simple frozen treat to a symbol of celebration, a centerpiece that brought smiles to faces of all ages. Its more than just dessert; its a tradition.
But what is it about this frozen masterpiece that makes it so universally loved? For me, it’s the perfect combination of textures and flavors. The smooth, cold ice cream, the rich, decadent fudge, and that undeniably addictive crunch it’s a symphony in every bite! Plus, let’s face it, the convenience factor is a huge win. Need a crowd-pleasing dessert for a party? A DQ Ice Cream Cake is always a guaranteed hit. So, are you ready to recreate this classic at home? Let’s get started!

Ingredients:
- For the Chocolate Cookie Base:
- 2 cups chocolate sandwich cookies (like Oreos), finely crushed
- 6 tablespoons unsalted butter, melted
- For the Fudge Layer:
- 1 cup heavy cream
- 8 ounces semi-sweet chocolate, chopped
- 2 tablespoons unsalted butter
- 1/4 cup light corn syrup
- 1/4 teaspoon salt
- For the Vanilla Ice Cream Layer:
- 1 quart vanilla ice cream, softened
- For the Chocolate Ice Cream Layer:
- 1 quart chocolate ice cream, softened
- For the Chocolate Ganache:
- 1 cup heavy cream
- 8 ounces semi-sweet chocolate, chopped
- For Decoration (Optional):
- Whipped cream
- Chocolate shavings
- Maraschino cherries
- Additional crushed chocolate sandwich cookies
Preparing the Chocolate Cookie Base:
- First, let’s get that delicious cookie base ready! In a medium bowl, combine the finely crushed chocolate sandwich cookies and the melted butter. Make sure the butter is evenly distributed so the base holds together nicely.
- Press the mixture firmly into the bottom of a 9-inch springform pan. I like to use the bottom of a measuring cup to really pack it down. This will give us a solid foundation for our ice cream layers.
- Place the springform pan in the freezer while you prepare the fudge layer. This will help the base set and prevent it from crumbling when you add the next layer.
Making the Fudge Layer:
- Now, for the decadent fudge layer! In a medium saucepan, combine the heavy cream, chopped semi-sweet chocolate, butter, corn syrup, and salt.
- Place the saucepan over medium-low heat and stir constantly until the chocolate is completely melted and the mixture is smooth. Be patient and don’t let it burn!
- Remove the saucepan from the heat and let the fudge cool slightly for about 5-10 minutes. This will prevent it from melting the cookie base too much.
- Pour the slightly cooled fudge over the frozen cookie base, spreading it evenly.
- Return the springform pan to the freezer and freeze for at least 30 minutes, or until the fudge layer is firm.
Assembling the Ice Cream Layers:
- Time for the ice cream! Remove the vanilla ice cream from the freezer and let it soften slightly. You want it to be soft enough to spread easily, but not completely melted.
- Once the fudge layer is firm, spread the softened vanilla ice cream evenly over the fudge. Work quickly to prevent the ice cream from melting too much.
- Return the springform pan to the freezer and freeze for at least 1 hour, or until the vanilla ice cream layer is firm.
- Repeat the process with the chocolate ice cream. Remove it from the freezer and let it soften slightly.
- Spread the softened chocolate ice cream evenly over the frozen vanilla ice cream layer.
- Return the springform pan to the freezer and freeze for at least 4 hours, or preferably overnight, to allow the ice cream cake to fully set. This is crucial for a clean slice!
Preparing the Chocolate Ganache:
- Let’s make that glossy ganache topping! Place the chopped semi-sweet chocolate in a heatproof bowl.
- In a small saucepan, heat the heavy cream over medium heat until it just begins to simmer. Do not boil!
- Pour the hot heavy cream over the chopped chocolate.
- Let the mixture sit for about 1 minute to allow the heat to melt the chocolate.
- Gently whisk the mixture together until it is smooth and glossy. Be careful not to over-whisk, as this can cause the ganache to become grainy.
- Let the ganache cool slightly for about 10-15 minutes before pouring it over the ice cream cake. This will help it thicken slightly and prevent it from running off the sides too quickly.
Finishing Touches and Decoration:
- Once the ice cream cake is completely frozen, remove it from the freezer.
- Carefully remove the sides of the springform pan. If the cake is sticking, you can run a warm knife around the edges to loosen it.
- Place the ice cream cake on a serving platter.
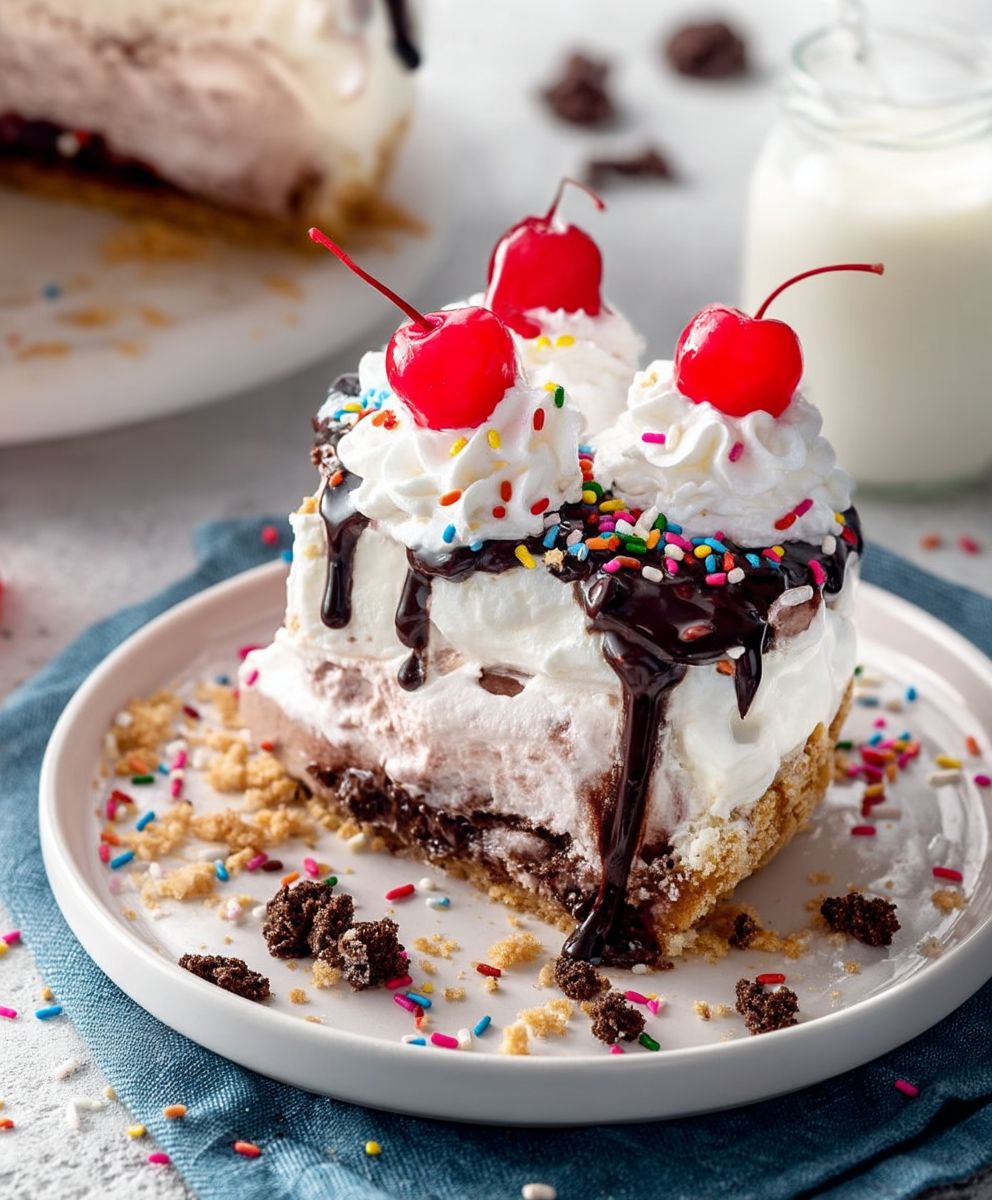
- Pour the slightly cooled chocolate ganache over the top of the ice cream cake, allowing it to drip down the sides. You can use a spatula to help spread it evenly.
- Now for the fun part decorating! You can get creative here. I like to pipe whipped cream around the edges of the cake.
- Sprinkle chocolate shavings over the top of the ganache.
- Add maraschino cherries for a pop of color.
- Sprinkle additional crushed chocolate sandwich cookies around the base of the cake.
- Return the decorated ice cream cake to the freezer for at least 30 minutes to allow the ganache to set. This will make it easier to slice.
Tips and Tricks for the Perfect DQ Ice Cream Cake:
- Softening the Ice Cream: The key to easy spreading is perfectly softened ice cream. Don’t let it get too melty, or it will be difficult to work with. A good rule of thumb is to let it sit at room temperature for about 10-15 minutes before spreading.
- Freezing Time: Don’t rush the freezing process! Each layer needs to be firm before adding the next to prevent a mushy mess. Overnight freezing is always best.
- Springform Pan: A springform pan is essential for this recipe. It allows you to easily remove the cake without damaging it. If you don’t have one, you can use a regular cake pan lined with parchment paper, but it will be more difficult to remove the cake.
- Fudge Consistency: The fudge layer should be thick enough to hold its shape but not so thick that it’s difficult to spread. If it’s too thick, you can add a tablespoon or two of heavy cream to thin it out.
- Ganache Consistency: The ganache should be smooth and glossy. If it’s too thick, you can add a tablespoon of hot heavy cream to thin it out. If it’s too thin, you can let it cool for a few more minutes to thicken.
- Decorating Ideas: Get creative with your decorations! You can use different types of candy, sprinkles, or even fresh fruit. The possibilities are endless!
- Serving: To make slicing easier, run a long, sharp knife under hot water and dry it before each slice. This will help the knife glide through the frozen cake.
- Storage: Store any leftover ice cream cake in the freezer in an airtight container. It will keep for several weeks.
- Variations: Feel free to experiment with different flavors of ice cream and toppings. You can use peanut butter ice cream, cookies and cream ice cream, or even add a layer of caramel.
- Crushing the Cookies: For the cookie base, you can use a food processor to crush the cookies quickly and evenly. If you don’t have a food processor, you can place the cookies in a resealable bag and crush them with a rolling pin.
Troubleshooting Tips:
- Ice Cream Too Soft: If your ice cream is melting too quickly, try placing the bowl of ice cream over a bowl of ice water while you’re working with it.
- Fudge Layer Not Setting: If your fudge layer isn’t setting properly, make sure you’re using good quality chocolate and that you’re not overheating the mixture.
- Ganache Too Thick: If your ganache is too thick, add a tablespoon of hot heavy cream at a time until it reaches the desired consistency.
- Ganache Too Thin: If your ganache is too thin, let it cool for a few more minutes to thicken. You can also add a small amount of melted chocolate to thicken it up.
- Cake Sticking to the Pan: If your cake is sticking to the springform pan, run a warm knife around the edges to loosen it. You can also try placing the pan in a bowl of warm water for a few seconds to help loosen the cake.
Enjoy Your Homemade DQ Ice Cream Cake!
Conclusion:
This isn’t just another dessert; it’s a celebration waiting to happen! This homemade DQ Ice Cream Cake recipe is a guaranteed crowd-pleaser, bringing all the joy and nostalgia of the original right to your kitchen. Forget the expensive store-bought versions with a little effort, you can create a masterpiece that’s even better, customized to your exact tastes, and bursting with homemade goodness. The combination of creamy ice cream, crunchy cookie crumble, and decadent fudge is simply irresistible. Trust me, the smiles on your loved ones’ faces will be worth every single minute spent crafting this delightful treat.
But why is this recipe a must-try? It’s all about the experience. From the satisfying crunch of the cookie base to the smooth, melt-in-your-mouth ice cream layers, every bite is a symphony of textures and flavors. Plus, the sheer versatility of this recipe makes it a winner. You’re not limited to the classic DQ flavors! Feel free to experiment with your favorite ice cream combinations. Imagine a chocolate peanut butter ice cream cake, or perhaps a strawberry cheesecake version. The possibilities are truly endless!
Speaking of variations, let’s talk serving suggestions. While a simple slice of this cake is divine on its own, consider adding a dollop of whipped cream and a sprinkle of chocolate shavings for an extra touch of elegance. For a truly decadent experience, drizzle some hot fudge sauce over each slice just before serving. And if you’re feeling adventurous, why not try adding some fresh berries or chopped nuts to the top?
For a fun twist, consider making individual mini ice cream cakes using muffin tins. These are perfect for parties or portion control! You could also experiment with different cookie crusts. Instead of chocolate sandwich cookies, try using graham crackers or even crushed Oreos. Get creative and let your imagination run wild!
Don’t be intimidated by the thought of making your own ice cream cake. This recipe is surprisingly easy to follow, and the results are absolutely spectacular. The key is to plan ahead and allow enough time for each layer to freeze properly. But trust me, the wait is worth it.
So, what are you waiting for? Gather your ingredients, put on your apron, and get ready to create a dessert that will become a family favorite for years to come. I promise you won’t regret it. This DQ Ice Cream Cake recipe is more than just a dessert; it’s a memory in the making.
I’m so excited for you to try this recipe! Once you’ve made your own version, I’d love to hear about your experience. What flavors did you use? What variations did you try? Did you add any special touches of your own? Share your photos and stories in the comments below. I can’t wait to see your creations and hear all about your ice cream cake adventures! Let’s spread the joy of homemade ice cream cake, one delicious slice at a time! Happy baking (or should I say, freezing!) and enjoy!
DQ Ice Cream Cake: The Ultimate Guide to Flavors, Prices & More
Decadent homemade ice cream cake with a chocolate cookie base, fudge layer, vanilla and chocolate ice cream, topped with a rich chocolate ganache.
Ingredients
- 2 cups chocolate sandwich cookies (like Oreos), finely crushed
- 6 tablespoons unsalted butter, melted
- 1 cup heavy cream
- 8 ounces semi-sweet chocolate, chopped
- 2 tablespoons unsalted butter
- 1/4 cup light corn syrup
- 1/4 teaspoon salt
- 1 quart vanilla ice cream, softened
- 1 quart chocolate ice cream, softened
- 1 cup heavy cream
- 8 ounces semi-sweet chocolate, chopped
- Whipped cream
- Chocolate shavings
- Maraschino cherries
- Additional crushed chocolate sandwich cookies
Instructions
- Prepare the Chocolate Cookie Base: In a medium bowl, combine crushed chocolate sandwich cookies and melted butter. Press firmly into the bottom of a 9-inch springform pan. Freeze while preparing the fudge layer.
- Make the Fudge Layer: In a medium saucepan, combine heavy cream, chopped semi-sweet chocolate, butter, corn syrup, and salt. Stir constantly over medium-low heat until chocolate is melted and smooth. Cool slightly (5-10 minutes).
- Pour the slightly cooled fudge over the frozen cookie base, spreading it evenly. Return the springform pan to the freezer and freeze for at least 30 minutes, or until the fudge layer is firm.
- Assemble the Ice Cream Layers: Soften vanilla ice cream slightly. Spread evenly over the firm fudge layer. Freeze for at least 1 hour, or until firm.
- Soften chocolate ice cream slightly. Spread evenly over the frozen vanilla ice cream layer.
- Return the springform pan to the freezer and freeze for at least 4 hours, or preferably overnight, to allow the ice cream cake to fully set.
- Prepare the Chocolate Ganache: Place chopped semi-sweet chocolate in a heatproof bowl. Heat heavy cream in a small saucepan over medium heat until it just begins to simmer.
- Pour hot heavy cream over the chopped chocolate. Let sit for 1 minute.
- Gently whisk until smooth and glossy. Cool slightly (10-15 minutes).
- Finishing Touches and Decoration: Remove the ice cream cake from the freezer and carefully remove the sides of the springform pan. Place the ice cream cake on a serving platter.
- Pour the slightly cooled chocolate ganache over the top of the ice cream cake, allowing it to drip down the sides.
- Decorate with whipped cream, chocolate shavings, maraschino cherries, and crushed chocolate sandwich cookies (optional).
- Return the decorated ice cream cake to the freezer for at least 30 minutes to allow the ganache to set.
Notes
- Softening the Ice Cream: Let ice cream sit at room temperature for about 10-15 minutes before spreading.
- Freezing Time: Each layer needs to be firm before adding the next. Overnight freezing is best.
- Springform Pan: Essential for easy removal.
- Fudge Consistency: Add a tablespoon or two of heavy cream to thin it out if it’s too thick.
- Ganache Consistency: Add a tablespoon of hot heavy cream to thin it out if it’s too thick. Let it cool for a few more minutes to thicken if it’s too thin.
- Decorating Ideas: Get creative with your decorations!
- Serving: Run a long, sharp knife under hot water and dry it before each slice.
- Storage: Store any leftover ice cream cake in the freezer in an airtight container.
- Variations: Experiment with different flavors of ice cream and toppings.
- Crushing the Cookies: Use a food processor or place the cookies in a resealable bag and crush them with a rolling pin.
Leave a Comment