
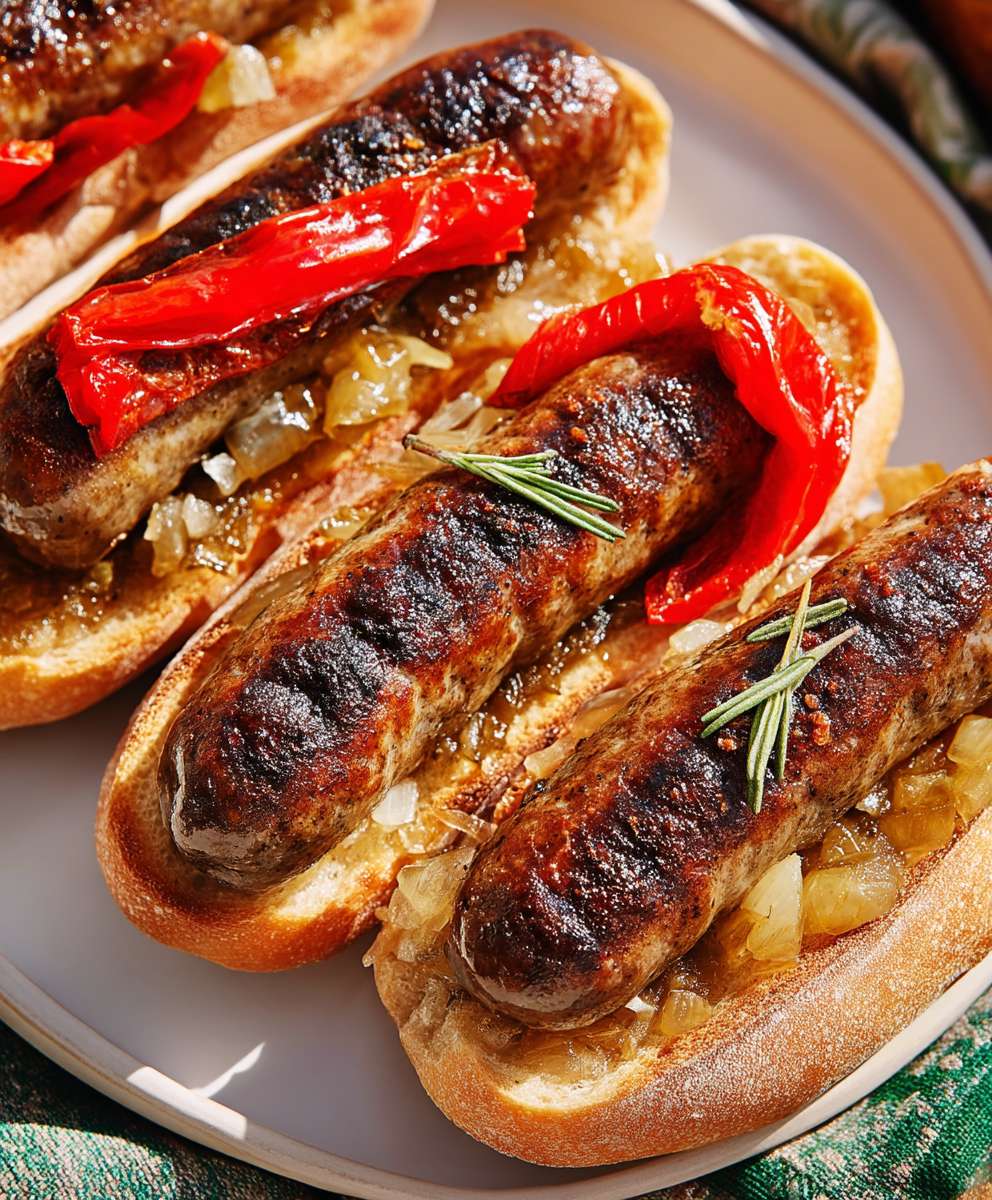
Grilled Beer Brats: the quintessential summer indulgence, taken to the next level! Imagine sinking your teeth into a perfectly charred, juicy bratwurst, infused with the malty goodness of your favorite brew. The snap of the casing, the savory explosion of flavor it’s an experience that’s hard to beat. But have you ever wondered about the story behind this iconic dish?
Bratwurst, with its roots firmly planted in German culinary tradition, has been enjoyed for centuries. The word “bratwurst” itself comes from the Old High German “brätwurst,” meaning “finely chopped sausage.” Over time, regional variations emerged, each boasting its unique blend of spices and preparation methods. The marriage of bratwurst and beer, however, is a more modern innovation, likely born from the American love of grilling and the readily available, refreshing nature of beer.
What makes grilled beer brats so irresistible? It’s the perfect combination of smoky char, savory meat, and the subtle, yet distinct, flavor imparted by the beer. The beer not only adds moisture, keeping the brats plump and juicy, but also enhances the overall flavor profile, creating a depth that’s simply unmatched. Plus, they’re incredibly easy to make, making them a crowd-pleasing favorite for backyard barbecues, tailgating parties, and casual weeknight dinners. So, fire up the grill, grab your favorite beer, and let’s get ready to make some unforgettable grilled beer brats!

Ingredients:
- 6 Bratwurst sausages (fresh, uncooked)
- 1 (12 ounce) bottle of your favorite beer (lager or pilsner works well)
- 1 large yellow onion, sliced
- 2 tablespoons butter
- 6 bratwurst buns
- Your favorite bratwurst toppings (mustard, sauerkraut, relish, etc.)
- Optional: 1 green bell pepper, sliced
- Optional: 1 red bell pepper, sliced
- Optional: 1 tablespoon olive oil
- Optional: Pretzel buns instead of regular bratwurst buns
Preparing the Beer Bath
Okay, let’s get started! The secret to juicy, flavorful grilled beer brats is the beer bath. This step infuses the brats with delicious flavor and helps them cook evenly.
- Slice the Onion: First, grab your large yellow onion and slice it into thin rounds or half-moons. Don’t worry about being perfect; they’re going to simmer in beer! If you’re using bell peppers, slice them into strips as well.
- Sauté the Vegetables (Optional): In a large skillet or saucepan, melt the butter over medium heat. If you’re using olive oil, you can use that instead of butter, or a combination of both. Add the sliced onions (and bell peppers, if using) to the skillet. Sauté them until they are softened and slightly translucent, about 5-7 minutes. This step adds a wonderful depth of flavor to the beer bath. Don’t let them brown too much!
- Add the Beer: Pour the entire bottle of beer into the skillet with the onions (and peppers). Bring the mixture to a simmer over medium heat. You should see small bubbles forming around the edges.
- Simmer the Brats: Gently place the bratwurst sausages into the simmering beer mixture. Make sure the brats are mostly submerged in the beer. If not, you can add a little water or more beer to cover them. Reduce the heat to low, cover the skillet, and let the brats simmer for 15-20 minutes. This pre-cooking step ensures that the brats are cooked through before they hit the grill, preventing them from burning on the outside while remaining raw on the inside.
Grilling the Brats
Now for the fun part grilling! This is where we get that beautiful char and smoky flavor.
- Preheat the Grill: Preheat your grill to medium heat (around 350-400°F or 175-200°C). Make sure the grates are clean. You can use a grill brush to scrape off any residue from previous grilling sessions. A clean grill is a happy grill!
- Remove Brats from Beer Bath: Carefully remove the brats from the beer bath using tongs. Place them on a plate or tray. Don’t discard the beer bath just yet! We’ll use it later.
- Grill the Brats: Place the brats on the preheated grill. Grill them for about 2-3 minutes per side, or until they are nicely browned and have grill marks. Turn them frequently to ensure even cooking and prevent burning. The internal temperature of the brats should reach 160°F (71°C). You can use a meat thermometer to check the temperature.
- Return to Beer Bath (Optional): For extra juicy brats, you can return them to the beer bath after grilling for a few minutes. This will keep them warm and moist while you prepare the buns and toppings. This step is optional, but I highly recommend it!
Preparing the Buns and Toppings
While the brats are grilling (or resting in the beer bath), let’s get the buns and toppings ready. This is where you can get creative and customize your brats to your liking.
- Toast the Buns (Optional): If you like toasted buns, you can lightly toast them on the grill for a minute or two. Watch them carefully, as they can burn quickly. You can also toast them in a toaster or under the broiler.
- Prepare the Toppings: Set out your favorite bratwurst toppings. Mustard is a classic choice, but you can also use sauerkraut, relish, chopped onions, peppers, or any other toppings you enjoy. I personally love a good spicy mustard and some sauerkraut.
- Warm the Beer Bath Onions (Optional): If you want to serve the onions and peppers from the beer bath as a topping, you can warm them up in the skillet over low heat. This will make them even more flavorful and delicious.
Assembling the Grilled Beer Brats
Finally, the moment we’ve all been waiting for assembling the brats! This is the easiest part, but it’s also the most rewarding.
- Place Brat in Bun: Place a grilled bratwurst sausage in each bun.
- Add Toppings: Top the brats with your favorite toppings. Don’t be shy! Pile them high with mustard, sauerkraut, relish, onions, peppers, or whatever your heart desires.
- Serve Immediately: Serve the grilled beer brats immediately and enjoy! They are best served hot off the grill.
Tips and Variations
Here are a few extra tips and variations to help you make the perfect grilled beer brats:
- Choosing the Right Beer: The type of beer you use will affect the flavor of the brats. A lager or pilsner is a good all-around choice, but you can also experiment with other beers, such as amber ales, IPAs, or even stouts. Just be aware that stronger beers will impart a more pronounced flavor.
- Pre-Cooking Methods: If you don’t have time to simmer the brats in beer, you can also pre-cook them by boiling them in water or steaming them. However, simmering them in beer is the best way to infuse them with flavor.
- Grilling Techniques: For best results, use indirect heat to grill the brats. This means placing them on a part of the grill that is not directly over the heat source. This will help them cook evenly and prevent them from burning. You can also use a grill basket to prevent the brats from falling through the grates.
- Topping Ideas: The possibilities are endless when it comes to bratwurst toppings. Some other popular options include:
- Spicy Mustard: Adds a kick of heat.
- Sweet Relish: Provides a sweet and tangy flavor.
- Sauerkraut: A classic German topping.
- Caramelized Onions: Adds a sweet and savory flavor.
- Pickled Peppers: Adds a spicy and tangy flavor.
- Cheese Sauce: A decadent and cheesy topping.
- Chili: A hearty and flavorful topping.
- Serving Suggestions: Grilled beer brats are a great main course for a barbecue or cookout. They can be served with a variety of sides, such as potato salad, coleslaw, corn on the cob, or baked beans. They also pair well with beer, of course!
- Storage: Leftover grilled beer brats can be stored in the refrigerator for up to 3 days. Reheat them in the microwave, oven, or on the grill before serving.
- Freezing: You can also freeze grilled beer brats for longer storage. Wrap them tightly in plastic wrap or aluminum foil and store them in the freezer for up to 2 months. Thaw them in the refrigerator before reheating.
- Experiment with Different Types of Brats: There are many different types of bratwurst available, such as cheddar brats, jalapeno brats, and Italian brats. Experiment with different types to find your favorite.
- Use a Meat Thermometer: The best way to ensure that your brats are cooked through is to use a meat thermometer. Insert the thermometer into the center of the bratwurst and cook until it reaches an internal temperature of 160°F (71°C).
Troubleshooting
Sometimes things don’t go exactly as planned. Here are a few common problems and how to fix them:
- Brats are Burning: If your brats are burning on the outside but still raw on the inside, reduce the heat of the grill and move the brats to a cooler part of the grill. You can also try pre-cooking the brats in the beer bath for a longer period of time.
- Brats are Dry: If your brats are dry, try simmering them in the beer bath for a longer period of time. You can also brush them with olive oil or butter while they are grilling.
-
Conclusion:
So there you have it! These Grilled Beer Brats are more than just a summer staple; they’re a flavor explosion waiting to happen. I truly believe this recipe is a must-try for anyone who loves a good, hearty meal with minimal fuss. The combination of the smoky grill, the rich beer infusion, and the perfectly seasoned bratwurst creates a symphony of tastes that will leave you wanting more.
Why is this recipe a must-try? Because it’s incredibly easy, unbelievably delicious, and endlessly customizable. Forget bland, boring brats this method elevates them to a whole new level. The beer bath plumps them up, infusing them with moisture and flavor, while the grilling gives them that irresistible char and smoky goodness. It’s a guaranteed crowd-pleaser, perfect for backyard barbecues, tailgating parties, or even a simple weeknight dinner.
But the fun doesn’t stop there! Let’s talk serving suggestions and variations. For a classic experience, serve these Grilled Beer Brats on toasted buns with your favorite toppings. I personally love a generous dollop of sauerkraut, a drizzle of spicy mustard, and maybe even some caramelized onions for a touch of sweetness. But feel free to get creative! Try adding some pickled peppers, a creamy coleslaw, or even a homemade relish.
Looking for variations? You can easily adapt this recipe to suit your taste preferences. Experiment with different types of beer a dark stout will add a rich, malty flavor, while a lighter lager will keep things crisp and refreshing. You can also try using different types of bratwurst, such as cheddar brats, jalapeno brats, or even vegetarian brats. The possibilities are endless!
And don’t forget the sides! These Grilled Beer Brats pair perfectly with a variety of dishes. Think potato salad, corn on the cob, baked beans, or even a simple green salad. For a truly authentic German experience, serve them with some potato pancakes and applesauce.
I’m so excited for you to try this recipe and experience the deliciousness for yourself. I’m confident that these Grilled Beer Brats will become a new favorite in your household. They’re simple enough for a beginner cook to master, yet flavorful enough to impress even the most discerning palate.
So, fire up your grill, grab your favorite beer, and get ready to create some culinary magic. I promise you won’t be disappointed.
And now, the most important part: I want to hear about your experience! Did you try this recipe? What variations did you make? What toppings did you use? Share your photos and stories in the comments below. I can’t wait to see what you create! Your feedback is invaluable and helps me continue to create recipes that you’ll love. Let’s build a community of brat-loving grill masters together! Happy grilling!
Grilled Beer Brats: The Ultimate Guide to Perfect Flavor
Juicy and flavorful grilled beer brats, simmered in a beer bath with onions and peppers, then grilled to perfection. Top with your favorite condiments for a classic cookout treat!
Ingredients
- 6 Bratwurst sausages (fresh, uncooked)
- 1 (12 ounce) bottle of your favorite beer (lager or pilsner works well)
- 1 large yellow onion, sliced
- 2 tablespoons butter
- 6 bratwurst buns
- Your favorite bratwurst toppings (mustard, sauerkraut, relish, etc.)
- Optional: 1 green bell pepper, sliced
- Optional: 1 red bell pepper, sliced
- Optional: 1 tablespoon olive oil
- Optional: Pretzel buns instead of regular bratwurst buns
Instructions
- Slice the yellow onion into thin rounds or half-moons. If using bell peppers, slice them into strips.
- In a large skillet or saucepan, melt the butter over medium heat. If using olive oil, use that instead of butter, or a combination of both. Add the sliced onions (and bell peppers, if using) to the skillet. Sauté until softened and slightly translucent, about 5-7 minutes.
- Pour the entire bottle of beer into the skillet with the onions (and peppers). Bring the mixture to a simmer over medium heat.
- Gently place the bratwurst sausages into the simmering beer mixture. Make sure the brats are mostly submerged in the beer. If not, add a little water or more beer to cover them. Reduce the heat to low, cover the skillet, and let the brats simmer for 15-20 minutes.
- Preheat your grill to medium heat (around 350-400°F or 175-200°C). Make sure the grates are clean.
- Carefully remove the brats from the beer bath using tongs. Place them on a plate or tray. Don’t discard the beer bath just yet! We’ll use it later.
- Place the brats on the preheated grill. Grill them for about 2-3 minutes per side, or until they are nicely browned and have grill marks. Turn them frequently to ensure even cooking and prevent burning. The internal temperature of the brats should reach 160°F (71°C). You can use a meat thermometer to check the temperature.
- For extra juicy brats, you can return them to the beer bath after grilling for a few minutes. This will keep them warm and moist while you prepare the buns and toppings. This step is optional, but I highly recommend it!
- If you like toasted buns, you can lightly toast them on the grill for a minute or two. Watch them carefully, as they can burn quickly. You can also toast them in a toaster or under the broiler.
- Set out your favorite bratwurst toppings. Mustard is a classic choice, but you can also use sauerkraut, relish, chopped onions, peppers, or any other toppings you enjoy. I personally love a good spicy mustard and some sauerkraut.
- If you want to serve the onions and peppers from the beer bath as a topping, you can warm them up in the skillet over low heat. This will make them even more flavorful and delicious.
- Place a grilled bratwurst sausage in each bun.
- Top the brats with your favorite toppings. Don’t be shy! Pile them high with mustard, sauerkraut, relish, onions, peppers, or whatever your heart desires.
- Serve the grilled beer brats immediately and enjoy! They are best served hot off the grill.
Notes
- Choosing the Right Beer: The type of beer you use will affect the flavor of the brats. A lager or pilsner is a good all-around choice, but you can also experiment with other beers, such as amber ales, IPAs, or even stouts. Just be aware that stronger beers will impart a more pronounced flavor.
- Pre-Cooking Methods: If you don’t have time to simmer the brats in beer, you can also pre-cook them by boiling them in water or steaming them. However, simmering them in beer is the best way to infuse them with flavor.
- Grilling Techniques: For best results, use indirect heat to grill the brats. This means placing them on a part of the grill that is not directly over the heat source. This will help them cook evenly and prevent them from burning. You can also use a grill basket to prevent the brats from falling through the grates.
- Topping Ideas: The possibilities are endless when it comes to bratwurst toppings. Some other popular options include:
- Spicy Mustard: Adds a kick of heat.
- Sweet Relish: Provides a sweet and tangy flavor.
- Sauerkraut: A classic German topping.
- Caramelized Onions: Adds a sweet and savory flavor.
- Pickled Peppers: Adds a spicy and tangy flavor.
- Cheese Sauce: A decadent and cheesy topping.
- Chili: A hearty and flavorful topping.
- Serving Suggestions: Grilled beer brats are a great main course for a barbecue or cookout. They can be served with a variety of sides, such as potato salad, coleslaw, corn on the cob, or baked beans. They also pair well with beer, of course!
- Storage: Leftover grilled beer brats can be stored in the refrigerator for up to 3 days. Reheat them in the microwave, oven, or on the grill before serving.
- Freezing: You can also freeze grilled beer brats for longer storage. Wrap them tightly in plastic wrap or aluminum foil and store them in the freezer for up to 2 months. Thaw them in the refrigerator before reheating.
- Experiment with Different Types of Brats: There are many different types of bratwurst available, such as cheddar brats, jalapeno brats, and Italian brats. Experiment with different types to find your favorite.
- Use a Meat Thermometer: The best way to ensure that your brats are cooked through is to use a meat thermometer. Insert the thermometer into the center of the bratwurst and cook until it reaches an internal temperature of 160°F (71°C).
Leave a Comment