
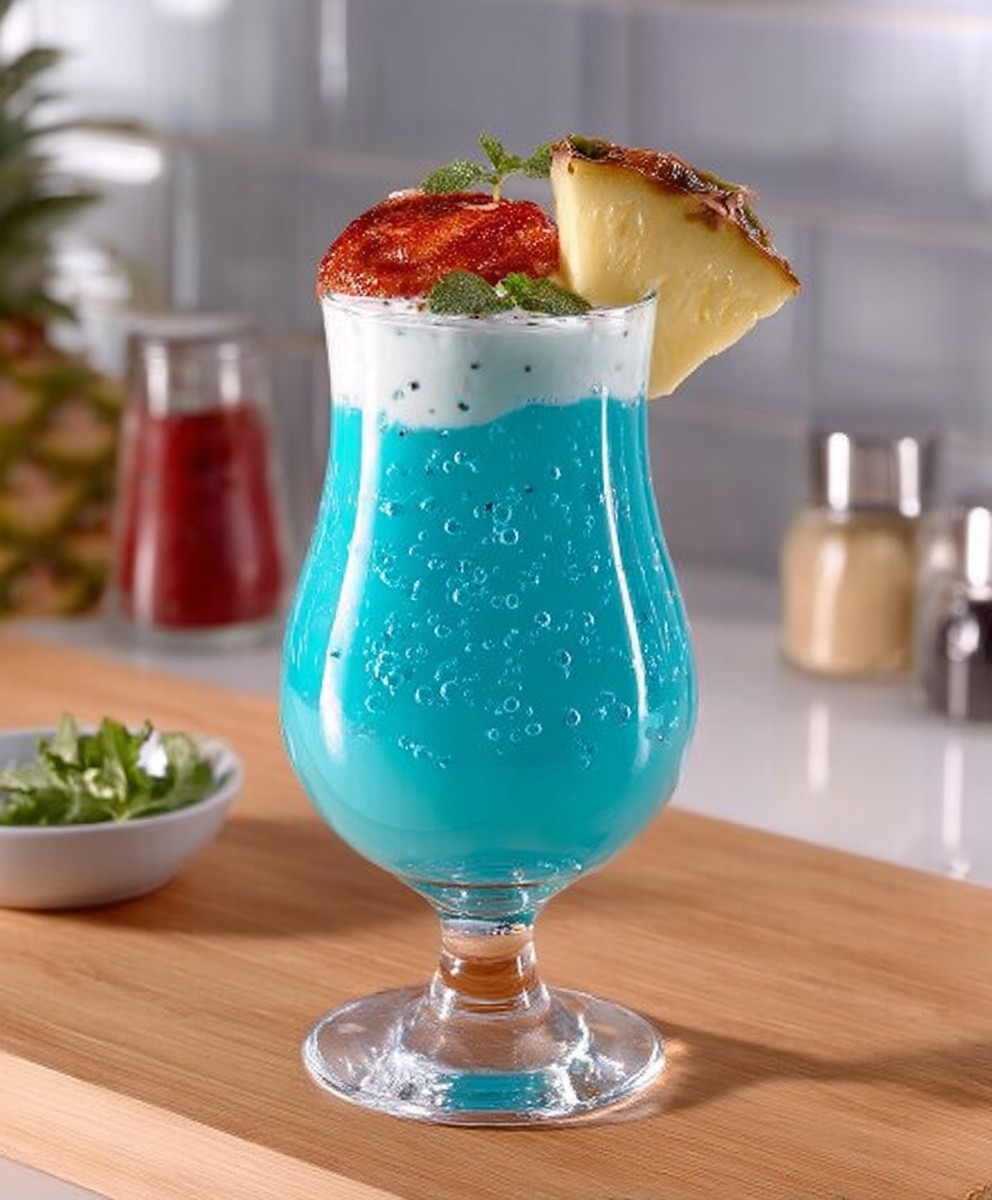
Swimming Pool season is officially here, and what better way to celebrate than with a refreshing, vibrant cocktail that perfectly captures the essence of summer? Forget the chlorine and cannonballs; we’re diving headfirst into a delicious drink that’s as visually stunning as it is delightful to sip.
The Swimming Pool cocktail, with its mesmerizing turquoise hue, is a relatively modern creation, born from the desire to create a visually appealing and tropical-tasting drink. While it doesn’t boast centuries of history like some classic cocktails, its popularity has exploded in recent years, becoming a staple at beach bars and backyard barbecues alike. Its vibrant color evokes images of crystal-clear waters and sunny skies, instantly transporting you to a vacation state of mind.
What makes this cocktail so irresistible? It’s the perfect balance of sweet, creamy, and slightly tart flavors. The blend of vodka, white rum, blue curaçao, pineapple juice, and cream of coconut creates a smooth, tropical symphony that dances on your palate. Plus, the striking blue color, courtesy of the blue curaçao, makes it a showstopper at any gathering. Whether you’re lounging by the actual swimming pool or simply dreaming of one, this cocktail is the perfect way to beat the heat and add a touch of paradise to your day. So, grab your shaker, and let’s get mixing!

Ingredients:
- For the Cake:
- 3 cups all-purpose flour
- 1 teaspoon baking powder
- 1 teaspoon baking soda
- 1/2 teaspoon salt
- 1 cup (2 sticks) unsalted butter, softened
- 2 cups granulated sugar
- 4 large eggs
- 1 teaspoon vanilla extract
- 1 1/2 cups buttermilk
- For the Vanilla Buttercream Frosting:
- 1 cup (2 sticks) unsalted butter, softened
- 4 cups powdered sugar
- 1/2 cup heavy cream
- 2 teaspoons vanilla extract
- Pinch of salt
- For the “Water” (Blue Gelatin):
- 6 cups boiling water
- 2 (3-ounce) boxes blue gelatin (Jell-O)
- For the “Sand”:
- 2 cups graham cracker crumbs
- 1/4 cup melted butter
- 2 tablespoons sugar
- For the Decorations:
- Gummy bears (for swimmers)
- Miniature umbrellas
- Lifesaver candies
- Teddy Grahams (for sunbathers)
- Small beach balls (optional)
- Chocolate rocks (optional)
Preparing the Cake:
- Preheat and Prepare: Preheat your oven to 350°F (175°C). Grease and flour a 9×13 inch baking pan. This will prevent the cake from sticking and ensure easy removal. I like to use baking spray with flour already in it for extra insurance!
- Combine Dry Ingredients: In a large bowl, whisk together the flour, baking powder, baking soda, and salt. Whisking is important to evenly distribute the leavening agents. This ensures a light and fluffy cake.
- Cream Butter and Sugar: In a separate large bowl, cream together the softened butter and granulated sugar until light and fluffy. This usually takes about 3-5 minutes with an electric mixer. The mixture should be pale and airy. This step is crucial for incorporating air into the batter, which contributes to the cake’s texture.
- Add Eggs: Beat in the eggs one at a time, making sure each egg is fully incorporated before adding the next. Then, stir in the vanilla extract.
- Alternate Wet and Dry Ingredients: Gradually add the dry ingredients to the wet ingredients, alternating with the buttermilk. Begin and end with the dry ingredients. So, add about 1/3 of the dry ingredients, then 1/2 of the buttermilk, then another 1/3 of the dry ingredients, the remaining buttermilk, and finally the last 1/3 of the dry ingredients. Mix until just combined. Be careful not to overmix, as this can result in a tough cake. Overmixing develops the gluten in the flour, leading to a less tender crumb.
- Bake: Pour the batter into the prepared baking pan and spread evenly. Bake for 30-35 minutes, or until a wooden skewer inserted into the center comes out clean.
- Cool: Let the cake cool in the pan for 10 minutes before inverting it onto a wire rack to cool completely. Make sure the cake is completely cool before frosting. Frosting a warm cake will cause the frosting to melt.
Making the Vanilla Buttercream Frosting:
- Cream Butter: In a large bowl, cream the softened butter until smooth and fluffy. This usually takes about 2-3 minutes with an electric mixer.
- Add Powdered Sugar: Gradually add the powdered sugar, one cup at a time, beating well after each addition. This prevents the powdered sugar from creating a cloud of dust.
- Add Heavy Cream and Vanilla: Add the heavy cream, vanilla extract, and salt. Beat until the frosting is smooth and creamy. If the frosting is too thick, add a little more heavy cream, one tablespoon at a time, until you reach the desired consistency. If it’s too thin, add a little more powdered sugar.
Preparing the Blue Gelatin “Water”:
- Dissolve Gelatin: In a large bowl, dissolve the blue gelatin in the boiling water. Stir until the gelatin is completely dissolved.
- Refrigerate: Pour the gelatin into a 9×13 inch baking dish (or a container of similar size) and refrigerate for at least 4 hours, or preferably overnight, until firm. The gelatin needs to be completely set before you can use it for the pool.
Making the Graham Cracker “Sand”:
- Combine Ingredients: In a medium bowl, combine the graham cracker crumbs, melted butter, and sugar. Mix well until the crumbs are evenly moistened.
Assembling the Swimming Pool Cake:
- Frost the Cake: Once the cake is completely cool, frost the top and sides with the vanilla buttercream frosting. Use an offset spatula or a knife to create a smooth and even layer.
- Create the Pool Area: On one end of the cake, create a rectangular “pool” area by carefully cutting out a section of the frosted cake. Make sure the pool is deep enough to hold the gelatin. I usually cut about 1/2 inch deep.
- Add the “Sand”: Sprinkle the graham cracker crumb mixture around the pool area to create a “sand” effect. You can also create a small “beach” area on one side of the pool.
- Cut the Gelatin: Once the blue gelatin is firm, cut it into cubes or rectangles that will fit into the pool area.
- Fill the Pool: Carefully place the gelatin cubes into the pool area, filling it completely.
- Decorate: Arrange the gummy bears, miniature umbrellas, Lifesaver candies, Teddy Grahams, and other decorations around the pool and on the “beach” to create a fun and festive swimming pool scene. Get creative and have fun with it! You can add small beach balls, chocolate rocks, or anything else that fits the theme.
- Chill (Optional): If desired, chill the cake in the refrigerator for about 30 minutes before serving to allow the gelatin to firm up even more.
Tips and Variations:
- Cake Flavor: You can use any cake flavor you like for this recipe. Chocolate cake, yellow cake, or even a funfetti cake would all work well.
- Frosting Flavor: Feel free to experiment with different frosting flavors. Chocolate buttercream, strawberry buttercream, or even a cream cheese frosting would be delicious.
- Gelatin Flavor: While blue gelatin is the most common choice for the “water,” you can use other colors as well. Green gelatin could represent a pond or lake.
- Healthier Option: For a slightly healthier version, you can use whole wheat flour for the cake and reduce the amount of sugar in the frosting. You can also use sugar-free gelatin.
- Dietary Restrictions: To make this cake gluten-free, use a gluten-free flour blend. To make it dairy-free, use a dairy-free butter substitute and dairy-free milk.
- Make Ahead: You can bake the cake and make the frosting a day ahead of time. Store the cake wrapped tightly in plastic wrap and the frosting in an airtight container in the refrigerator. You can also prepare the gelatin a day ahead of time. Assemble the cake on the day you plan to serve it.
- Serving Suggestions: This cake is perfect for birthday parties, summer gatherings, or any occasion that calls for a fun and festive dessert. Serve it chilled or at room temperature.
- Storage: Store leftover cake in an airtight container in the refrigerator for up to 3 days. The gelatin may start to soften after a few days.
Troubleshooting:
- Cake is Dry: Make sure you are not overbaking the cake. Use a toothpick to check for doneness. If the cake is still dry, you can brush it with a simple syrup after it cools.
- Frosting is Too Thick: Add a little more heavy cream, one tablespoon at a time, until you reach the desired consistency.
- Frosting is Too Thin: Add a little more powdered sugar, one tablespoon at a time, until you reach the desired consistency.
- Gelatin is Not Setting: Make sure you are using the correct amount of boiling water. Also, make sure you are refrigerating the gelatin for at least 4
Conclusion:
So, there you have it! This isn’t just another recipe; it’s a passport to a taste of summer, a burst of sunshine in every bite, and a guaranteed crowd-pleaser. I truly believe this recipe is a must-try because it’s more than just the sum of its ingredients. It’s about creating a moment, a memory, a little escape from the everyday. The vibrant colors, the refreshing flavors, and the sheer simplicity of preparation make it an absolute winner in my book.
But why is it a must-try? Well, beyond the deliciousness, it’s incredibly versatile. Imagine serving this at your next barbecue it’ll be the star of the show! Or picture yourself enjoying a quiet afternoon by the swimming pool, savoring each spoonful of this cool and refreshing treat. It’s perfect for potlucks, picnics, or even just a simple weeknight dessert.
And the best part? You can easily adapt it to your own preferences. Feeling adventurous? Try adding a pinch of chili powder for a subtle kick. Want to make it even more decadent? A dollop of whipped cream or a scoop of vanilla ice cream will do the trick. For a healthier twist, substitute the sugar with honey or agave nectar. The possibilities are endless!
Serving Suggestions and Variations:
* Poolside Perfection: Serve chilled in individual glasses with a sprig of mint for a refreshing poolside treat.
* Barbecue Bonanza: Offer it as a light and refreshing dessert option at your next barbecue.
* Picnic Pleasure: Pack it in a cooler for a delightful picnic dessert.
* Spicy Surprise: Add a pinch of chili powder for a subtle kick.
* Decadent Delight: Top with whipped cream or vanilla ice cream.
* Healthy Harmony: Substitute sugar with honey or agave nectar.
* Fruity Fusion: Experiment with different fruits like mango, pineapple, or kiwi.
* Layered Luxury: Create a layered parfait with granola and yogurt.
* Frozen Fantasy: Freeze it into popsicles for a fun and refreshing treat.
* Cocktail Companion: Use it as a base for a refreshing summer cocktail.I’ve poured my heart into perfecting this recipe, and I’m confident that you’ll love it as much as I do. But the real magic happens when you make it your own. Don’t be afraid to experiment, to tweak, to add your own personal touch. After all, cooking is all about creativity and having fun!
So, what are you waiting for? Grab your ingredients, put on some music, and get ready to create a culinary masterpiece. I promise you won’t regret it. And once you’ve tried it, I’d absolutely love to hear about your experience. Share your photos, your variations, and your thoughts in the comments below. Let’s create a community of food lovers who are passionate about sharing delicious and inspiring recipes. I can’t wait to see what you come up with! Happy cooking, and happy swimming (poolside, of course, while enjoying this treat)!
Swimming Pool: Your Ultimate Guide to Choosing, Maintaining & Enjoying
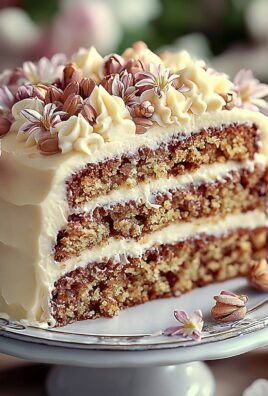
A fun, festive swimming pool cake with moist cake, vanilla buttercream, blue gelatin "water," graham cracker "sand," and gummy bear swimmers!
Ingredients
- 3 cups all-purpose flour
- 1 teaspoon baking powder
- 1 teaspoon baking soda
- 1/2 teaspoon salt
- 1 cup (2 sticks) unsalted butter, softened
- 2 cups granulated sugar
- 4 large eggs
- 1 teaspoon vanilla extract
- 1 1/2 cups buttermilk
- 1 cup (2 sticks) unsalted butter, softened
- 4 cups powdered sugar
- 1/2 cup heavy cream
- 2 teaspoons vanilla extract
- Pinch of salt
- 6 cups boiling water
- 2 (3-ounce) boxes blue gelatin (Jell-O)
- 2 cups graham cracker crumbs
- 1/4 cup melted butter
- 2 tablespoons sugar
- Gummy bears (for swimmers)
- Miniature umbrellas
- Lifesaver candies
- Teddy Grahams (for sunbathers)
- Small beach balls (optional)
- Chocolate rocks (optional)
Instructions
- Preheat your oven to 350°F (175°C). Grease and flour a 9×13 inch baking pan.
- In a large bowl, whisk together the flour, baking powder, baking soda, and salt.
- In a separate large bowl, cream together the softened butter and granulated sugar until light and fluffy (3-5 minutes).
- Beat in the eggs one at a time, incorporating each fully before adding the next. Stir in the vanilla extract.
- Gradually add the dry ingredients to the wet ingredients, alternating with the buttermilk. Begin and end with the dry ingredients. Mix until just combined.
- Pour the batter into the prepared baking pan and spread evenly. Bake for 30-35 minutes, or until a wooden skewer inserted into the center comes out clean.
- Let the cake cool in the pan for 10 minutes before inverting it onto a wire rack to cool completely.
- In a large bowl, cream the softened butter until smooth and fluffy (2-3 minutes).
- Gradually add the powdered sugar, one cup at a time, beating well after each addition.
- Add the heavy cream, vanilla extract, and salt. Beat until the frosting is smooth and creamy. Adjust consistency with more cream or sugar as needed.
- In a large bowl, dissolve the blue gelatin in the boiling water. Stir until the gelatin is completely dissolved.
- Pour the gelatin into a 9×13 inch baking dish (or similar) and refrigerate for at least 4 hours, or preferably overnight, until firm.
- In a medium bowl, combine the graham cracker crumbs, melted butter, and sugar. Mix well until the crumbs are evenly moistened.
- Once the cake is completely cool, frost the top and sides with the vanilla buttercream frosting.
- On one end of the cake, create a rectangular “pool” area by carefully cutting out a section of the frosted cake (about 1/2 inch deep).
- Sprinkle the graham cracker crumb mixture around the pool area to create a “sand” effect.
- Once the blue gelatin is firm, cut it into cubes or rectangles that will fit into the pool area.
- Carefully place the gelatin cubes into the pool area, filling it completely.
- Arrange the gummy bears, miniature umbrellas, Lifesaver candies, Teddy Grahams, and other decorations around the pool and on the “beach” to create a fun and festive swimming pool scene.
- If desired, chill the cake in the refrigerator for about 30 minutes before serving to allow the gelatin to firm up even more.
Notes
- You can use any cake flavor you like for this recipe. Chocolate cake, yellow cake, or even a funfetti cake would all work well.
- Feel free to experiment with different frosting flavors. Chocolate buttercream, strawberry buttercream, or even a cream cheese frosting would be delicious.
- While blue gelatin is the most common choice for the “water,” you can use other colors as well. Green gelatin could represent a pond or lake.
- For a slightly healthier version, you can use whole wheat flour for the cake and reduce the amount of sugar in the frosting. You can also use sugar-free gelatin.
- To make this cake gluten-free, use a gluten-free flour blend. To make it dairy-free, use a dairy-free butter substitute and dairy-free milk.
- You can bake the cake and make the frosting a day ahead of time. Store the cake wrapped tightly in plastic wrap and the frosting in an airtight container in the refrigerator. You can also prepare the gelatin a day ahead of time. Assemble the cake on the day you plan to serve it.
- This cake is perfect for birthday parties, summer gatherings, or any occasion that calls for a fun and festive dessert. Serve it chilled or at room temperature.
- Store leftover cake in an airtight container in the refrigerator for up to 3 days. The gelatin may start to soften after a few days.
- Make sure you are not overbaking the cake. Use a toothpick to check for doneness. If the cake is still dry, you can brush it with a simple syrup after it cools.
- Add a little more heavy cream, one tablespoon at a time, until you reach the desired consistency.
- Add a little more powdered sugar, one tablespoon at a time, until you reach the desired consistency.
- Make sure you are using the correct amount of boiling water. Also, make sure you are refrigerating the gelatin for at least 4 hours.

Leave a Comment