
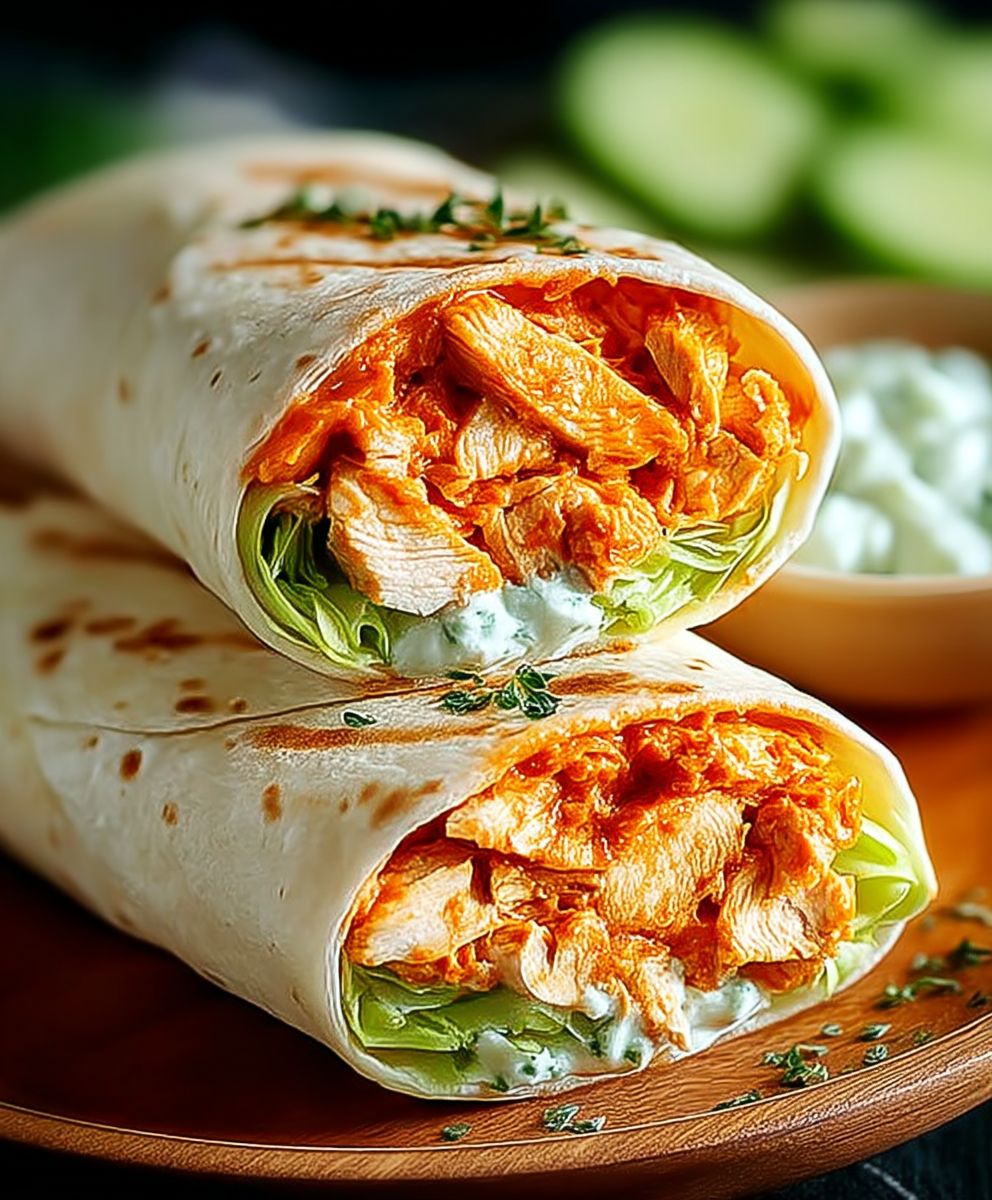
Buffalo Chicken Wrap: Prepare to embark on a flavor journey that will redefine your lunch game! Forget those bland, boring midday meals. We’re diving headfirst into a world of spicy, tangy, and utterly satisfying goodness. Imagine juicy, tender chicken, coated in a fiery buffalo sauce, nestled in a soft, warm tortilla with crisp lettuce, creamy ranch, and maybe even a sprinkle of blue cheese for the truly adventurous.
The beauty of the Buffalo Chicken Wrap lies not only in its incredible taste but also in its versatility and convenience. While the exact origins of the buffalo chicken flavor profile are debated, its roots are firmly planted in Buffalo, New York, with the creation of buffalo wings. This iconic flavor combination has since exploded in popularity, finding its way into everything from dips to pizzas, and of course, these delightful wraps.
What makes this wrap so irresistible? It’s the perfect balance of heat and coolness, the satisfying crunch of the lettuce against the tender chicken, and the sheer ease of preparation. Whether you’re packing a lunch for work, need a quick weeknight dinner, or are looking for a crowd-pleasing appetizer, the Buffalo Chicken Wrap is your answer. It’s a guaranteed hit that will leave everyone craving more. So, let’s get wrapping!

Ingredients:
- For the Chicken:
- 2 large boneless, skinless chicken breasts (about 1.5 lbs total)
- 1 cup buttermilk
- 1 tablespoon hot sauce (such as Frank’s RedHot)
- 1 teaspoon garlic powder
- 1 teaspoon onion powder
- 1/2 teaspoon paprika
- 1/2 teaspoon salt
- 1/4 teaspoon black pepper
- 1 cup all-purpose flour
- 1/2 cup cornstarch
- 1 teaspoon baking powder
- 1/2 teaspoon salt
- 1/4 teaspoon black pepper
- Vegetable oil, for frying
- For the Buffalo Sauce:
- 1/2 cup hot sauce (such as Frank’s RedHot)
- 1/4 cup unsalted butter, melted
- 1 tablespoon white vinegar
- 1/2 teaspoon garlic powder
- 1/4 teaspoon cayenne pepper (optional, for extra heat)
- For the Wrap Assembly:
- 4 large flour tortillas (10-12 inch)
- 1 cup shredded lettuce
- 1/2 cup shredded carrots
- 1/2 cup crumbled blue cheese (optional)
- 1/2 cup ranch dressing or blue cheese dressing
Preparing the Chicken:
- Marinate the Chicken: In a medium bowl, whisk together the buttermilk, hot sauce, garlic powder, onion powder, paprika, salt, and pepper. Add the chicken breasts to the bowl, ensuring they are fully submerged in the marinade. Cover the bowl with plastic wrap and refrigerate for at least 30 minutes, or up to 4 hours. The longer the chicken marinates, the more flavorful and tender it will be. I usually aim for at least an hour!
- Prepare the Dredging Station: While the chicken is marinating, prepare your dredging station. In a shallow dish, whisk together the flour, cornstarch, baking powder, salt, and pepper. Make sure everything is well combined. The cornstarch helps create a crispy coating.
- Dredge the Chicken: Remove the chicken breasts from the buttermilk marinade, letting any excess drip off. One at a time, dredge each chicken breast in the flour mixture, pressing firmly to ensure it is fully coated. Shake off any excess flour. This is crucial for getting a nice, even crust.
Frying the Chicken:
- Heat the Oil: Pour about 1 inch of vegetable oil into a large, heavy-bottomed skillet or Dutch oven. Heat the oil over medium-high heat until it reaches 350°F (175°C). You can use a deep-fry thermometer to monitor the temperature. If you don’t have a thermometer, you can test the oil by dropping a small piece of the flour mixture into it. If it sizzles and turns golden brown in a few seconds, the oil is ready. Be careful not to overheat the oil, as it can burn the chicken.
- Fry the Chicken: Carefully place the dredged chicken breasts into the hot oil, being careful not to overcrowd the pan. Fry for about 6-8 minutes per side, or until the chicken is golden brown and cooked through. The internal temperature of the chicken should reach 165°F (74°C). I always use a meat thermometer to be sure!
- Drain the Chicken: Remove the fried chicken breasts from the oil and place them on a wire rack lined with paper towels to drain off any excess oil. This will help keep the chicken crispy.
Making the Buffalo Sauce:
- Combine the Ingredients: In a medium bowl, whisk together the hot sauce, melted butter, white vinegar, garlic powder, and cayenne pepper (if using). Adjust the amount of cayenne pepper to your desired level of spiciness. I like mine with a little kick!
Assembling the Buffalo Chicken Wraps:
- Cut the Chicken: Once the fried chicken breasts have cooled slightly, cut them into bite-sized strips or cubes. This makes them easier to eat in the wraps.
- Toss with Buffalo Sauce: Place the cut chicken pieces in the bowl with the buffalo sauce and toss to coat evenly. Make sure every piece is covered in that delicious, spicy sauce!
- Warm the Tortillas (Optional): If desired, warm the tortillas in a dry skillet over medium heat for a few seconds per side, or in the microwave for about 10-15 seconds. This will make them more pliable and easier to roll.
- Assemble the Wraps: Lay a tortilla flat on a clean surface. Spread a generous amount of ranch dressing or blue cheese dressing in the center of the tortilla. Top with shredded lettuce, shredded carrots, and crumbled blue cheese (if using).
- Add the Buffalo Chicken: Place a generous amount of the buffalo chicken on top of the lettuce and carrot mixture.
- Roll the Wraps: Fold in the sides of the tortilla, then tightly roll up the wrap from the bottom. Secure with a toothpick if necessary.
- Serve Immediately: Serve the buffalo chicken wraps immediately. You can cut them in half on a diagonal for easier eating. Enjoy!
Tips and Variations:
- Air Fryer Option: For a healthier option, you can air fry the chicken instead of frying it in oil. Preheat your air fryer to 400°F (200°C). Place the dredged chicken breasts in the air fryer basket in a single layer, being careful not to overcrowd. Cook for about 12-15 minutes, flipping halfway through, or until the chicken is golden brown and cooked through.
- Grilled Chicken Option: You can also grill the chicken breasts instead of frying them. Marinate the chicken as directed, then grill over medium heat for about 6-8 minutes per side, or until cooked through. Cut into strips and toss with the buffalo sauce.
- Add More Veggies: Feel free to add other vegetables to your wraps, such as diced tomatoes, sliced cucumbers, or chopped celery.
- Spice Level: Adjust the amount of hot sauce and cayenne pepper to your desired level of spiciness. If you prefer a milder flavor, you can use a mild hot sauce or reduce the amount of cayenne pepper.
- Cheese Options: If you don’t like blue cheese, you can substitute it with shredded cheddar cheese, Monterey Jack cheese, or pepper jack cheese.
- Make it a Salad: If you’re watching your carbs, you can skip the tortilla and serve the buffalo chicken over a bed of lettuce with your favorite toppings.
- Make Ahead: You can prepare the chicken and buffalo sauce ahead of time and store them separately in the refrigerator. When you’re ready to assemble the wraps, simply reheat the chicken and assemble as directed.
Serving Suggestions:
These buffalo chicken wraps are delicious on their own, but they also pair well with a variety of sides, such as:
- French fries
- Sweet potato fries
- Coleslaw
- Potato salad
- Celery sticks with ranch dressing or blue cheese dressing
Storage Instructions:
If you have any leftover buffalo chicken wraps, you can store them in an airtight container in the refrigerator for up to 2 days. However, the tortillas may become soggy over time. It’s best to assemble the wraps just before serving.
Nutritional Information (approximate, per wrap):
Calories: 600-800
Protein: 40-50g
Fat: 30-40g
Carbohydrates: 40-50g
Note: Nutritional information may vary depending on the specific ingredients used.
Conclusion:
This Buffalo Chicken Wrap isn’t just another lunch option; it’s a flavor explosion waiting to happen, and trust me, you absolutely need to try it! The perfect balance of spicy buffalo sauce, creamy coolness, and satisfying crunch makes it a truly irresistible meal. It’s quick, it’s easy, and it’s guaranteed to banish those boring lunchtime blues. I’ve made this wrap countless times, and it’s always a hit, whether I’m packing it for myself or serving it to friends.
But the best part? It’s incredibly versatile! Feel free to experiment with different variations to suit your own taste. For a lighter option, try using grilled chicken breast instead of breaded tenders. Or, if you’re feeling adventurous, add a sprinkle of crumbled blue cheese for an extra layer of tangy flavor. You could even swap out the traditional ranch or blue cheese dressing for a creamy avocado ranch for a healthier twist.
Serving Suggestions and Variations:
* Spice it up: Add a pinch of cayenne pepper to the buffalo sauce for an extra kick.
* Cool it down: Serve with a side of celery sticks and carrot sticks with extra ranch or blue cheese dressing for dipping.
* Make it a salad: Deconstruct the wrap and toss the ingredients together for a delicious Buffalo Chicken Salad.
* Wrap alternatives: Use lettuce wraps for a low-carb option, or try a whole wheat tortilla for added fiber.
* Add some veggies: Include sliced bell peppers, cucumbers, or shredded carrots for extra nutrients and crunch.
* Make it vegetarian: Substitute the chicken with crispy tofu or buffalo cauliflower.
I’ve found that this Buffalo Chicken Wrap is also perfect for game day gatherings, picnics, or even a quick and satisfying dinner. It’s a crowd-pleaser that’s sure to disappear fast! You can easily prepare the chicken and other ingredients ahead of time, making it a breeze to assemble the wraps when you’re ready to eat.
Don’t be afraid to get creative and customize this recipe to your liking. The possibilities are endless! I encourage you to experiment with different ingredients and flavor combinations until you find your perfect Buffalo Chicken Wrap masterpiece.
So, what are you waiting for? Grab your ingredients, fire up the stove (or oven, if you’re baking the chicken), and get ready to experience the ultimate Buffalo Chicken Wrap. I’m confident that you’ll love it as much as I do.
And most importantly, I want to hear about your experience! Once you’ve tried this recipe, please come back and share your thoughts in the comments below. Did you make any modifications? What did you think of the flavor? I’m always eager to learn from your culinary adventures and see how you’ve put your own spin on this classic dish. Happy wrapping! Let me know what you think!
Buffalo Chicken Wrap: The Ultimate Recipe & Guide
Crispy fried chicken tossed in tangy buffalo sauce, wrapped in a tortilla with fresh veggies and creamy dressing. Spicy and satisfying!
Ingredients
- 2 large boneless, skinless chicken breasts (about 1.5 lbs total)
- 1 cup buttermilk
- 1 tablespoon hot sauce (such as Frank’s RedHot)
- 1 teaspoon garlic powder
- 1 teaspoon onion powder
- 1/2 teaspoon paprika
- 1/2 teaspoon salt
- 1/4 teaspoon black pepper
- 1 cup all-purpose flour
- 1/2 cup cornstarch
- 1 teaspoon baking powder
- 1/2 teaspoon salt
- 1/4 teaspoon black pepper
- Vegetable oil, for frying
- 1/2 cup hot sauce (such as Frank’s RedHot)
- 1/4 cup unsalted butter, melted
- 1 tablespoon white vinegar
- 1/2 teaspoon garlic powder
- 1/4 teaspoon cayenne pepper (optional, for extra heat)
- 4 large flour tortillas (10-12 inch)
- 1 cup shredded lettuce
- 1/2 cup shredded carrots
- 1/2 cup crumbled blue cheese (optional)
- 1/2 cup ranch dressing or blue cheese dressing
Instructions
- **Marinate the Chicken:** In a medium bowl, whisk together the buttermilk, hot sauce, garlic powder, onion powder, paprika, salt, and pepper. Add the chicken breasts to the bowl, ensuring they are fully submerged in the marinade. Cover the bowl with plastic wrap and refrigerate for at least 30 minutes, or up to 4 hours.
- **Prepare the Dredging Station:** While the chicken is marinating, prepare your dredging station. In a shallow dish, whisk together the flour, cornstarch, baking powder, salt, and pepper.
- **Dredge the Chicken:** Remove the chicken breasts from the buttermilk marinade, letting any excess drip off. One at a time, dredge each chicken breast in the flour mixture, pressing firmly to ensure it is fully coated. Shake off any excess flour.
- **Heat the Oil:** Pour about 1 inch of vegetable oil into a large, heavy-bottomed skillet or Dutch oven. Heat the oil over medium-high heat until it reaches 350°F (175°C).
- **Fry the Chicken:** Carefully place the dredged chicken breasts into the hot oil, being careful not to overcrowd the pan. Fry for about 6-8 minutes per side, or until the chicken is golden brown and cooked through. The internal temperature of the chicken should reach 165°F (74°C).
- **Drain the Chicken:** Remove the fried chicken breasts from the oil and place them on a wire rack lined with paper towels to drain off any excess oil.
- **Combine the Ingredients (Buffalo Sauce):** In a medium bowl, whisk together the hot sauce, melted butter, white vinegar, garlic powder, and cayenne pepper (if using). Adjust the amount of cayenne pepper to your desired level of spiciness.
- **Cut the Chicken:** Once the fried chicken breasts have cooled slightly, cut them into bite-sized strips or cubes.
- **Toss with Buffalo Sauce:** Place the cut chicken pieces in the bowl with the buffalo sauce and toss to coat evenly.
- **Warm the Tortillas (Optional):** If desired, warm the tortillas in a dry skillet over medium heat for a few seconds per side, or in the microwave for about 10-15 seconds.
- **Assemble the Wraps:** Lay a tortilla flat on a clean surface. Spread a generous amount of ranch dressing or blue cheese dressing in the center of the tortilla. Top with shredded lettuce, shredded carrots, and crumbled blue cheese (if using).
- **Add the Buffalo Chicken:** Place a generous amount of the buffalo chicken on top of the lettuce and carrot mixture.
- **Roll the Wraps:** Fold in the sides of the tortilla, then tightly roll up the wrap from the bottom. Secure with a toothpick if necessary.
- **Serve Immediately:** Serve the buffalo chicken wraps immediately. You can cut them in half on a diagonal for easier eating.
Notes
- Air Fryer Option: For a healthier option, you can air fry the chicken instead of frying it in oil. Preheat your air fryer to 400°F (200°C). Place the dredged chicken breasts in the air fryer basket in a single layer, being careful not to overcrowd. Cook for about 12-15 minutes, flipping halfway through, or until the chicken is golden brown and cooked through.
- Grilled Chicken Option: You can also grill the chicken breasts instead of frying them. Marinate the chicken as directed, then grill over medium heat for about 6-8 minutes per side, or until cooked through. Cut into strips and toss with the buffalo sauce.
- Add More Veggies: Feel free to add other vegetables to your wraps, such as diced tomatoes, sliced cucumbers, or chopped celery.
- Spice Level: Adjust the amount of hot sauce and cayenne pepper to your desired level of spiciness. If you prefer a milder flavor, you can use a mild hot sauce or reduce the amount of cayenne pepper.
- Cheese Options: If you don’t like blue cheese, you can substitute it with shredded cheddar cheese, Monterey Jack cheese, or pepper jack cheese.
- Make it a Salad: If you’re watching your carbs, you can skip the tortilla and serve the buffalo chicken over a bed of lettuce with your favorite toppings.
- Make Ahead: You can prepare the chicken and buffalo sauce ahead of time and store them separately in the refrigerator. When you’re ready to assemble the wraps, simply reheat the chicken and assemble as directed.
Leave a Comment