
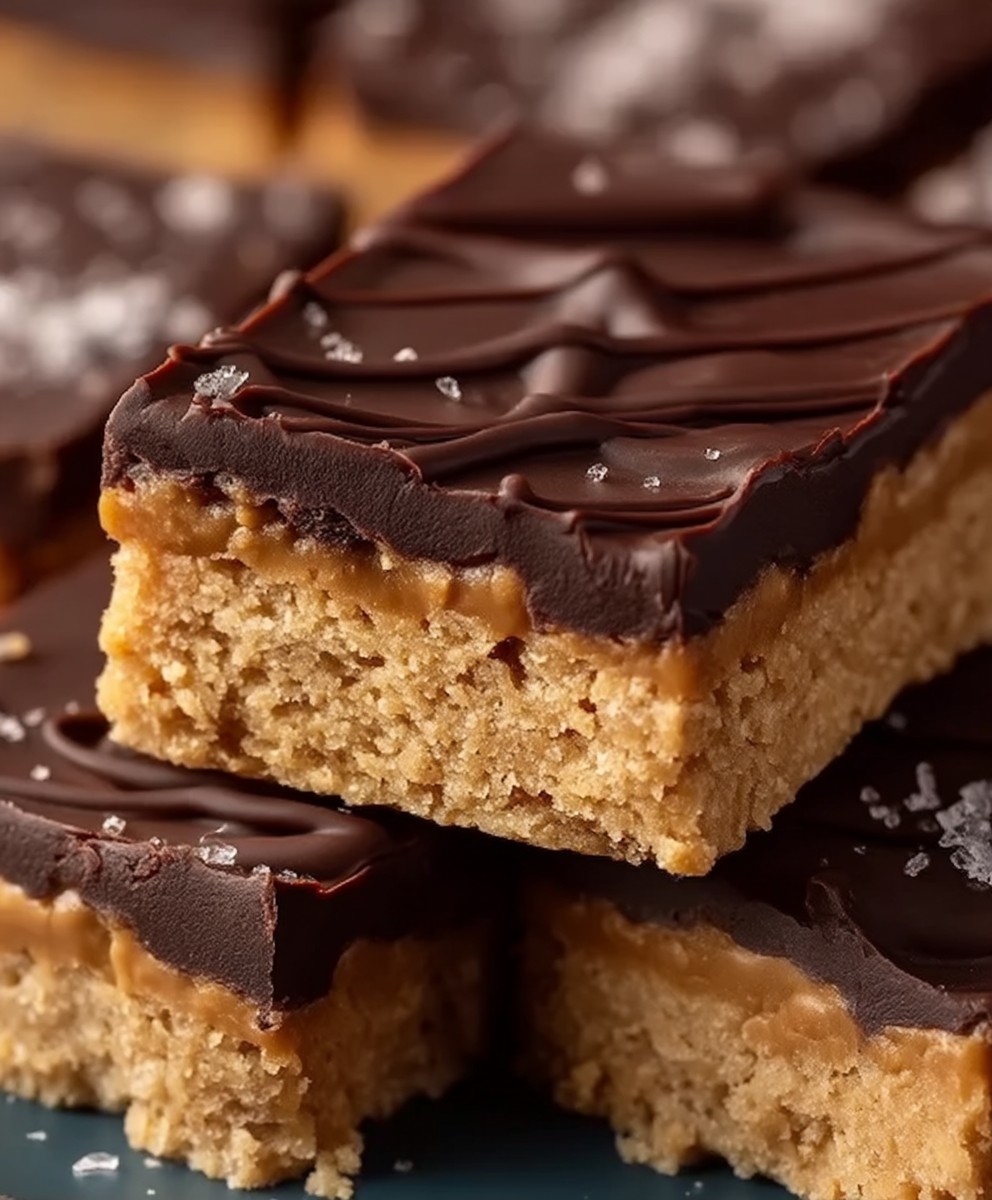
Peanut Butter Bars: Prepare to be transported back to childhood with a recipe that’s both nostalgic and utterly irresistible! Imagine sinking your teeth into a rich, decadent treat where the creamy, salty-sweetness of peanut butter meets a buttery, crumbly base. These aren’t just any bars; they’re a symphony of textures and flavors that will have you reaching for seconds (and maybe thirds!).
While the exact origins of Peanut Butter Bars are shrouded in a bit of mystery, their popularity exploded in the mid-20th century, coinciding with the rise of peanut butter as a pantry staple. They quickly became a bake sale favorite, a potluck superstar, and a cherished homemade treat passed down through generations. Their enduring appeal lies in their simplicity and the sheer joy they bring.
What’s not to love? The combination of the smooth, melt-in-your-mouth peanut butter filling and the slightly salty, crumbly crust is a match made in dessert heaven. Plus, they’re incredibly easy to make, requiring minimal ingredients and effort. Whether you’re a seasoned baker or a kitchen novice, you can whip up a batch of these delectable bars in no time. Get ready to experience a taste of pure comfort and happiness with every bite!

Ingredients:
- 1 cup (2 sticks) unsalted butter, softened
- 1 cup granulated sugar
- 1 cup packed brown sugar
- 2 large eggs
- 1 teaspoon vanilla extract
- 2 cups creamy peanut butter
- 3 cups all-purpose flour
- 1 teaspoon baking powder
- 1 teaspoon baking soda
- 1/2 teaspoon salt
Preparing the Peanut Butter Base:
- First things first, let’s cream together the butter and sugars. In a large bowl (or the bowl of your stand mixer), combine the softened butter, granulated sugar, and packed brown sugar. Beat on medium speed until light and fluffy. This usually takes about 3-5 minutes. Don’t rush this step; it’s crucial for a tender bar! You want the mixture to be pale and airy. Scrape down the sides of the bowl occasionally to ensure everything is evenly incorporated.
- Now, let’s add the eggs and vanilla. Beat in the eggs one at a time, making sure each egg is fully incorporated before adding the next. Then, stir in the vanilla extract. The mixture should be smooth and creamy at this point.
- Time for the peanut butter! Add the creamy peanut butter to the bowl and beat until well combined. Make sure there are no streaks of peanut butter remaining. The mixture will be quite thick at this stage, and that’s perfectly normal.
Combining Dry and Wet Ingredients:
- In a separate medium bowl, whisk together the flour, baking powder, baking soda, and salt. Whisking ensures that the baking powder and baking soda are evenly distributed throughout the flour, which will help the bars rise properly.
- Gradually add the dry ingredients to the wet ingredients, mixing on low speed until just combined. Be careful not to overmix! Overmixing can lead to tough bars. Mix until the flour disappears, but don’t keep mixing after that. A few streaks of flour are okay at this point.
Baking the Peanut Butter Bars:
- Preheat your oven to 350°F (175°C). Grease a 9×13 inch baking pan. You can also line the pan with parchment paper, leaving an overhang on the sides. This will make it super easy to lift the bars out of the pan once they’re baked.
- Press the peanut butter mixture evenly into the prepared baking pan. I find it easiest to do this with my hands. You can lightly grease your hands with cooking spray or use a piece of parchment paper to prevent the dough from sticking. Make sure the dough is evenly distributed across the pan for even baking.
- Bake for 25-30 minutes, or until the edges are golden brown and a toothpick inserted into the center comes out with a few moist crumbs attached. Be careful not to overbake the bars, as they will become dry. The center should still be slightly soft.
- Let the bars cool completely in the pan before cutting into squares. This is important because the bars will continue to set as they cool. If you try to cut them while they’re still warm, they’ll be crumbly and messy. If you lined the pan with parchment paper, you can lift the bars out of the pan and place them on a cutting board for easier cutting.
Optional Chocolate Topping (Highly Recommended!):
While the peanut butter bars are delicious on their own, adding a chocolate topping takes them to the next level. Here’s how to make a simple chocolate ganache:
Chocolate Ganache Ingredients:
- 1 cup semi-sweet chocolate chips
- 1/2 cup heavy cream
Making the Chocolate Ganache:
- Place the chocolate chips in a heatproof bowl.
- In a small saucepan, heat the heavy cream over medium heat until it just begins to simmer. Do not boil the cream.
- Pour the hot cream over the chocolate chips and let it sit for 1 minute to allow the chocolate to melt.
- Gently whisk the mixture until smooth and glossy.
Applying the Chocolate Topping:
- Once the peanut butter bars have cooled completely, pour the chocolate ganache over the top, spreading it evenly with a spatula.
- Let the chocolate topping set completely before cutting the bars. This will take about 30 minutes at room temperature or 15 minutes in the refrigerator.
Variations and Tips:
- Add-ins: Feel free to add other ingredients to the peanut butter bars, such as chocolate chips, chopped nuts, or pretzels. Stir them into the batter before pressing it into the pan.
- Peanut Butter Swirl: For a marbled effect, melt 1/4 cup of peanut butter and drizzle it over the top of the bars before baking. Use a knife or toothpick to swirl the peanut butter into the batter.
- Different Peanut Butter: While I recommend using creamy peanut butter for this recipe, you can also use chunky peanut butter for added texture.
- Storage: Store the peanut butter bars in an airtight container at room temperature for up to 3 days or in the refrigerator for up to a week.
- Freezing: These bars freeze well. Wrap them individually in plastic wrap and then place them in a freezer-safe bag or container. They can be frozen for up to 2 months. Thaw them at room temperature before serving.
- Salted Peanut Butter: If you are using salted peanut butter, you may want to reduce the amount of salt added to the dry ingredients. Taste the peanut butter first and adjust accordingly.
- Brown Butter: For an even richer flavor, you can brown the butter before creaming it with the sugars. To brown the butter, melt it in a saucepan over medium heat. Continue cooking until the butter turns a golden brown color and has a nutty aroma. Be careful not to burn the butter. Let the browned butter cool slightly before using it in the recipe.
- Espresso Powder: A teaspoon of espresso powder added to the dry ingredients will enhance the chocolate flavor in the ganache, if you choose to make it.
- Sea Salt Flakes: A sprinkle of sea salt flakes on top of the chocolate ganache adds a delightful salty-sweet contrast.
- Cutting Tips: For clean cuts, use a sharp knife and wipe it clean between each cut. You can also run the knife under hot water before each cut.
- Pan Size: While a 9×13 inch pan is recommended, you can use an 8×8 inch pan for thicker bars. You will need to adjust the baking time accordingly.
- Vegan Option: To make these bars vegan, substitute the butter with a vegan butter alternative, the eggs with flax eggs (1 tablespoon of ground flaxseed mixed with 3 tablespoons of water per egg), and ensure your chocolate chips are dairy-free.
Troubleshooting:
- Bars are too dry: This could be due to overbaking or using too much flour. Make sure to measure the flour accurately and avoid overbaking the bars.
- Bars are too crumbly: This could be due to not enough fat or overmixing. Make sure to use the correct amount of butter and avoid overmixing the batter.
- Bars are too soft: This could be due to underbaking or using too much sugar. Make sure to bake the bars for the correct amount of time and use the correct amount of sugar.
- Chocolate ganache is too thick: Add a tablespoon of heavy cream at a time until it reaches the desired consistency.
- Chocolate ganache is too thin: Add a tablespoon of melted chocolate at a time until it reaches the desired consistency.
Enjoy your homemade peanut butter bars! They’re perfect for a snack, dessert, or even a potluck. I hope you love them as much as I do!
Conclusion:
And there you have it! These Peanut Butter Bars are truly a must-try for anyone who loves the irresistible combination of creamy peanut butter and sweet, melt-in-your-mouth goodness. I know, I know, I might be biased, but trust me on this one. From the simple, straightforward instructions to the incredibly satisfying final product, this recipe is a winner. It’s the kind of dessert that disappears quickly at parties, becomes a requested treat for family gatherings, and satisfies those late-night cravings like nothing else.
But what makes these bars so special? It’s the perfect balance of textures and flavors. The slightly crumbly, buttery base provides a wonderful contrast to the smooth, rich peanut butter filling. And that chocolate topping? Pure decadence! It’s a symphony of sweet and salty that will have your taste buds singing. Plus, the recipe is incredibly forgiving, making it perfect for both seasoned bakers and kitchen novices alike. You really can’t mess this one up!
Looking for serving suggestions? These bars are fantastic on their own, of course, but they also pair beautifully with a scoop of vanilla ice cream or a dollop of whipped cream. For a truly indulgent experience, try drizzling them with a little extra melted chocolate or a sprinkle of sea salt. And if you’re feeling adventurous, why not experiment with some variations?
Here are a few ideas to get you started:
* Chocolate Chip Peanut Butter Bars: Add a cup of chocolate chips to the peanut butter filling for an extra dose of chocolatey goodness.
* Pretzel Peanut Butter Bars: Press crushed pretzels into the base before baking for a salty, crunchy twist.
* Oatmeal Peanut Butter Bars: Incorporate rolled oats into the base for a chewier, more wholesome texture.
* White Chocolate Peanut Butter Bars: Swap the milk chocolate topping for white chocolate for a sweeter, creamier flavor.
* Reese’s Pieces Peanut Butter Bars: Sprinkle Reese’s Pieces on top of the chocolate layer before it sets for a colorful and festive treat.
The possibilities are endless! Feel free to get creative and customize these bars to your own liking. That’s the beauty of baking, isn’t it? It’s all about experimenting and finding what works best for you.
I truly believe that this Peanut Butter Bars recipe will become a staple in your baking repertoire. It’s quick, easy, and guaranteed to please. So, what are you waiting for? Gather your ingredients, preheat your oven, and get ready to create a batch of these irresistible treats.
And most importantly, I want to hear about your experience! Did you try the recipe? Did you make any variations? What did you think? Share your photos and comments on social media using #PeanutButterBarPerfection or tag me in your posts. I can’t wait to see your creations and hear your feedback. Happy baking! I know you’ll love these as much as I do.
Peanut Butter Bars: The Ultimate Guide to Delicious & Easy Recipes
Classic peanut butter bars, soft and chewy, perfect on their own or topped with a decadent chocolate ganache.
Ingredients
- 1 cup (2 sticks) unsalted butter, softened
- 1 cup granulated sugar
- 1 cup packed brown sugar
- 2 large eggs
- 1 teaspoon vanilla extract
- 2 cups creamy peanut butter
- 3 cups all-purpose flour
- 1 teaspoon baking powder
- 1 teaspoon baking soda
- 1/2 teaspoon salt
- 1 cup semi-sweet chocolate chips
- 1/2 cup heavy cream
Instructions
- Preheat oven to 350°F (175°C). Grease a 9×13 inch baking pan.
- Cream together the softened butter, granulated sugar, and packed brown sugar in a large bowl (or stand mixer) on medium speed until light and fluffy (3-5 minutes). Scrape down the sides of the bowl occasionally.
- Beat in the eggs one at a time, ensuring each is fully incorporated before adding the next. Stir in the vanilla extract.
- Add the creamy peanut butter and beat until well combined.
- In a separate medium bowl, whisk together the flour, baking powder, baking soda, and salt.
- Gradually add the dry ingredients to the wet ingredients, mixing on low speed until just combined. Be careful not to overmix.
- Press the peanut butter mixture evenly into the prepared baking pan.
- Bake for 25-30 minutes, or until the edges are golden brown and a toothpick inserted into the center comes out with a few moist crumbs attached.
- Let the bars cool completely in the pan before cutting into squares.
- Place the chocolate chips in a heatproof bowl.
- In a small saucepan, heat the heavy cream over medium heat until it just begins to simmer. Do not boil the cream.
- Pour the hot cream over the chocolate chips and let it sit for 1 minute to allow the chocolate to melt.
- Gently whisk the mixture until smooth and glossy.
- Once the peanut butter bars have cooled completely, pour the chocolate ganache over the top, spreading it evenly with a spatula.
- Let the chocolate topping set completely before cutting the bars (about 30 minutes at room temperature or 15 minutes in the refrigerator).
Notes
- Add-ins: Feel free to add other ingredients to the peanut butter bars, such as chocolate chips, chopped nuts, or pretzels. Stir them into the batter before pressing it into the pan.
- Peanut Butter Swirl: For a marbled effect, melt 1/4 cup of peanut butter and drizzle it over the top of the bars before baking. Use a knife or toothpick to swirl the peanut butter into the batter.
- Different Peanut Butter: While I recommend using creamy peanut butter for this recipe, you can also use chunky peanut butter for added texture.
- Storage: Store the peanut butter bars in an airtight container at room temperature for up to 3 days or in the refrigerator for up to a week.
- Freezing: These bars freeze well. Wrap them individually in plastic wrap and then place them in a freezer-safe bag or container. They can be frozen for up to 2 months. Thaw them at room temperature before serving.
- Salted Peanut Butter: If you are using salted peanut butter, you may want to reduce the amount of salt added to the dry ingredients. Taste the peanut butter first and adjust accordingly.
- Brown Butter: For an even richer flavor, you can brown the butter before creaming it with the sugars. To brown the butter, melt it in a saucepan over medium heat. Continue cooking until the butter turns a golden brown color and has a nutty aroma. Be careful not to burn the butter. Let the browned butter cool slightly before using it in the recipe.
- Espresso Powder: A teaspoon of espresso powder added to the dry ingredients will enhance the chocolate flavor in the ganache, if you choose to make it.
- Sea Salt Flakes: A sprinkle of sea salt flakes on top of the chocolate ganache adds a delightful salty-sweet contrast.
- Cutting Tips: For clean cuts, use a sharp knife and wipe it clean between each cut. You can also run the knife under hot water before each cut.
- Pan Size: While a 9×13 inch pan is recommended, you can use an 8×8 inch pan for thicker bars. You will need to adjust the baking time accordingly.
- Vegan Option: To make these bars vegan, substitute the butter with a vegan butter alternative, the eggs with flax eggs (1 tablespoon of ground flaxseed mixed with 3 tablespoons of water per egg), and ensure your chocolate chips are dairy-free.
Leave a Comment