
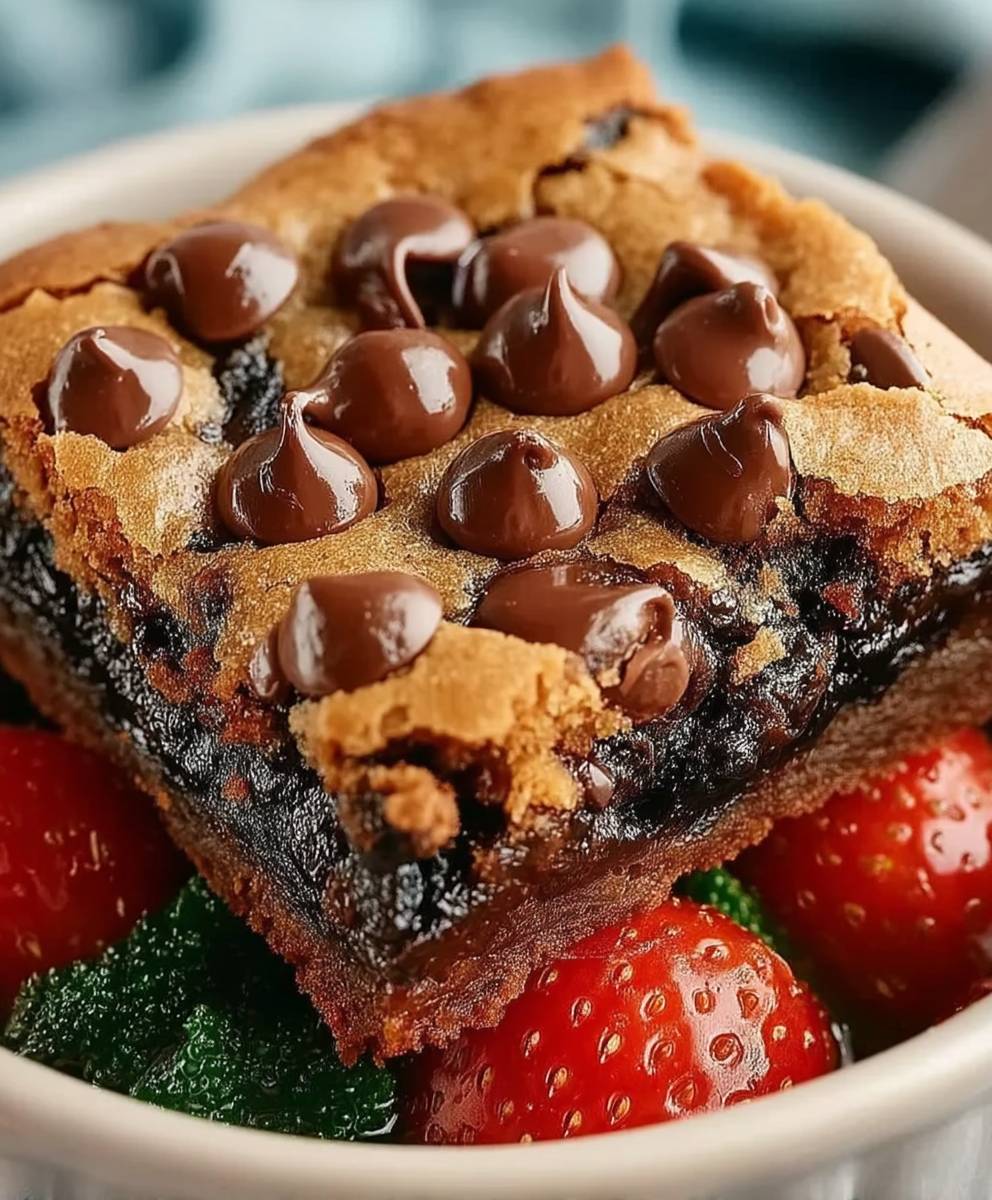
Brookie for one? Yes, you read that right! Imagine sinking your spoon into a warm, gooey dessert that perfectly marries the fudgy decadence of a brownie with the chewy, comforting goodness of a chocolate chip cookie. This isn’t just a dessert; it’s a personal celebration, a sweet escape crafted just for you. Forget sharing this is all about indulging in a single-serving masterpiece.
While the exact origins of the brookie are shrouded in delicious mystery, its popularity has exploded in recent years, becoming a favorite in cafes and home kitchens alike. It represents the ultimate fusion dessert, a testament to our love of combining the best of both worlds. Think of it as the culinary equivalent of a perfect harmony, where two classic treats unite to create something even more extraordinary.
People adore the brookie for its incredible textural contrast the crisp edges of a cookie giving way to the soft, fudgy center of a brownie. It’s a symphony of flavors and sensations in every bite. And let’s be honest, who can resist the allure of warm chocolate? This brookie for one recipe is especially appealing because it satisfies those intense cravings without the temptation of a whole batch. It’s quick, easy, and utterly satisfying the perfect treat for a cozy night in or a spontaneous dessert craving. So, let’s get baking!

Ingredients:
- 4 tablespoons (56g) unsalted butter, melted
- 2 tablespoons (25g) granulated sugar
- 2 tablespoons (30g) packed light brown sugar
- 1/4 teaspoon vanilla extract
- Pinch of salt
- 1 large egg yolk
- 1/4 cup (30g) all-purpose flour
- 2 tablespoons (20g) unsweetened cocoa powder
- 1/4 teaspoon baking powder
- 2 tablespoons chocolate chips (milk, dark, or semi-sweet, your choice!)
Preparing the Cookie Dough Base:
- First, let’s get that cookie dough started! In a small, microwave-safe bowl, melt the 4 tablespoons of unsalted butter. I usually microwave it in 20-second intervals, stirring in between, to prevent it from splattering everywhere. You want it completely melted but not boiling.
- Once the butter is melted, add the 2 tablespoons of granulated sugar and 2 tablespoons of packed light brown sugar to the bowl. Make sure you pack that brown sugar in the measuring spoon for accurate measurement! Stir the sugars into the melted butter until everything is well combined and the mixture looks smooth and slightly grainy.
- Now, for the vanilla! Add the 1/4 teaspoon of vanilla extract and a pinch of salt to the sugar and butter mixture. The vanilla adds a lovely warmth to the cookie, and the salt helps to balance the sweetness and enhance the other flavors. Stir it all together until it’s evenly distributed.
- Here comes the egg yolk! This is what will give our cookie that rich, chewy texture. Add the large egg yolk to the bowl and whisk it in vigorously until the mixture is smooth, lightened in color, and slightly thickened. Don’t skip this step the aeration is important for the final texture.
Adding the Dry Ingredients:
- Time to incorporate the dry ingredients. In the same bowl (less dishes!), add the 1/4 cup of all-purpose flour, 2 tablespoons of unsweetened cocoa powder, and 1/4 teaspoon of baking powder.
- Gently fold the dry ingredients into the wet ingredients using a spatula or spoon. Be careful not to overmix! Overmixing can develop the gluten in the flour, resulting in a tough cookie. Mix just until the dry ingredients are incorporated and no streaks of flour or cocoa powder remain. A few small lumps are okay.
- Finally, stir in the 2 tablespoons of chocolate chips. I like to use a mix of milk and dark chocolate chips for a more complex flavor, but you can use whatever kind you prefer. Gently fold them into the dough until they are evenly distributed.
Preparing the Brownie Batter:
- Now, let’s make the brownie part! In a separate small bowl (or you can reuse the same one after a quick wash), melt 2 tablespoons of the melted butter from the cookie dough. Make sure it’s still warm, but not hot.
- Add 1 tablespoon of granulated sugar to the melted butter and stir until combined. The sugar will dissolve slightly into the butter.
- Add 1 tablespoon of unsweetened cocoa powder to the mixture. Stir well until a thick paste forms. Don’t worry if it seems a little dry at first; it will come together as you mix.
- Add 1 tablespoon of all-purpose flour to the cocoa mixture. Stir until just combined. Again, be careful not to overmix.
- Add 1 tablespoon of milk to the batter. This will loosen the batter and give it a smoother consistency. Stir until the milk is fully incorporated.
- Finally, add a pinch of salt to enhance the flavor of the brownie. Stir until the salt is evenly distributed.
Assembling and Baking the Brookie:
- Preheat your oven to 350°F (175°C). While the oven is preheating, prepare a small oven-safe dish or ramekin. I usually use a 4-inch ramekin. Grease the dish lightly with butter or cooking spray to prevent the brookie from sticking.
- Spoon the cookie dough into the prepared dish, spreading it evenly across the bottom. You can use the back of a spoon or your fingers to smooth it out.
- Carefully spoon the brownie batter over the cookie dough layer. Try to spread it evenly, but don’t worry if it’s not perfect. The two layers will meld together as they bake. You can swirl the brownie batter into the cookie dough slightly with a toothpick or knife for a marbled effect, if you like.
- Bake in the preheated oven for 20-25 minutes, or until a toothpick inserted into the center comes out with moist crumbs. The baking time may vary depending on your oven, so keep an eye on it. You want the brownie part to be set and the cookie part to be golden brown around the edges.
- Remove the brookie from the oven and let it cool in the dish for a few minutes before serving. This will allow it to set up slightly and make it easier to eat.
Serving and Enjoying Your Brookie:
- You can enjoy your brookie warm, straight from the oven, or let it cool completely. I personally prefer it warm, with a scoop of vanilla ice cream on top!
- If you want to get fancy, you can drizzle some melted chocolate or caramel sauce over the top. You can also sprinkle it with chopped nuts, sprinkles, or a dusting of powdered sugar.
- This brookie is best enjoyed immediately, but you can store any leftovers in an airtight container at room temperature for up to a day. However, it’s unlikely there will be any leftovers!
Tips and Variations:
- Chocolate Chip Variations: Experiment with different types of chocolate chips! Try using white chocolate chips, peanut butter chips, or even chopped nuts.
- Nutty Brookie: Add a tablespoon of chopped walnuts, pecans, or almonds to the cookie dough for a nutty crunch.
- Espresso Brookie: Add 1/2 teaspoon of instant espresso powder to the brownie batter for a mocha flavor.
- Salted Caramel Brookie: Drizzle salted caramel sauce over the brookie after baking for a decadent treat.
- Double Chocolate Brookie: Add an extra tablespoon of cocoa powder to the brownie batter for an even richer chocolate flavor.
- Vegan Brookie: Substitute the butter with vegan butter, the egg yolk with applesauce (about 2 tablespoons), and the milk with plant-based milk. Make sure your chocolate chips are also vegan-friendly.
- Gluten-Free Brookie: Substitute the all-purpose flour with a gluten-free all-purpose flour blend. You may need to add a little extra liquid to the batter to achieve the right consistency.
- Don’t Overbake: Overbaking will result in a dry brookie. It’s better to underbake it slightly than to overbake it. The center should still be slightly soft and gooey.
- Use Quality Ingredients: The quality of your ingredients will affect the taste of your brookie. Use good quality butter, chocolate, and cocoa powder for the best results.
- Adjust Sweetness: If you prefer a less sweet brookie, you can reduce the amount of sugar in both the cookie dough and the brownie batter.
Enjoy your delicious homemade brookie!
Conclusion:
So, there you have it! This single-serving brookie recipe is truly a must-try for anyone craving a quick, satisfying, and utterly delicious treat. It’s the perfect solution for those moments when you want something sweet but don’t want to bake an entire batch of cookies or brownies. The beauty of this recipe lies in its simplicity and speed. From start to finish, you’re looking at less than 30 minutes, and most of that is baking time! Plus, clean-up is a breeze just one mug to wash!
Why is this brookie a must-try? Because it delivers the best of both worlds: the fudgy, chocolatey goodness of a brownie and the chewy, slightly crisp edges of a cookie, all in one perfect little package. It’s intensely satisfying and customizable to your own preferences.
But the fun doesn’t stop there! Feel free to experiment with different variations to make this brookie truly your own. For a richer, more decadent experience, try adding a tablespoon of peanut butter or Nutella to the batter. Or, if you’re a fan of nuts, toss in a handful of chopped walnuts, pecans, or macadamia nuts. For a festive touch, sprinkle some colorful sprinkles on top before baking.
Serving suggestions are endless! Enjoy your warm brookie straight from the mug with a scoop of vanilla ice cream for an extra indulgent dessert. A dollop of whipped cream and a drizzle of chocolate sauce also work wonders. For a more sophisticated pairing, try it with a glass of cold milk or a cup of hot coffee. You could even crumble it over yogurt or oatmeal for a decadent breakfast treat.
If you’re feeling adventurous, consider adding a pinch of sea salt to the top of the brookie before baking. The salt enhances the sweetness and creates a delightful contrast of flavors. Another fun variation is to use different types of chocolate chips. Try dark chocolate chips for a more intense chocolate flavor, or white chocolate chips for a sweeter, creamier taste. You could even use a combination of different chocolate chips for a truly unique brookie experience.
Don’t be afraid to get creative and experiment with different ingredients and flavors. The possibilities are endless! This recipe is a great starting point, but it’s really just a blank canvas for your own culinary creations.
I truly believe that everyone should have this recipe in their back pocket. It’s a lifesaver for those late-night cravings, a perfect pick-me-up on a gloomy day, and a guaranteed crowd-pleaser (even if the crowd is just you!).
So, what are you waiting for? Go ahead and give this brookie recipe a try! I promise you won’t be disappointed. And when you do, please share your experience with me! I’d love to hear what variations you tried, what toppings you added, and how much you enjoyed it. Leave a comment below and let me know! Happy baking! I can’t wait to hear all about your brookie adventures.
Brookie for One: The Ultimate Guide to Baking a Single-Serving Treat
A warm, gooey single-serving treat with a chewy chocolate chip cookie base and a rich, fudgy brownie top. Perfect for a quick dessert fix.
Ingredients
- 4 tablespoons (56g) unsalted butter, melted
- 2 tablespoons (25g) granulated sugar
- 2 tablespoons (30g) packed light brown sugar
- 1/4 teaspoon vanilla extract
- Pinch of salt
- 1 large egg yolk
- 1/4 cup (30g) all-purpose flour
- 2 tablespoons (20g) unsweetened cocoa powder
- 1/4 teaspoon baking powder
- 2 tablespoons chocolate chips (milk, dark, or semi-sweet, your choice!)
- 2 tablespoons melted butter (from the cookie dough butter)
- 1 tablespoon granulated sugar
- 1 tablespoon unsweetened cocoa powder
- 1 tablespoon all-purpose flour
- 1 tablespoon milk
- Pinch of salt
Instructions
- Prepare the Cookie Dough Base: In a small, microwave-safe bowl, melt the 4 tablespoons of unsalted butter in 20-second intervals, stirring in between.
- Add the 2 tablespoons of granulated sugar and 2 tablespoons of packed light brown sugar to the melted butter. Stir until well combined.
- Add the 1/4 teaspoon of vanilla extract and a pinch of salt. Stir until evenly distributed.
- Add the large egg yolk and whisk vigorously until the mixture is smooth, lightened in color, and slightly thickened.
- Add the 1/4 cup of all-purpose flour, 2 tablespoons of unsweetened cocoa powder, and 1/4 teaspoon of baking powder to the same bowl.
- Gently fold the dry ingredients into the wet ingredients until just incorporated. Be careful not to overmix.
- Stir in the 2 tablespoons of chocolate chips.
- Prepare the Brownie Batter: In a separate small bowl, melt 2 tablespoons of the melted butter from the cookie dough.
- Add 1 tablespoon of granulated sugar to the melted butter and stir until combined.
- Add 1 tablespoon of unsweetened cocoa powder to the mixture. Stir well until a thick paste forms.
- Add 1 tablespoon of all-purpose flour to the cocoa mixture. Stir until just combined.
- Add 1 tablespoon of milk to the batter. Stir until the milk is fully incorporated.
- Finally, add a pinch of salt to enhance the flavor of the brownie. Stir until the salt is evenly distributed.
- Assemble and Bake: Preheat your oven to 350°F (175°C). Grease a small oven-safe dish or ramekin (about 4-inch).
- Spoon the cookie dough into the prepared dish, spreading it evenly across the bottom.
- Carefully spoon the brownie batter over the cookie dough layer. Swirl the brownie batter into the cookie dough slightly with a toothpick or knife for a marbled effect, if you like.
- Bake in the preheated oven for 20-25 minutes, or until a toothpick inserted into the center comes out with moist crumbs.
- Remove the brookie from the oven and let it cool in the dish for a few minutes before serving.
- Serve and Enjoy: Enjoy warm, straight from the oven, or let it cool completely. Top with vanilla ice cream, melted chocolate, caramel sauce, chopped nuts, sprinkles, or a dusting of powdered sugar, if desired.
Notes
- Experiment with different types of chocolate chips! Try using white chocolate chips, peanut butter chips, or even chopped nuts.
- Add a tablespoon of chopped walnuts, pecans, or almonds to the cookie dough for a nutty crunch.
- Add 1/2 teaspoon of instant espresso powder to the brownie batter for a mocha flavor.
- Drizzle salted caramel sauce over the brookie after baking for a decadent treat.
- Add an extra tablespoon of cocoa powder to the brownie batter for an even richer chocolate flavor.
- Substitute the butter with vegan butter, the egg yolk with applesauce (about 2 tablespoons), and the milk with plant-based milk. Make sure your chocolate chips are also vegan-friendly.
- Substitute the all-purpose flour with a gluten-free all-purpose flour blend. You may need to add a little extra liquid to the batter to achieve the right consistency.
- Overbaking will result in a dry brookie. It’s better to underbake it slightly than to overbake it. The center should still be slightly soft and gooey.
- The quality of your ingredients will affect the taste of your brookie. Use good quality butter, chocolate, and cocoa powder for the best results.
- If you prefer a less sweet brookie, you can reduce the amount of sugar in both the cookie dough and the brownie batter.

Leave a Comment