
Sourdough bread: the mere mention of it conjures images of crusty loaves, tangy aromas, and the satisfying chew of a perfectly fermented crumb. Have you ever dreamt of baking your own? Imagine pulling a warm, golden-brown loaf from your oven, the scent filling your kitchen with a comforting, rustic fragrance. It’s more attainable than you think!
Sourdough isn’t just bread; it’s a culinary legacy. Its history stretches back thousands of years, predating commercial yeast. Ancient Egyptians are believed to have stumbled upon the magic of wild yeast and bacteria, creating a naturally leavened bread that sustained civilizations. From the gold rush era in San Francisco, where it became a staple, to its modern-day resurgence, sourdough bread has always held a special place in our hearts (and stomachs!).
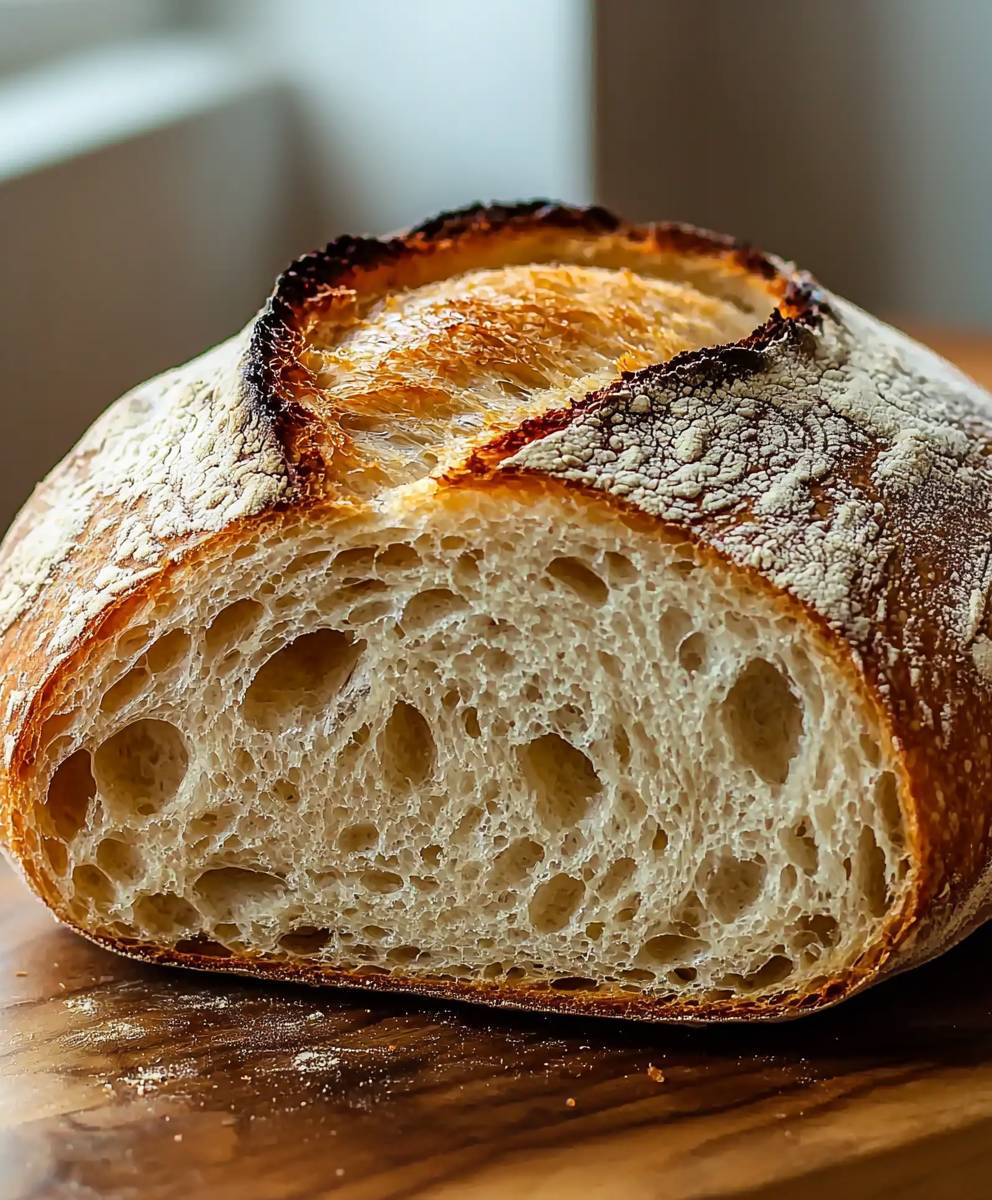
But what makes sourdough so irresistible? It’s the complex flavor, a delightful dance of tangy and subtly sweet notes that you simply can’t find in commercially produced bread. The crust boasts a satisfying crunch, giving way to a soft, airy interior with those characteristic irregular holes. Beyond the taste, sourdough is also easier to digest for some people, thanks to the fermentation process that breaks down gluten. And let’s be honest, there’s a certain satisfaction in creating something so delicious and wholesome from scratch. So, are you ready to embark on your sourdough journey? Let’s get baking!

Ingredients:
- 500g Strong Bread Flour (high protein content is key!)
- 350g Water (lukewarm, around 85-90°F)
- 100g Active Sourdough Starter (100% hydration)
- 10g Salt (sea salt or kosher salt preferred)
- Optional: 2 tablespoons olive oil (for a slightly softer crust)
Preparing the Levain (Optional but Recommended):
While not strictly necessary, preparing a levain the night before really enhances the flavor and texture of your sourdough. Think of it as giving your starter a little boost!
- Combine Levain Ingredients: In a small bowl, mix together 50g of your active sourdough starter, 50g of strong bread flour, and 50g of lukewarm water.
- Mix Well: Stir until everything is well combined and you have a smooth, slightly thick mixture.
- Cover and Ferment: Cover the bowl loosely with plastic wrap or a lid and let it sit at room temperature (ideally around 70-75°F) for 4-6 hours, or overnight. You’ll know it’s ready when it has doubled in size and is bubbly and active.
Mixing the Dough:
Now for the fun part! Getting your hands (or a stand mixer) dirty and creating that beautiful dough.
- Autolyse (Optional but Highly Recommended): In a large bowl (or the bowl of your stand mixer), combine the 500g of strong bread flour and 300g of the lukewarm water. Mix with your hands or a spatula until just combined you don’t want to overmix it at this stage. The mixture will be shaggy. Cover the bowl and let it rest for 30-60 minutes. This process, called autolysing, allows the flour to fully hydrate, which will result in a more extensible and easier-to-handle dough.
- Add Starter and Remaining Water: After the autolyse, add the 100g of active sourdough starter (or the levain you prepared) and the remaining 50g of lukewarm water to the bowl.
- Mix Thoroughly: Using your hands, a spatula, or the dough hook attachment of your stand mixer, mix the ingredients together until well combined. This will take a few minutes. The dough will still be quite shaggy and sticky at this point don’t worry, that’s normal!
- Add Salt: Add the 10g of salt to the dough.
- Mix Again: Continue mixing for another 5-7 minutes, until the dough starts to come together and becomes smoother. If using a stand mixer, mix on low speed. The dough should still be slightly sticky, but it should be pulling away from the sides of the bowl. If you’re using olive oil, add it now and mix until incorporated.
Bulk Fermentation (First Rise):
This is where the magic happens! The bulk fermentation is the period where the dough develops its flavor and structure.
- Transfer to a Clean Bowl: Transfer the dough to a clean, lightly oiled bowl. This will prevent it from sticking.
- Stretch and Folds (Every 30-45 Minutes for 2-3 Hours): For the next 2-3 hours, perform stretch and folds every 30-45 minutes. To do a stretch and fold, gently grab one side of the dough, stretch it upwards, and fold it over onto itself. Rotate the bowl 90 degrees and repeat. Do this until you’ve stretched and folded all four sides of the dough. This helps to develop strength and structure in the dough.
- Rest and Rise: After the stretch and folds, let the dough rest and rise for the remainder of the bulk fermentation. The total bulk fermentation time will depend on the temperature of your kitchen and the activity of your starter. Aim for the dough to increase in volume by about 50-75%. This could take anywhere from 4-6 hours, or even longer in a cooler environment. Look for signs of activity, such as bubbles on the surface of the dough.
Shaping the Dough:
Time to shape your dough into a beautiful loaf!
- Gently Turn Out the Dough: Lightly flour your work surface and gently turn the dough out of the bowl. Be careful not to deflate it too much.
- Pre-Shape (Optional): Gently pat the dough into a rough rectangle. Fold the top third of the dough down towards the center, and then fold the bottom third up towards the center. Gently flip the dough over and round it into a ball. Let it rest for 15-20 minutes. This allows the gluten to relax and makes the final shaping easier.
- Final Shape: After the rest, gently pat the dough into a rectangle again. Fold the top third of the dough down towards the center, and then fold the bottom third up towards the center. Roll the dough tightly towards you, creating a tight seam. Pinch the seam closed.
- Place in Banneton Basket: Lightly flour a banneton basket (or a bowl lined with a floured kitchen towel). Place the shaped dough seam-side up in the basket.
Proofing (Second Rise):
The final rise before baking. This can be done in the refrigerator for a longer, slower rise, or at room temperature for a faster rise.
- Cold Proof (Recommended): Cover the banneton basket with plastic wrap or a damp towel and place it in the refrigerator for 12-24 hours. This slow, cold proof develops a more complex flavor and makes the dough easier to score.
- Room Temperature Proof (Faster): If you prefer a faster proof, cover the banneton basket and let it sit at room temperature for 1-3 hours, or until the dough has increased in size by about 50%. Be careful not to over-proof the dough, as it will be difficult to score and may collapse in the oven.
Baking the Bread:
The moment of truth! Baking your sourdough to golden perfection.
- Preheat Oven and Dutch Oven: Preheat your oven to 450°F (232°C) with a Dutch oven inside. It’s crucial that the Dutch oven is very hot before you put the dough in, as this creates steam that helps the bread rise and develop a crispy crust. Let the Dutch oven preheat for at least 30 minutes.
- Score the Dough: Carefully remove the hot Dutch oven from the oven. Remove the lid. Gently turn the dough out of the banneton basket and into the Dutch oven. Use a sharp knife or lame to score the top of the dough. Scoring allows the bread to expand properly in the oven and also creates a beautiful design. A simple straight line or a cross is a good starting point.
- Cover and Bake: Cover the Dutch oven with the lid and bake for 20 minutes.
- Uncover and Bake: Remove the lid and continue baking for another 25-35 minutes, or until the bread is a deep golden brown and the internal temperature reaches 205-210°F (96-99°C).
- Cool Completely: Carefully remove the bread from the Dutch oven and let it cool completely on a wire rack before slicing and enjoying. This is crucial! Cutting into the bread while it’s still warm will result in a gummy texture.
Troubleshooting Tips:
My dough is too sticky:
Sourdough can be a sticky dough, especially with higher hydration. Make sure you’re using enough flour on your work surface and when handling the dough. Also, resist the urge to add more flour during mixing, as this can result in a dry loaf. Trust the process and the dough will become more manageable as it ferments.
My bread is flat:
A flat loaf can be caused by several factors, including a weak starter, over-proofing, or under-proofing. Make sure your starter is active and bubbly before using it. Pay close attention to the bulk fermentation and proofing times, and adjust them based on the temperature of your kitchen. Scoring the dough deeply enough is also important for allowing it to expand properly.
My crust is too hard:
Baking in a Dutch oven helps to create a crispy crust, but it can sometimes be too hard. Try reducing the baking time with the lid on, or lowering the oven temperature slightly. You can also try tenting the bread with foil during the last few
Conclusion:
So, there you have it! This sourdough bread recipe isn’t just another bread recipe; it’s an experience. It’s about connecting with the process, nurturing your starter, and ultimately, creating something truly special with your own two hands. The tangy aroma that fills your kitchen as it bakes, the satisfying crackle of the crust as you slice into it, and the chewy, flavorful crumb it all adds up to a loaf that’s simply irresistible. I truly believe that once you taste homemade sourdough, you’ll never go back to store-bought again!
But why is this recipe a must-try, you ask? Well, beyond the incredible flavor and texture, it’s about the satisfaction of knowing exactly what goes into your food. No preservatives, no artificial flavors, just simple, wholesome ingredients transformed into something extraordinary. Plus, the active cultures in sourdough are known to be easier to digest than commercially produced bread, making it a healthier choice for you and your family.
Now, let’s talk serving suggestions! A thick slice of this sourdough, toasted and slathered with butter, is a classic for a reason. But don’t stop there! It’s fantastic for sandwiches think grilled cheese, BLTs, or even a gourmet turkey and cranberry creation. Use it to make croutons for your favorite salad, or cube it up for a hearty bread pudding. And of course, it’s the perfect accompaniment to a bowl of soup or stew, soaking up all those delicious flavors.
Feeling adventurous? Here are a few variations you might want to try. Add a handful of chopped rosemary and a sprinkle of sea salt to the dough for an herby, aromatic loaf. Or, incorporate some roasted garlic for a savory twist. For a sweeter option, try adding a handful of dried cranberries and walnuts. The possibilities are truly endless! You can even experiment with different types of flour, like whole wheat or rye, to create your own unique sourdough bread masterpiece.
Don’t be intimidated by the process! While sourdough baking does require a bit of patience and attention, it’s incredibly rewarding. And remember, even if your first loaf isn’t perfect, it will still be delicious. Every bake is a learning experience, and with a little practice, you’ll be churning out beautiful, crusty loaves in no time.
I’m so excited for you to embark on your sourdough journey! I truly believe that this recipe will become a staple in your kitchen. So, gather your ingredients, fire up your oven, and get ready to experience the magic of homemade sourdough. And most importantly, don’t forget to have fun! Baking should be a joyful and relaxing experience.
I can’t wait to hear about your results! Please, please, please come back and share your experience in the comments below. Tell me about your successes, your challenges, and any variations you tried. I’m always eager to learn from fellow bakers and see what creative twists you put on this recipe. Happy baking, and enjoy your delicious, homemade sourdough bread!
And one last thing: don’t forget to tag me in your photos on social media! I’d love to see your beautiful loaves and share them with the world. Let’s spread the sourdough love!
Sourdough Bread: The Ultimate Guide to Baking Delicious Loaves
Classic sourdough bread with tangy flavor and chewy texture, baked to golden perfection in a Dutch oven.
Ingredients
- 500g Strong Bread Flour (high protein content)
- 350g Water (lukewarm, 85-90°F)
- 100g Active Sourdough Starter (100% hydration)
- 10g Salt (sea salt or kosher salt)
- Optional: 2 tablespoons olive oil (for a softer crust)
Instructions
- Combine 50g active starter, 50g bread flour, and 50g lukewarm water in a small bowl.
- Mix well until smooth.
- Cover and ferment at room temperature (70-75°F) for 4-6 hours or overnight, until doubled and bubbly.
- Combine 500g flour and 300g lukewarm water in a large bowl. Mix until just combined. Cover and rest for 30-60 minutes.
- Add 100g active starter (or levain) and remaining 50g lukewarm water to the bowl.
- Mix thoroughly with hands, spatula, or dough hook until well combined (a few minutes).
- Add 10g salt.
- Mix again for 5-7 minutes until dough starts to come together and becomes smoother. If using olive oil, add it now and mix until incorporated.
- Transfer dough to a clean, lightly oiled bowl.
- Grab one side of the dough, stretch it upwards, and fold it over onto itself. Rotate the bowl 90 degrees and repeat. Do this until you’ve stretched and folded all four sides of the dough.
- Rest and rise for the remainder of the bulk fermentation. Aim for a 50-75% increase in volume (4-6 hours or longer, depending on temperature).
- Lightly flour your work surface and gently turn the dough out of the bowl.
- Gently pat the dough into a rough rectangle. Fold the top third of the dough down towards the center, and then fold the bottom third up towards the center. Gently flip the dough over and round it into a ball. Let it rest for 15-20 minutes.
- After the rest, gently pat the dough into a rectangle again. Fold the top third of the dough down towards the center, and then fold the bottom third up towards the center. Roll the dough tightly towards you, creating a tight seam. Pinch the seam closed.
- Lightly flour a banneton basket (or a bowl lined with a floured kitchen towel). Place the shaped dough seam-side up in the basket.
- Cover the banneton basket with plastic wrap or a damp towel and place it in the refrigerator for 12-24 hours.
- If you prefer a faster proof, cover the banneton basket and let it sit at room temperature for 1-3 hours, or until the dough has increased in size by about 50%. Be careful not to over-proof the dough, as it will be difficult to score and may collapse in the oven.
- Preheat oven to 450°F (232°C) with a Dutch oven inside for at least 30 minutes.
- Carefully remove the hot Dutch oven from the oven. Remove the lid. Gently turn the dough out of the banneton basket and into the Dutch oven.
- Score the top of the dough with a sharp knife or lame.
- Cover and bake for 20 minutes.
- Uncover and bake for another 25-35 minutes, or until deep golden brown and internal temperature reaches 205-210°F (96-99°C).
- Cool completely on a wire rack before slicing.
Notes
- High protein bread flour is essential for good structure.
- Lukewarm water helps activate the starter.
- Autolysing improves dough extensibility.
- Stretch and folds develop dough strength.
- Bulk fermentation time varies depending on temperature and starter activity.
- Cold proofing enhances flavor and scoring.
- A hot Dutch oven creates steam for a crispy crust.
- Cooling completely prevents a gummy texture.


Leave a Comment