
Gourmand chocolate cake, a phrase that whispers promises of decadent indulgence and pure chocolate bliss. Have you ever craved a dessert so intensely chocolatey that it borders on sinful? A cake so rich and moist that each bite is a journey to chocolate heaven? Then look no further, because this recipe is about to become your new obsession.
Chocolate cake, in its various forms, has been a beloved dessert for centuries. While the exact origins are debated, the rise of chocolate cake popularity can be traced back to the 19th century with advancements in cocoa processing. It quickly became a staple in bakeries and home kitchens alike, evolving into countless variations to suit every palate. Our gourmand chocolate cake recipe takes inspiration from classic techniques, but elevates the experience with carefully selected ingredients and a focus on achieving the ultimate texture and flavor.
What makes chocolate cake so universally adored? It’s the perfect combination of comforting familiarity and luxurious indulgence. The deep, satisfying flavor of chocolate, the tender crumb, and the endless possibilities for customization from frostings to fillings make it a crowd-pleaser for any occasion. This particular recipe is designed to be exceptionally moist and intensely flavored, making it a truly unforgettable treat. Get ready to experience chocolate cake like never before!

Ingredients:
- For the Cake:
- 2 cups (250g) all-purpose flour
- 2 cups (400g) granulated sugar
- ¾ cup (75g) unsweetened cocoa powder
- 1 ½ teaspoons baking powder
- 1 ½ teaspoons baking soda
- 1 teaspoon salt
- 1 cup (240ml) buttermilk
- ½ cup (120ml) vegetable oil
- 2 large eggs
- 2 teaspoons vanilla extract
- 1 cup (240ml) boiling water
- 2 ounces (57g) bittersweet chocolate, finely chopped
- For the Chocolate Ganache:
- 1 ½ cups (360ml) heavy cream
- 12 ounces (340g) bittersweet chocolate, finely chopped
- 2 tablespoons unsalted butter, softened
- 1 teaspoon vanilla extract
- Pinch of salt
- For the Chocolate Buttercream (Optional):
- 1 cup (2 sticks) unsalted butter, softened
- 3 cups (360g) powdered sugar
- ½ cup (50g) unsweetened cocoa powder
- ¼ cup (60ml) milk or heavy cream
- 1 teaspoon vanilla extract
- Pinch of salt
- Optional Decorations:
- Chocolate shavings
- Fresh berries (raspberries, strawberries)
- Cocoa powder for dusting
- Edible gold leaf
Preparing the Cake Batter:
- Preheat and Prepare: First things first, preheat your oven to 350°F (175°C). Grease and flour two 9-inch round cake pans. I like to use baking spray with flour already in it for extra insurance against sticking. You can also line the bottom of the pans with parchment paper rounds for easy removal.
- Combine Dry Ingredients: In a large bowl, whisk together the flour, sugar, cocoa powder, baking powder, baking soda, and salt. Make sure everything is evenly distributed this will help your cake rise beautifully.
- Add Wet Ingredients: In a separate bowl, whisk together the buttermilk, oil, eggs, and vanilla extract. Whisk until well combined and the mixture is smooth.
- Combine Wet and Dry: Gradually add the wet ingredients to the dry ingredients, mixing on low speed with an electric mixer until just combined. Be careful not to overmix! Overmixing can lead to a tough cake.
- Add Boiling Water and Chocolate: Gradually pour in the boiling water while mixing on low speed. The batter will be very thin don’t worry, that’s normal! Stir in the finely chopped bittersweet chocolate until it’s evenly distributed throughout the batter. The hot water will help bloom the cocoa powder and intensify the chocolate flavor.
- Divide and Bake: Divide the batter evenly between the prepared cake pans. Bake for 30-35 minutes, or until a wooden skewer inserted into the center comes out clean or with a few moist crumbs attached.
- Cool the Cakes: Let the cakes cool in the pans for 10-15 minutes before inverting them onto a wire rack to cool completely. Make sure the cakes are completely cool before frosting. This is crucial to prevent the frosting from melting.
Making the Chocolate Ganache:
- Heat the Cream: In a saucepan, heat the heavy cream over medium heat until it just begins to simmer. Do not let it boil!
- Pour Over Chocolate: Remove the saucepan from the heat and pour the hot cream over the finely chopped bittersweet chocolate in a heatproof bowl.
- Let it Sit: Let the mixture sit for 1-2 minutes to allow the heat from the cream to melt the chocolate.
- Whisk Until Smooth: Gently whisk the mixture together, starting from the center and working your way outwards, until the chocolate is completely melted and the ganache is smooth and glossy.
- Add Butter and Vanilla: Stir in the softened butter, vanilla extract, and a pinch of salt. The butter will add richness and shine to the ganache.
- Cool Slightly: Let the ganache cool slightly at room temperature for about 30 minutes, or until it thickens to a spreadable consistency. You can also refrigerate it for a shorter period, but be sure to check it frequently and stir it occasionally to prevent it from becoming too firm.
Preparing the Chocolate Buttercream (Optional):
- Cream the Butter: In a large bowl, beat the softened butter with an electric mixer until it is light and fluffy. This usually takes about 3-5 minutes.
- Add Powdered Sugar and Cocoa: Gradually add the powdered sugar and cocoa powder to the butter, mixing on low speed until combined. Be careful not to add too much powdered sugar at once, or it will create a cloud of dust!
- Add Milk and Vanilla: Gradually add the milk or heavy cream and vanilla extract, mixing on low speed until the buttercream reaches your desired consistency. Add more liquid if needed to achieve a smooth and creamy texture.
- Beat Until Fluffy: Increase the mixer speed to medium-high and beat the buttercream for 2-3 minutes, or until it is light and fluffy.
Assembling the Cake:
- Level the Cakes (Optional): If your cakes have a dome on top, use a serrated knife to carefully level them. This will ensure that your cake is even and stable.
- Place First Layer: Place one cake layer on a serving plate or cake stand.
- Frost with Ganache or Buttercream: Spread a generous layer of chocolate ganache or chocolate buttercream evenly over the first cake layer.
- Add Second Layer: Carefully place the second cake layer on top of the frosted first layer.
- Frost the Entire Cake: Frost the top and sides of the cake with the remaining chocolate ganache or chocolate buttercream. You can create a smooth finish or add decorative swirls with a spatula or piping bag.
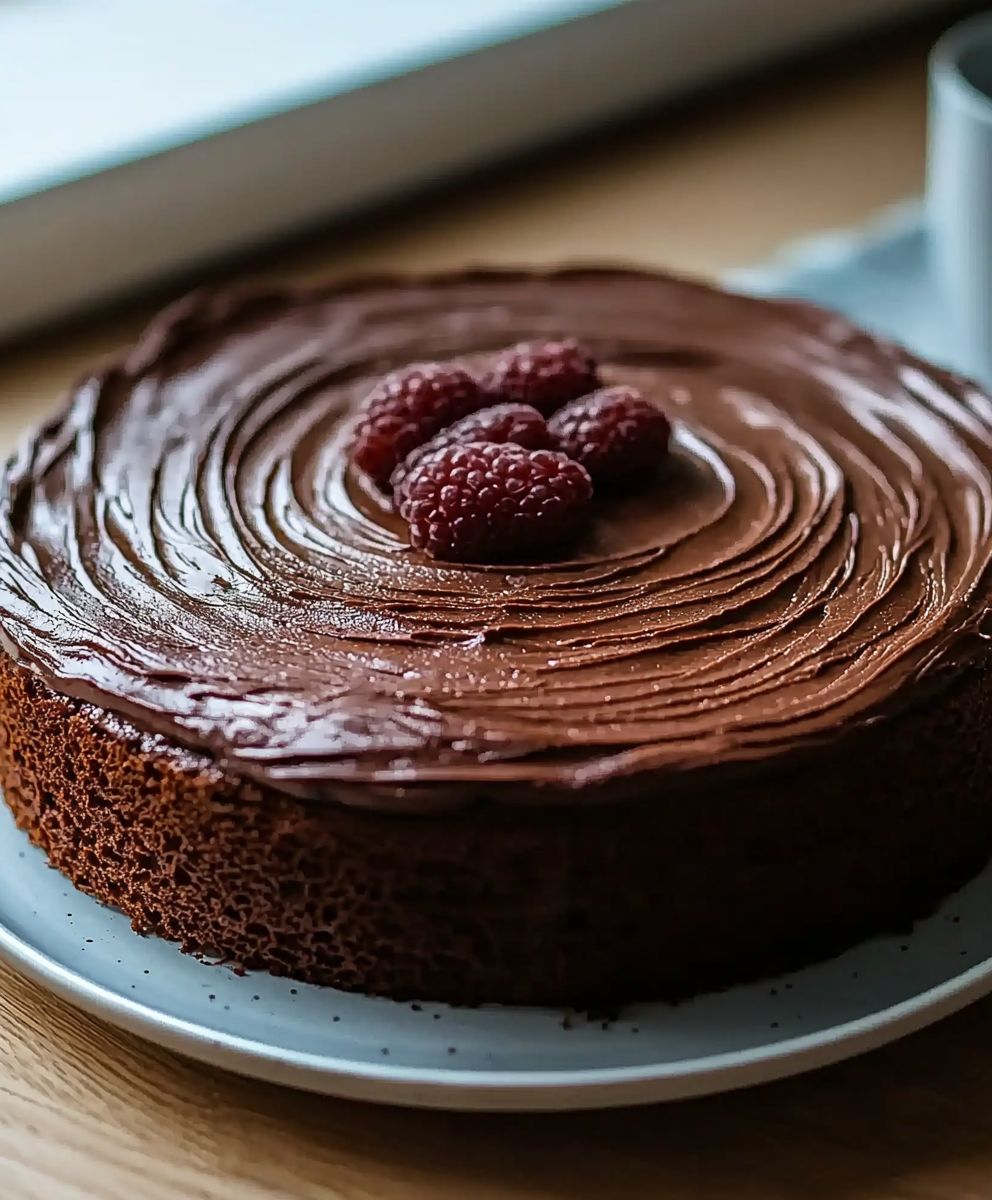
- Decorate (Optional): Decorate the cake with chocolate shavings, fresh berries, a dusting of cocoa powder, or edible gold leaf. Get creative and have fun!
- Chill (Optional): Refrigerate the cake for at least 30 minutes to allow the frosting to set before serving. This will make it easier to slice and serve.
- Serve and Enjoy: Slice the cake and serve. This gourmand chocolate cake is best enjoyed with a glass of milk, a cup of coffee, or a scoop of vanilla ice cream.
Tips for Success:
- Use High-Quality Chocolate: The quality of your chocolate will directly impact the flavor of your cake and ganache. Use a good quality bittersweet chocolate for the best results.
- Don’t Overbake: Overbaking will result in a dry cake. Check the cakes frequently during baking and remove them from the oven as soon as a wooden skewer inserted into the center comes out clean or with a few moist crumbs attached.
- Cool Completely: Make sure the cakes are completely cool before frosting. This will prevent the frosting from melting and sliding off the cake.
- Adjust Sweetness: If you prefer a less sweet cake, you can reduce the amount of sugar in the cake batter or ganache.
- Make Ahead: The cake layers can be baked ahead of time and stored in the refrigerator for up to 2 days. The ganache can also be made ahead of time and stored in the refrigerator for up to 1 week. Bring the ganache to room temperature before using.
- Experiment with Flavors: Feel free to add other flavors to the cake or ganache, such as espresso powder, orange zest, or a liqueur like Kahlua or Grand Marnier.
Variations:
- Chocolate Raspberry Cake: Add fresh raspberries to the cake batter or between the layers of frosting for a delicious chocolate raspberry flavor combination.
- Chocolate Peanut Butter Cake: Swirl peanut butter into the chocolate buttercream for a decadent chocolate peanut butter cake.
- Chocolate Mint Cake: Add peppermint extract to the chocolate buttercream for a refreshing chocolate mint cake.
- Triple Chocolate Cake: Use milk chocolate and white chocolate in addition to bittersweet chocolate for a triple chocolate extravaganza.
Conclusion:
So there you have it! This gourmand chocolate cake isn’t just another dessert; it’s an experience. From the rich, decadent aroma that fills your kitchen as it bakes to the unbelievably moist and fudgy texture that melts in your mouth, every element of this cake is designed to impress. It’s the kind of cake that makes you close your eyes and savor every single bite. I truly believe this recipe is a must-try for any chocolate lover, whether you’re a seasoned baker or just starting out. The steps are straightforward, the ingredients are readily available, and the result is simply divine.
But don’t just take my word for it! I encourage you to whip up this masterpiece yourself and discover the magic firsthand. Imagine serving a slice of this gourmand chocolate cake warm with a scoop of vanilla bean ice cream the contrast of temperatures and textures is heavenly. Or, for an extra touch of elegance, dust it with a light coating of powdered sugar and garnish with fresh raspberries. The possibilities are endless!
Looking for variations? You could easily add a layer of chocolate ganache on top for an even more intense chocolate experience. Simply melt equal parts of heavy cream and chocolate chips, let it cool slightly, and pour it over the cooled cake. Alternatively, consider incorporating a hint of espresso powder into the batter to enhance the chocolate flavor. A swirl of peanut butter throughout the batter before baking would also be a delicious addition for peanut butter chocolate lovers. For a festive touch, try adding chopped peppermint candies to the batter during the holiday season.
And if you’re feeling adventurous, why not try making mini gourmand chocolate cakes in muffin tins? These individual treats are perfect for parties or for portion control (though I can’t guarantee you’ll only eat one!). Just adjust the baking time accordingly, checking for doneness with a toothpick.
I’ve poured my heart and soul into perfecting this recipe, and I’m confident that it will become a staple in your baking repertoire. It’s perfect for birthdays, anniversaries, holidays, or simply a special treat for yourself. After all, everyone deserves a little bit of indulgence now and then, right?
I’m so excited for you to try this recipe and experience the joy of baking (and eating!) this incredible gourmand chocolate cake. Once you’ve had a chance to bake it, please, please, please share your experience with me! I’d love to hear about any variations you tried, how your family and friends enjoyed it, and any tips or tricks you discovered along the way. You can leave a comment below, tag me on social media, or even send me an email. I truly value your feedback and can’t wait to see your creations! Happy baking! Let me know if you have any questions, and I’ll do my best to help. Enjoy!
Gourmand Chocolate Cake: A Decadent Recipe You'll Love
Decadent and moist chocolate cake with rich chocolate ganache frosting. Optional chocolate buttercream and decorations make this cake perfect for any celebration.
Ingredients
- 2 cups (250g) all-purpose flour
- 2 cups (400g) granulated sugar
- ¾ cup (75g) unsweetened cocoa powder
- 1 ½ teaspoons baking powder
- 1 ½ teaspoons baking soda
- 1 teaspoon salt
- 1 cup (240ml) buttermilk
- ½ cup (120ml) vegetable oil
- 2 large eggs
- 2 teaspoons vanilla extract
- 1 cup (240ml) boiling water
- 2 ounces (57g) bittersweet chocolate, finely chopped
- 1 ½ cups (360ml) heavy cream
- 12 ounces (340g) bittersweet chocolate, finely chopped
- 2 tablespoons unsalted butter, softened
- 1 teaspoon vanilla extract
- Pinch of salt
- 1 cup (2 sticks) unsalted butter, softened
- 3 cups (360g) powdered sugar
- ½ cup (50g) unsweetened cocoa powder
- ¼ cup (60ml) milk or heavy cream
- 1 teaspoon vanilla extract
- Pinch of salt
- Chocolate shavings
- Fresh berries (raspberries, strawberries)
- Cocoa powder for dusting
- Edible gold leaf
Instructions
- Preheat and Prepare: Preheat your oven to 350°F (175°C). Grease and flour two 9-inch round cake pans. You can also line the bottom of the pans with parchment paper rounds for easy removal.
- Combine Dry Ingredients: In a large bowl, whisk together the flour, sugar, cocoa powder, baking powder, baking soda, and salt.
- Add Wet Ingredients: In a separate bowl, whisk together the buttermilk, oil, eggs, and vanilla extract. Whisk until well combined and the mixture is smooth.
- Combine Wet and Dry: Gradually add the wet ingredients to the dry ingredients, mixing on low speed with an electric mixer until just combined. Be careful not to overmix!
- Add Boiling Water and Chocolate: Gradually pour in the boiling water while mixing on low speed. The batter will be very thin don’t worry, that’s normal! Stir in the finely chopped bittersweet chocolate until it’s evenly distributed throughout the batter.
- Divide and Bake: Divide the batter evenly between the prepared cake pans. Bake for 30-35 minutes, or until a wooden skewer inserted into the center comes out clean or with a few moist crumbs attached.
- Cool the Cakes: Let the cakes cool in the pans for 10-15 minutes before inverting them onto a wire rack to cool completely. Make sure the cakes are completely cool before frosting.
- Heat the Cream: In a saucepan, heat the heavy cream over medium heat until it just begins to simmer. Do not let it boil!
- Pour Over Chocolate: Remove the saucepan from the heat and pour the hot cream over the finely chopped bittersweet chocolate in a heatproof bowl.
- Let it Sit: Let the mixture sit for 1-2 minutes to allow the heat from the cream to melt the chocolate.
- Whisk Until Smooth: Gently whisk the mixture together, starting from the center and working your way outwards, until the chocolate is completely melted and the ganache is smooth and glossy.
- Add Butter and Vanilla: Stir in the softened butter, vanilla extract, and a pinch of salt.
- Cool Slightly: Let the ganache cool slightly at room temperature for about 30 minutes, or until it thickens to a spreadable consistency. You can also refrigerate it for a shorter period, but be sure to check it frequently and stir it occasionally to prevent it from becoming too firm.
- Cream the Butter: In a large bowl, beat the softened butter with an electric mixer until it is light and fluffy. This usually takes about 3-5 minutes.
- Add Powdered Sugar and Cocoa: Gradually add the powdered sugar and cocoa powder to the butter, mixing on low speed until combined.
- Add Milk and Vanilla: Gradually add the milk or heavy cream and vanilla extract, mixing on low speed until the buttercream reaches your desired consistency. Add more liquid if needed to achieve a smooth and creamy texture.
- Beat Until Fluffy: Increase the mixer speed to medium-high and beat the buttercream for 2-3 minutes, or until it is light and fluffy.
- Level the Cakes (Optional): If your cakes have a dome on top, use a serrated knife to carefully level them.
- Place First Layer: Place one cake layer on a serving plate or cake stand.
- Frost with Ganache or Buttercream: Spread a generous layer of chocolate ganache or chocolate buttercream evenly over the first cake layer.
- Add Second Layer: Carefully place the second cake layer on top of the frosted first layer.
- Frost the Entire Cake: Frost the top and sides of the cake with the remaining chocolate ganache or chocolate buttercream. You can create a smooth finish or add decorative swirls with a spatula or piping bag.
- Decorate (Optional): Decorate the cake with chocolate shavings, fresh berries, a dusting of cocoa powder, or edible gold leaf.
- Chill (Optional): Refrigerate the cake for at least 30 minutes to allow the frosting to set before serving.
- Serve and Enjoy: Slice the cake and serve.
Notes
- Use high-quality bittersweet chocolate for the best flavor.
- Don’t overbake the cake, or it will be dry.
- Cool the cakes completely before frosting to prevent melting.
- Adjust the sweetness to your preference by reducing sugar.
- Cake layers and ganache can be made ahead of time.
- Experiment with flavors like espresso, orange zest, or liqueurs.