
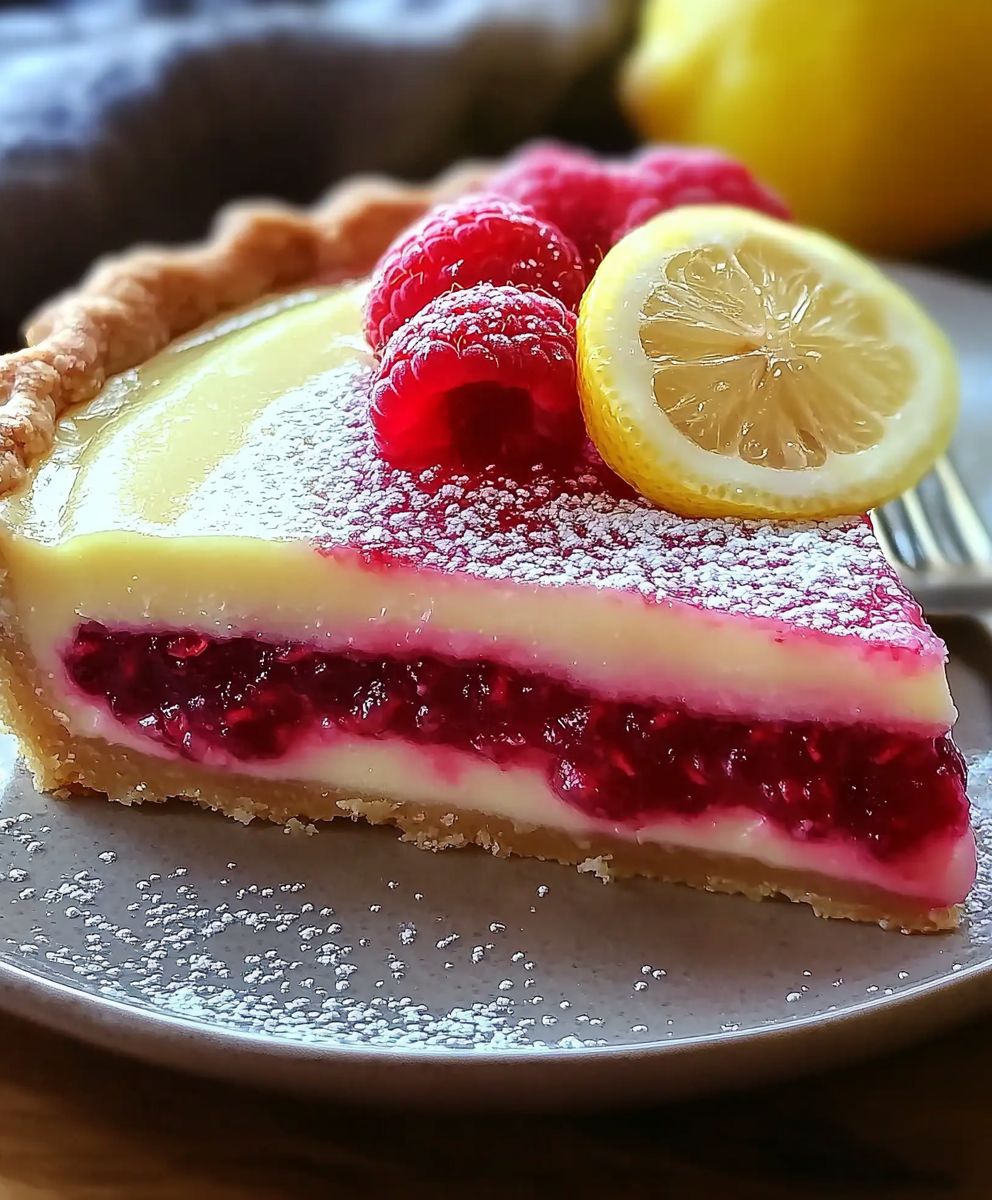
Lemon Raspberry Pie: just the name conjures images of sunshine, summer breezes, and a dessert that’s both tart and sweet in perfect harmony. Imagine sinking your fork into a flaky, golden crust, followed by a burst of tangy lemon curd studded with juicy, ruby-red raspberries. It’s a flavor explosion that will leave you craving more!
While the exact origins of fruit pies are debated, the combination of citrus and berries has been a culinary delight for centuries. Lemons, though not native to colder climates, became prized ingredients, adding a bright counterpoint to richer flavors. Raspberries, with their delicate sweetness, provide the perfect complement. Together, they create a symphony of taste that’s both refreshing and comforting.
What makes Lemon Raspberry Pie so irresistible? It’s the delightful contrast of textures the crisp crust, the smooth, creamy lemon filling, and the soft, yielding raspberries. It’s also incredibly versatile. Perfect for a summer picnic, an elegant dinner party, or simply a well-deserved treat on a rainy afternoon. The bright, zesty flavor is a guaranteed mood booster, and the beautiful presentation makes it a show-stopping dessert that’s sure to impress. So, let’s get baking and create this unforgettable pie together!

Ingredients:
- For the Crust:
- 1 ½ cups all-purpose flour
- ½ teaspoon salt
- ½ cup (1 stick) cold unsalted butter, cut into cubes
- ¼ cup cold vegetable shortening, cut into cubes
- 5-7 tablespoons ice water
- For the Lemon Filling:
- 1 ½ cups granulated sugar
- ¼ cup cornstarch
- ¼ teaspoon salt
- 1 ½ cups water
- ½ cup fresh lemon juice (from about 3-4 lemons)
- 2 tablespoons lemon zest
- 4 large egg yolks, lightly beaten
- 2 tablespoons unsalted butter
- Yellow food coloring (optional, for a more vibrant color)
- For the Raspberry Layer:
- 1 pint fresh raspberries
- ¼ cup granulated sugar
- 1 tablespoon lemon juice
- 1 tablespoon cornstarch
- For the Topping (Optional):
- Whipped cream or meringue
Preparing the Pie Crust:
- Combine Dry Ingredients: In a large bowl, whisk together the flour and salt. This ensures the salt is evenly distributed throughout the crust, which is crucial for flavor.
- Cut in the Fat: Add the cold butter and shortening to the flour mixture. Using a pastry blender or your fingertips (work quickly to keep the butter cold!), cut the fat into the flour until the mixture resembles coarse crumbs. You should still see small pieces of butter and shortening these are what create flaky layers.
- Add Ice Water: Gradually add the ice water, one tablespoon at a time, mixing gently after each addition. Be careful not to overmix; you want the dough to just come together. The amount of water needed can vary depending on the humidity.
- Form the Dough: Once the dough starts to clump together, gently press it into a disc. Divide the disc in half if you’re making a double-crust pie (we’re only using one crust for this recipe, so keep it as one disc). Wrap the dough tightly in plastic wrap and refrigerate for at least 30 minutes, or up to 2 days. This chilling time allows the gluten to relax, resulting in a more tender crust.
- Roll Out the Dough: On a lightly floured surface, roll out the chilled dough into a circle about 12 inches in diameter. Make sure to rotate the dough frequently and add more flour as needed to prevent sticking.
- Transfer to Pie Plate: Carefully transfer the rolled-out dough to a 9-inch pie plate. Gently press the dough into the bottom and up the sides of the plate.
- Trim and Crimp the Edges: Trim any excess dough from the edges of the pie plate. Crimp the edges using a fork or your fingers to create a decorative border. This also helps to seal the crust and prevent it from shrinking during baking.
- Pre-bake the Crust (Blind Bake): Preheat your oven to 375°F (190°C). Line the pie crust with parchment paper and fill it with pie weights or dried beans. This will prevent the crust from puffing up during baking. Bake for 15-20 minutes, or until the edges are lightly golden brown. Remove the parchment paper and pie weights and bake for another 5-10 minutes, or until the bottom of the crust is also lightly golden brown. Let the crust cool completely before adding the filling.
Making the Lemon Filling:
- Combine Dry Ingredients: In a medium saucepan, whisk together the sugar, cornstarch, and salt. The cornstarch is essential for thickening the lemon filling.
- Add Water and Lemon Juice: Gradually whisk in the water and lemon juice until smooth. Make sure there are no lumps of cornstarch.
- Cook the Mixture: Cook the mixture over medium heat, stirring constantly, until it comes to a boil and thickens. This usually takes about 5-7 minutes. Continue to cook for 1 minute more, stirring constantly, to ensure the cornstarch is fully cooked.
- Temper the Egg Yolks: In a small bowl, whisk the egg yolks lightly. Gradually whisk a small amount of the hot lemon mixture into the egg yolks to temper them. This prevents the eggs from scrambling when added to the hot mixture.
- Add Egg Yolks to the Filling: Pour the tempered egg yolks into the saucepan with the remaining lemon mixture. Cook over low heat, stirring constantly, until the filling thickens slightly and coats the back of a spoon. This should take about 1-2 minutes.
- Remove from Heat: Remove the saucepan from the heat and stir in the butter and lemon zest. The butter adds richness and shine to the filling, while the lemon zest enhances the lemon flavor. If desired, add a few drops of yellow food coloring for a more vibrant color.
- Cool Slightly: Let the lemon filling cool slightly before pouring it into the pre-baked pie crust. This will prevent the crust from becoming soggy.
Preparing the Raspberry Layer:
- Combine Ingredients: In a medium saucepan, combine the fresh raspberries, sugar, lemon juice, and cornstarch.
- Cook the Mixture: Cook over medium heat, stirring constantly, until the raspberries break down and the mixture thickens. This usually takes about 5-7 minutes.
- Cool Slightly: Let the raspberry mixture cool slightly before spreading it over the lemon filling.
Assembling the Pie:
- Pour in Lemon Filling: Pour the slightly cooled lemon filling into the pre-baked pie crust, spreading it evenly.
- Add Raspberry Layer: Gently spoon the slightly cooled raspberry mixture over the lemon filling, spreading it evenly. You can create a swirl pattern by using a knife or toothpick to gently mix the raspberry layer into the lemon filling.
- Chill the Pie: Cover the pie with plastic wrap and refrigerate for at least 4 hours, or preferably overnight, to allow the filling to set completely.
Serving the Pie:
- Add Topping (Optional): Before serving, top the pie with whipped cream or meringue, if desired.
- Slice and Serve: Slice the pie into wedges and serve chilled. Enjoy!
Conclusion:
This Lemon Raspberry Pie isn’t just a dessert; it’s a burst of sunshine and summer berries in every single bite. The tangy lemon curd perfectly complements the sweet-tart raspberries, creating a flavor profile that’s both refreshing and utterly irresistible. I truly believe this pie deserves a spot on your baking bucket list, and here’s why: it’s surprisingly easy to make, even for novice bakers. The crust comes together quickly, and the filling is a simple matter of whisking and simmering. Plus, the vibrant colors of the lemon and raspberries make it a showstopper on any dessert table.
But the real magic lies in the taste. The creamy lemon curd, infused with the bright, zesty flavor of fresh lemons, is a dream. And the raspberries? They add a delightful pop of sweetness and a beautiful textural contrast. It’s a symphony of flavors and textures that will have everyone reaching for a second slice.
Why is this Lemon Raspberry Pie a must-try? Because it’s a guaranteed crowd-pleaser, a delightful treat for any occasion, and a relatively simple recipe that delivers impressive results. It’s the perfect balance of sweet and tart, creamy and fruity, and it’s guaranteed to brighten your day.
Now, let’s talk serving suggestions and variations! While this pie is absolutely divine on its own, a dollop of freshly whipped cream or a scoop of vanilla ice cream elevates it to another level of indulgence. For a more sophisticated touch, try serving it with a sprinkle of toasted almonds or a drizzle of white chocolate.
If you’re feeling adventurous, you can easily adapt this recipe to suit your preferences. Swap out the raspberries for other berries like blueberries, blackberries, or strawberries. Or, add a hint of lavender to the lemon curd for a floral twist. You could even make mini pies or tarts for individual servings. The possibilities are endless!
Here are a few more ideas to get you started:
* Lemon Raspberry Pie Parfaits: Layer crumbled pie crust, lemon curd, and raspberries in a glass for a quick and easy dessert.
* Lemon Raspberry Pie Crumble Bars: Press half of the pie crust into a baking dish, spread with lemon curd and raspberries, then top with the remaining crust crumbled on top. Bake until golden brown.
* Lemon Raspberry Pie Milkshake: Blend a slice of pie with milk, ice cream, and a splash of lemon juice for a decadent milkshake.
I’m so excited for you to try this recipe and experience the joy of baking (and eating!) this incredible pie. I’ve poured my heart into creating a recipe that’s both delicious and accessible, and I truly believe you’ll love it as much as I do.
So, what are you waiting for? Gather your ingredients, preheat your oven, and get ready to bake the most amazing Lemon Raspberry Pie you’ve ever tasted. And when you do, please, please, please share your creations with me! I’d love to see your photos, hear your feedback, and learn about any variations you’ve tried. Tag me on social media or leave a comment below. Happy baking! I can’t wait to hear about your Lemon Raspberry Pie adventures!
Lemon Raspberry Pie: A Delicious & Easy Recipe
Tangy lemon pie with a vibrant raspberry layer in a flaky crust. A refreshing dessert for any occasion.
Ingredients
- 1 ½ cups all-purpose flour
- ½ teaspoon salt
- ½ cup (1 stick) cold unsalted butter, cut into cubes
- ¼ cup cold vegetable shortening, cut into cubes
- 5-7 tablespoons ice water
- 1 ½ cups granulated sugar
- ¼ cup cornstarch
- ¼ teaspoon salt
- 1 ½ cups water
- ½ cup fresh lemon juice (from about 3-4 lemons)
- 2 tablespoons lemon zest
- 4 large egg yolks, lightly beaten
- 2 tablespoons unsalted butter
- Yellow food coloring (optional, for a more vibrant color)
- 1 pint fresh raspberries
- ¼ cup granulated sugar
- 1 tablespoon lemon juice
- 1 tablespoon cornstarch
- Whipped cream or meringue
Instructions
- In a large bowl, whisk together the flour and salt.
- Add the cold butter and shortening to the flour mixture. Using a pastry blender or your fingertips (work quickly to keep the butter cold!), cut the fat into the flour until the mixture resembles coarse crumbs.
- Gradually add the ice water, one tablespoon at a time, mixing gently after each addition. Be careful not to overmix; you want the dough to just come together.
- Once the dough starts to clump together, gently press it into a disc. Wrap the dough tightly in plastic wrap and refrigerate for at least 30 minutes, or up to 2 days.
- On a lightly floured surface, roll out the chilled dough into a circle about 12 inches in diameter.
- Carefully transfer the rolled-out dough to a 9-inch pie plate. Gently press the dough into the bottom and up the sides of the plate.
- Trim any excess dough from the edges of the pie plate. Crimp the edges using a fork or your fingers to create a decorative border.
- Preheat your oven to 375°F (190°C). Line the pie crust with parchment paper and fill it with pie weights or dried beans. Bake for 15-20 minutes, or until the edges are lightly golden brown. Remove the parchment paper and pie weights and bake for another 5-10 minutes, or until the bottom of the crust is also lightly golden brown. Let the crust cool completely before adding the filling.
- In a medium saucepan, whisk together the sugar, cornstarch, and salt.
- Gradually whisk in the water and lemon juice until smooth.
- Cook the mixture over medium heat, stirring constantly, until it comes to a boil and thickens. Continue to cook for 1 minute more, stirring constantly.
- In a small bowl, whisk the egg yolks lightly. Gradually whisk a small amount of the hot lemon mixture into the egg yolks to temper them.
- Pour the tempered egg yolks into the saucepan with the remaining lemon mixture. Cook over low heat, stirring constantly, until the filling thickens slightly and coats the back of a spoon.
- Remove the saucepan from the heat and stir in the butter and lemon zest. If desired, add a few drops of yellow food coloring for a more vibrant color.
- Let the lemon filling cool slightly before pouring it into the pre-baked pie crust.
- In a medium saucepan, combine the fresh raspberries, sugar, lemon juice, and cornstarch.
- Cook over medium heat, stirring constantly, until the raspberries break down and the mixture thickens.
- Let the raspberry mixture cool slightly before spreading it over the lemon filling.
- Pour the slightly cooled lemon filling into the pre-baked pie crust, spreading it evenly.
- Gently spoon the slightly cooled raspberry mixture over the lemon filling, spreading it evenly. You can create a swirl pattern by using a knife or toothpick to gently mix the raspberry layer into the lemon filling.
- Cover the pie with plastic wrap and refrigerate for at least 4 hours, or preferably overnight, to allow the filling to set completely.
- Before serving, top the pie with whipped cream or meringue, if desired.
- Slice the pie into wedges and serve chilled. Enjoy!
Notes
- For the flakiest crust, keep all ingredients cold.
- Don’t overmix the pie dough.
- Blind baking the crust prevents a soggy bottom.
- Chilling the pie completely is essential for a firm filling.
- Feel free to adjust the sweetness of the raspberry layer to your liking.


Leave a Comment