
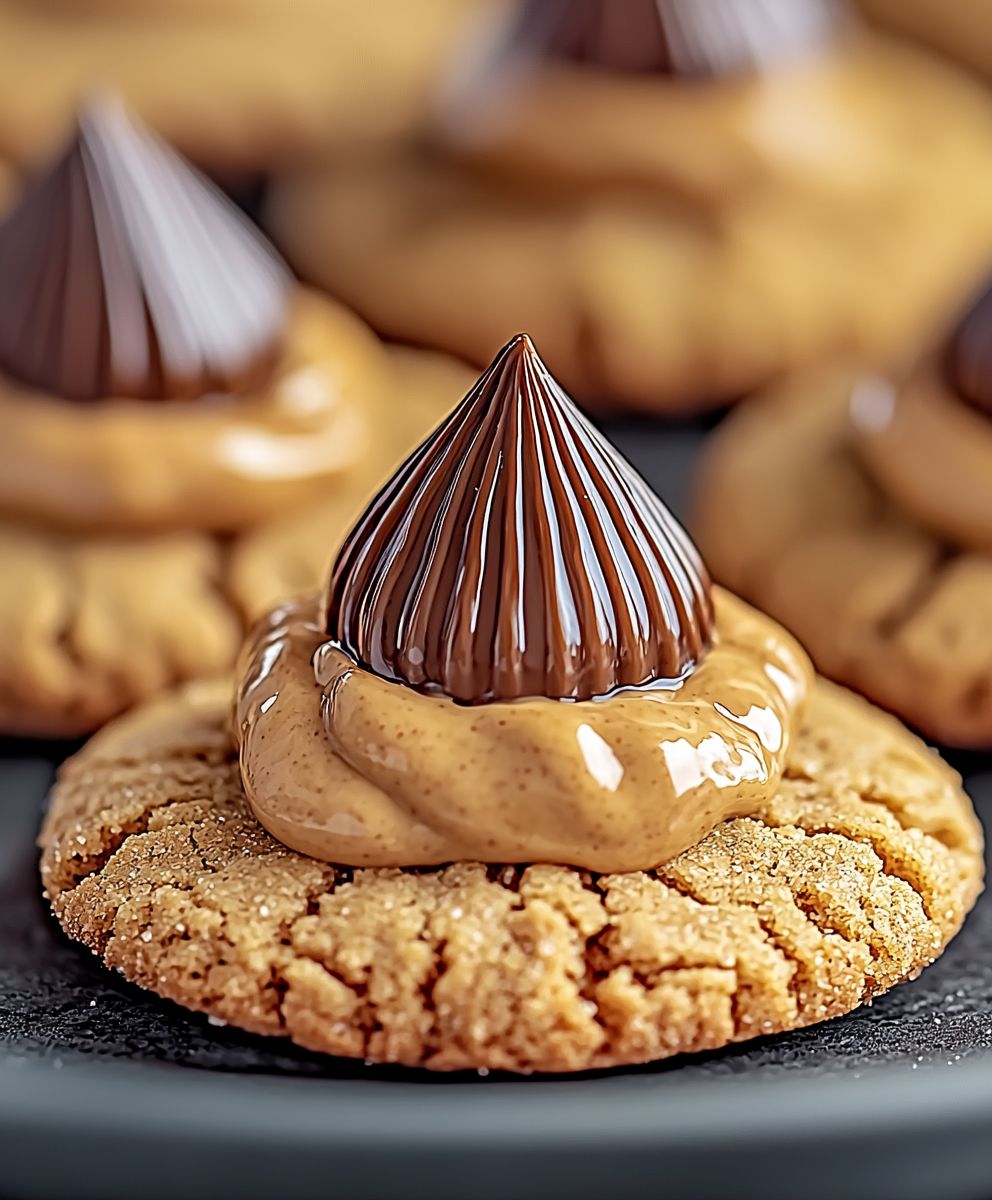
Peanut Butter Kiss Cookies: Is there anything more iconic during the holiday season? These delightful little treats, with their soft, melt-in-your-mouth peanut butter base and a chocolate Hershey’s Kiss nestled perfectly on top, are guaranteed to bring a smile to anyone’s face. I remember as a child, the sheer excitement of helping my grandmother unwrap what seemed like mountains of Hershey’s Kisses, a task almost as fun as actually eating the cookies!
While the exact origins of the Peanut Butter Kiss Cookies are a bit hazy, they gained immense popularity in the mid-20th century, coinciding with the rise of convenience baking and the widespread availability of pre-packaged ingredients. They represent a time of simpler pleasures and homemade goodness, a tradition passed down through generations. But beyond nostalgia, these cookies are simply irresistible. The combination of the salty, nutty peanut butter cookie with the sweet, creamy chocolate is a flavor explosion that’s hard to beat. Plus, their small size makes them perfect for snacking (or, let’s be honest, devouring by the handful!).
What I love most about this recipe is its simplicity. It requires minimal ingredients and is incredibly easy to make, even for novice bakers. Whether you’re looking for a festive treat to share with loved ones or a quick and satisfying dessert for yourself, these cookies are always a winner. So, let’s get baking and create some sweet memories with these classic Peanut Butter Kiss Cookies!

Ingredients:
- 1 ½ cups all-purpose flour
- 1 teaspoon baking soda
- ½ teaspoon baking powder
- ½ cup (1 stick) unsalted butter, softened
- ½ cup creamy peanut butter
- ½ cup granulated sugar
- ½ cup packed light brown sugar
- 1 large egg
- 2 tablespoons milk
- 1 teaspoon vanilla extract
- Approximately 48 Hershey’s Kisses, unwrapped
- Optional: Coarse sugar for sprinkling
Preparing the Dough:
- Combine Dry Ingredients: In a medium bowl, whisk together the flour, baking soda, and baking powder. Make sure everything is evenly distributed. This ensures that the cookies will rise properly and have a good texture. Set this bowl aside for later.
- Cream Butter and Peanut Butter: In a large bowl (or the bowl of your stand mixer), cream together the softened butter and peanut butter until light and fluffy. This usually takes about 2-3 minutes. Scrape down the sides of the bowl occasionally to ensure everything is evenly mixed. The mixture should be smooth and pale in color. Don’t rush this step; it’s crucial for the cookie’s texture.
- Add Sugars: Gradually add the granulated sugar and brown sugar to the butter mixture, beating until well combined. Again, scrape down the sides of the bowl as needed. The mixture should be light and fluffy. The brown sugar adds moisture and chewiness to the cookies, so don’t skip it!
- Incorporate Egg, Milk, and Vanilla: Beat in the egg, then add the milk and vanilla extract. Mix until everything is well combined. The batter might look slightly curdled at this point, but don’t worry; it will come together when you add the dry ingredients.
- Gradually Add Dry Ingredients: Gradually add the dry ingredients to the wet ingredients, mixing on low speed until just combined. Be careful not to overmix the dough, as this can result in tough cookies. Mix until you no longer see streaks of flour. Overmixing develops the gluten in the flour, which can make the cookies hard.
- Chill the Dough: Cover the bowl with plastic wrap and chill the dough in the refrigerator for at least 30 minutes. Chilling the dough helps prevent the cookies from spreading too much during baking and also allows the flavors to meld together. You can chill the dough for longer, even overnight, if you prefer. If chilling overnight, let the dough sit at room temperature for about 15-20 minutes before scooping to make it easier to handle.
Baking the Cookies:
- Preheat Oven and Prepare Baking Sheets: Preheat your oven to 375°F (190°C). Line baking sheets with parchment paper or silicone baking mats. This will prevent the cookies from sticking and make cleanup easier.
- Shape the Dough: Roll the chilled dough into 1-inch balls. You can use a small cookie scoop to ensure uniform size. Place the dough balls on the prepared baking sheets, leaving about 2 inches between each cookie to allow for spreading.
- Optional: Sprinkle with Sugar: If desired, sprinkle the tops of the dough balls with coarse sugar before baking. This adds a nice sparkle and a little extra sweetness.
- Bake the Cookies: Bake for 8-10 minutes, or until the edges are lightly golden brown. The centers of the cookies will still look slightly soft, but they will firm up as they cool. Keep a close eye on them, as baking times can vary depending on your oven.
- Cool Slightly: Remove the baking sheets from the oven and let the cookies cool on the baking sheets for a few minutes before transferring them to a wire rack to cool completely. This helps prevent them from breaking.
Adding the Hershey’s Kisses:
- Press in the Kisses: While the cookies are still warm (but not too hot to handle), gently press a Hershey’s Kiss into the center of each cookie. The heat from the cookie will slightly melt the chocolate, helping it adhere.
- Let Cool Completely: Allow the cookies to cool completely on the wire rack with the Kisses in place. This will allow the chocolate to set properly.
Tips and Variations:
- Peanut Butter Choice: I prefer using creamy peanut butter for these cookies, but you can also use chunky peanut butter for added texture.
- Chocolate Variations: Feel free to experiment with different flavors of Hershey’s Kisses, such as milk chocolate, dark chocolate, or caramel-filled.
- Add-Ins: You can add other ingredients to the dough, such as chocolate chips, chopped nuts, or sprinkles.
- Storage: Store the cookies in an airtight container at room temperature for up to 3 days.
- Freezing: You can freeze the baked cookies for up to 2 months. Let them thaw completely before serving. You can also freeze the dough balls before baking. Place the dough balls on a baking sheet and freeze until solid, then transfer them to a freezer bag. When ready to bake, bake from frozen, adding a few extra minutes to the baking time.
- Preventing Spreading: If your cookies are spreading too much, make sure your butter is not too soft. Also, ensure that you are not overmixing the dough. Chilling the dough for a longer period can also help.
- Soft Cookies: For softer cookies, slightly underbake them. They will continue to cook as they cool.
- Even Baking: Rotate the baking sheets halfway through baking to ensure even baking.
Troubleshooting:
Cookies are too dry:
Make sure you are using the correct amount of butter and sugar. Also, avoid overbaking the cookies.
Cookies are too flat:
Ensure your butter is not too soft. Chilling the dough for a longer period can also help. Make sure your baking powder and baking soda are fresh.
Cookies are too hard:
Avoid overmixing the dough. Also, make sure you are not overbaking the cookies.
Kisses are falling off:
Make sure the cookies are still warm when you press in the Kisses. If the cookies have cooled completely, you can warm them slightly in the oven before adding the Kisses.
Conclusion:
And there you have it! These Peanut Butter Kiss Cookies are more than just a sweet treat; they’re a nostalgic trip down memory lane, a guaranteed crowd-pleaser, and, quite frankly, a must-bake for any occasion. From the satisfyingly soft peanut butter cookie base to the perfectly placed Hershey’s Kiss, every bite is an explosion of flavor and texture that will leave you wanting more. I know, I know, there are a million cookie recipes out there, but trust me on this one. The simplicity of the ingredients and the straightforward instructions make these cookies incredibly easy to whip up, even for novice bakers. Plus, the sheer joy of unwrapping those Hershey’s Kisses and pressing them into the warm cookies is a therapeutic experience in itself! But what truly sets these cookies apart is their versatility. While the classic combination of peanut butter and chocolate is undeniably divine, feel free to get creative and experiment with different variations.Serving Suggestions and Variations:
* Spice it up: Add a pinch of cinnamon or nutmeg to the cookie dough for a warm, comforting flavor. * Nutty Delight: Incorporate chopped peanuts or pecans into the dough for added crunch and nutty goodness. * Chocolate Overload: Use dark chocolate Hershey’s Kisses for a richer, more intense chocolate experience. * Festive Fun: Decorate the cookies with festive sprinkles or colored sugar to match any holiday or celebration. * Ice Cream Sandwich: Let the cookies cool completely, then sandwich a scoop of your favorite ice cream between two cookies for an indulgent dessert. * Gift Giving: Package these cookies in a decorative tin or cellophane bag to create a thoughtful and delicious homemade gift. These Peanut Butter Kiss Cookies are perfect for holiday baking, bake sales, potlucks, or simply enjoying with a glass of milk on a cozy evening. They’re also a fantastic way to get kids involved in the kitchen, as they’ll love helping to mix the dough, unwrap the Kisses, and press them into the cookies. I’ve made these cookies countless times, and they always disappear in a flash. They’re a guaranteed hit with family, friends, and even picky eaters. So, what are you waiting for? Preheat your oven, gather your ingredients, and get ready to experience the magic of these irresistible cookies. I’m confident that you’ll love this recipe as much as I do. Once you’ve tried it, I’d love to hear about your experience! Did you make any variations? Did you add any special ingredients? What did your family and friends think? Share your photos and stories in the comments below. I can’t wait to see your creations and hear all about your Peanut Butter Kiss Cookie adventures! Happy baking! Print
Peanut Butter Kiss Cookies: The Ultimate Recipe and Baking Guide
- Total Time: 60 minutes
- Yield: 4 dozen cookies 1x
Description
Soft, chewy peanut butter cookies topped with a Hershey’s Kiss. The perfect classic treat!
Ingredients
- 1 ½ cups all-purpose flour
- 1 teaspoon baking soda
- ½ teaspoon baking powder
- ½ cup (1 stick) unsalted butter, softened
- ½ cup creamy peanut butter
- ½ cup granulated sugar
- ½ cup packed light brown sugar
- 1 large egg
- 2 tablespoons milk
- 1 teaspoon vanilla extract
- Approximately 48 Hershey’s Kisses, unwrapped
- Optional: Coarse sugar for sprinkling
Instructions
- Combine Dry Ingredients: In a medium bowl, whisk together the flour, baking soda, and baking powder. Set aside.
- Cream Butter and Peanut Butter: In a large bowl (or stand mixer), cream together the softened butter and peanut butter until light and fluffy (2-3 minutes). Scrape down the sides of the bowl.
- Add Sugars: Gradually add the granulated sugar and brown sugar to the butter mixture, beating until well combined. Scrape down the sides of the bowl.
- Incorporate Egg, Milk, and Vanilla: Beat in the egg, then add the milk and vanilla extract. Mix until well combined.
- Gradually Add Dry Ingredients: Gradually add the dry ingredients to the wet ingredients, mixing on low speed until just combined. Be careful not to overmix.
- Chill the Dough: Cover the bowl with plastic wrap and chill the dough in the refrigerator for at least 30 minutes.
- Preheat Oven and Prepare Baking Sheets: Preheat your oven to 375°F (190°C). Line baking sheets with parchment paper or silicone baking mats.
- Shape the Dough: Roll the chilled dough into 1-inch balls. Place the dough balls on the prepared baking sheets, leaving about 2 inches between each cookie.
- Optional: Sprinkle with Sugar: If desired, sprinkle the tops of the dough balls with coarse sugar before baking.
- Bake the Cookies: Bake for 8-10 minutes, or until the edges are lightly golden brown.
- Cool Slightly: Remove the baking sheets from the oven and let the cookies cool on the baking sheets for a few minutes before transferring them to a wire rack to cool completely.
- Press in the Kisses: While the cookies are still warm, gently press a Hershey’s Kiss into the center of each cookie.
- Let Cool Completely: Allow the cookies to cool completely on the wire rack with the Kisses in place.
Notes
- Peanut Butter Choice: Creamy peanut butter is preferred, but chunky can be used.
- Chocolate Variations: Experiment with different flavors of Hershey’s Kisses.
- Add-Ins: Add chocolate chips, chopped nuts, or sprinkles to the dough.
- Storage: Store in an airtight container at room temperature for up to 3 days.
- Freezing: Freeze baked cookies for up to 2 months. Freeze dough balls before baking.
- Preventing Spreading: Ensure butter is not too soft, don’t overmix, and chill dough longer.
- Soft Cookies: Slightly underbake for softer cookies.
- Even Baking: Rotate baking sheets halfway through baking.
- Prep Time: 20 minutes
- Cook Time: 8-10 minutes

Leave a Comment