
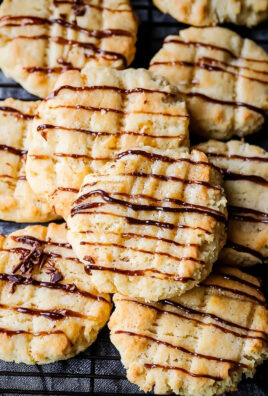
Christmas meltaway cookies: just the name conjures up images of snowy landscapes, crackling fireplaces, and the sweet anticipation of holiday cheer, doesn’t it? Imagine biting into a delicate, buttery cookie that practically dissolves in your mouth, leaving behind a whisper of almond and a comforting warmth. These aren’t just cookies; they’re edible memories, little bites of nostalgia that transport you back to childhood Christmases.
These delightful treats, sometimes called Russian Tea Cakes or Mexican Wedding Cookies, have a rich history, with variations found across numerous cultures. Each version tells a story of adaptation and tradition, passed down through generations. While the exact origins are debated, the common thread is the use of simple ingredients to create something truly special.
What is it about Christmas meltaway cookies that makes them so irresistible? Perhaps it’s the incredibly tender texture, achieved through the generous use of butter and finely ground nuts. Or maybe it’s the subtle sweetness, perfectly balanced and never cloying. Whatever the reason, these cookies are a guaranteed crowd-pleaser, perfect for sharing with loved ones or enjoying as a quiet indulgence during the busy holiday season. I find that their simple elegance makes them a welcome addition to any Christmas cookie platter, and they are surprisingly easy to make, even for novice bakers. So, let’s get baking and create some holiday magic!

Ingredients:
- 1 cup (2 sticks) unsalted butter, softened
- 1 cup powdered sugar, plus more for dusting
- 1 teaspoon vanilla extract
- 1/2 teaspoon almond extract
- 2 1/4 cups all-purpose flour
- 1/4 teaspoon salt
- Optional: Red and green sprinkles or sanding sugar
Preparing the Dough:
- Cream the Butter and Sugar: In a large bowl, using an electric mixer, cream together the softened butter and powdered sugar until light and fluffy. This usually takes about 3-5 minutes. Make sure to scrape down the sides of the bowl occasionally to ensure everything is evenly mixed. You want a smooth, pale mixture.
- Add the Extracts: Beat in the vanilla extract and almond extract until well combined. The almond extract really enhances the flavor, but you can omit it if you prefer a purely vanilla flavor.
- Combine Dry Ingredients: In a separate medium bowl, whisk together the all-purpose flour and salt. This ensures the salt is evenly distributed throughout the flour.
- Gradually Add Dry Ingredients to Wet Ingredients: Gradually add the dry ingredients to the wet ingredients, mixing on low speed until just combined. Be careful not to overmix the dough, as this can result in tough cookies. Mix until the flour is just incorporated, and no streaks of flour remain.
- Form the Dough into a Disc: Turn the dough out onto a lightly floured surface. Gently knead it a few times to bring it together into a smooth disc. This helps prevent the dough from cracking when you roll it out.
- Chill the Dough: Wrap the dough disc tightly in plastic wrap and refrigerate for at least 30 minutes, or up to 2 hours. Chilling the dough is crucial because it allows the butter to firm up, which prevents the cookies from spreading too much during baking. If you chill it for longer than 2 hours, you may need to let it sit at room temperature for a few minutes before rolling it out.
Rolling and Cutting the Cookies:
- Preheat the Oven: Preheat your oven to 350°F (175°C). Line baking sheets with parchment paper or silicone baking mats. This prevents the cookies from sticking and makes cleanup easier.
- Roll Out the Dough: On a lightly floured surface, roll out the chilled dough to about 1/4-inch thickness. Use a rolling pin and apply even pressure to ensure a uniform thickness. If the dough is sticking, sprinkle a little more flour on the surface.
- Cut Out Shapes: Use cookie cutters to cut out desired shapes. Christmas-themed shapes like stars, trees, and bells are perfect for Christmas meltaway cookies. You can also use a small round cutter for a classic look.
- Place Cookies on Baking Sheets: Carefully transfer the cut-out cookies to the prepared baking sheets, leaving about 1 inch of space between each cookie. This allows for even baking and prevents the cookies from sticking together.
- Optional: Add Sprinkles: If desired, sprinkle the cookies with red and green sprinkles or sanding sugar before baking. Gently press the sprinkles into the dough so they adhere well.
- Re-roll Scraps: Gather the dough scraps, re-roll them, and cut out more cookies until all the dough is used. Keep in mind that the cookies made from re-rolled dough may be slightly tougher, so try to minimize the number of times you re-roll the dough.
Baking the Cookies:
- Bake the Cookies: Bake the cookies for 8-10 minutes, or until the edges are just beginning to turn golden brown. Keep a close eye on them, as they can burn easily. The baking time will vary depending on the size and thickness of your cookies.
- Cool on Baking Sheets: Remove the baking sheets from the oven and let the cookies cool on the baking sheets for a few minutes before transferring them to a wire rack to cool completely. This allows the cookies to firm up slightly and prevents them from breaking when you move them.
Finishing Touches:
- Dust with Powdered Sugar: Once the cookies are completely cool, dust them generously with powdered sugar. This gives them a classic meltaway look and adds a touch of sweetness. You can use a sifter or a small strainer to evenly distribute the powdered sugar.
- Serve and Enjoy: Serve the Christmas meltaway cookies immediately or store them in an airtight container at room temperature for up to 3 days. These cookies are perfect for sharing with friends and family during the holiday season.
Tips for Perfect Meltaway Cookies:
- Use Softened Butter: Make sure your butter is properly softened, but not melted. It should be soft enough to easily cream with the sugar.
- Don’t Overmix the Dough: Overmixing the dough can develop the gluten in the flour, resulting in tough cookies. Mix until just combined.
- Chill the Dough: Chilling the dough is essential for preventing the cookies from spreading too much during baking.
- Bake Until Just Set: Bake the cookies until the edges are just beginning to turn golden brown. They should still be pale in the center.
- Cool Completely Before Dusting: Make sure the cookies are completely cool before dusting them with powdered sugar, or the sugar will melt.
- Experiment with Flavors: You can experiment with different extracts, such as lemon extract or orange extract, to create unique flavor combinations.
- Add Food Coloring: For a festive touch, you can add a few drops of food coloring to the dough to create colored cookies.
- Make Ahead: The dough can be made ahead of time and stored in the refrigerator for up to 2 days. You can also freeze the dough for longer storage.
- Freezing Baked Cookies: Baked cookies can be frozen in an airtight container for up to 2 months. Thaw completely before serving.
Troubleshooting:
- Cookies Spreading Too Much: If your cookies are spreading too much, the dough may not have been chilled long enough, or the oven temperature may be too low. Try chilling the dough for a longer period of time and making sure your oven is properly preheated.
- Cookies Too Dry: If your cookies are too dry, you may have overbaked them. Try reducing the baking time slightly.
- Cookies Too Tough: If your cookies are too tough, you may have overmixed the dough. Be careful not to overmix the dough in the future.
- Powdered Sugar Melting: If the powdered sugar is melting, the cookies may not be completely cool. Make sure the cookies are completely cool before dusting them with powdered sugar.
Variations:
- Chocolate Meltaway Cookies: Add 1/4 cup of unsweetened cocoa powder to the dry ingredients.
- Lemon Meltaway Cookies: Add 1 tablespoon of lemon zest and 1 teaspoon of lemon extract to the wet ingredients.
- Orange Meltaway Cookies: Add 1 tablespoon of orange zest and 1 teaspoon of orange extract to the wet ingredients.
- Peppermint Meltaway Cookies: Add 1/4 teaspoon of peppermint extract to the wet ingredients and sprinkle crushed peppermint candies on top of the cookies before baking.

Conclusion:
And there you have it! These Christmas meltaway cookies are more than just a recipe; they’re a little piece of holiday magic, ready to be baked and shared. I truly believe this recipe is a must-try for anyone looking to add a touch of sweetness and nostalgia to their Christmas celebrations. The delicate, buttery texture that practically dissolves in your mouth, combined with the festive flavors, makes them utterly irresistible. But why are these cookies so special? It’s the simplicity, really. With just a handful of ingredients and straightforward instructions, even novice bakers can achieve cookie perfection. Plus, the recipe is incredibly versatile. Feel free to experiment with different extracts almond, peppermint, or even a hint of orange would be delightful additions. You could also try using different colored sugars or sprinkles to match your holiday theme. Imagine a batch of these beauties adorned with red and green sanding sugar, or perhaps a dusting of edible glitter for an extra sparkle! Beyond the basic recipe, there are so many ways to make these cookies your own. For a richer flavor, consider using browned butter. Simply melt the butter in a saucepan and cook it until it turns a nutty brown color, then let it cool slightly before adding it to the recipe. This will add a depth of flavor that will take your cookies to the next level. Another variation is to add finely chopped nuts, such as pecans or walnuts, to the dough for a bit of crunch. Serving suggestions? Oh, the possibilities are endless! These cookies are perfect on their own, enjoyed with a cup of hot cocoa or coffee. They also make a wonderful addition to a holiday dessert platter, alongside other festive treats. You could even package them up in decorative tins or boxes to give as gifts to friends, family, and neighbors. Imagine the joy on their faces when they receive a homemade gift of these delicious Christmas meltaway cookies! For a truly decadent experience, try sandwiching two cookies together with a layer of buttercream frosting or chocolate ganache. This will create a delightful little cookie sandwich that is sure to impress. You could also crumble the cookies over ice cream or yogurt for a quick and easy dessert. I’m so excited for you to try this recipe and experience the joy of baking these delightful cookies. I know you’ll love them as much as I do. They are truly a holiday staple in my home, and I hope they become one in yours as well. So, go ahead, gather your ingredients, preheat your oven, and get ready to create some holiday magic. Don’t be afraid to get creative and experiment with different flavors and decorations. And most importantly, have fun! Once you’ve baked your batch of Christmas meltaway cookies, I would absolutely love to hear about your experience. Did you try any variations? What were your favorite decorations? Share your photos and stories in the comments below! I can’t wait to see what you create. Happy baking, and happy holidays! Print
Christmas Meltaway Cookies: The Ultimate Holiday Recipe
- Total Time: 58 minutes – 2 hours 30 minutes
- Yield: 24–36 cookies 1x
Description
Buttery, melt-in-your-mouth cookies perfect for the holidays! These delicate cookies are easy to make and dusted with powdered sugar for a festive touch.
Ingredients
- 1 cup (2 sticks) unsalted butter, softened
- 1 cup powdered sugar, plus more for dusting
- 1 teaspoon vanilla extract
- 1/2 teaspoon almond extract
- 2 1/4 cups all-purpose flour
- 1/4 teaspoon salt
- Optional: Red and green sprinkles or sanding sugar
Instructions
- Cream the Butter and Sugar: In a large bowl, using an electric mixer, cream together the softened butter and powdered sugar until light and fluffy (3-5 minutes). Scrape down the sides of the bowl occasionally.
- Add the Extracts: Beat in the vanilla extract and almond extract until well combined.
- Combine Dry Ingredients: In a separate medium bowl, whisk together the all-purpose flour and salt.
- Gradually Add Dry Ingredients to Wet Ingredients: Gradually add the dry ingredients to the wet ingredients, mixing on low speed until just combined. Be careful not to overmix.
- Form the Dough into a Disc: Turn the dough out onto a lightly floured surface. Gently knead it a few times to bring it together into a smooth disc.
- Chill the Dough: Wrap the dough disc tightly in plastic wrap and refrigerate for at least 30 minutes, or up to 2 hours.
- Preheat the Oven: Preheat your oven to 350°F (175°C). Line baking sheets with parchment paper or silicone baking mats.
- Roll Out the Dough: On a lightly floured surface, roll out the chilled dough to about 1/4-inch thickness.
- Cut Out Shapes: Use cookie cutters to cut out desired shapes.
- Place Cookies on Baking Sheets: Carefully transfer the cut-out cookies to the prepared baking sheets, leaving about 1 inch of space between each cookie.
- Optional: Add Sprinkles: If desired, sprinkle the cookies with red and green sprinkles or sanding sugar before baking.
- Re-roll Scraps: Gather the dough scraps, re-roll them, and cut out more cookies until all the dough is used.
- Bake the Cookies: Bake the cookies for 8-10 minutes, or until the edges are just beginning to turn golden brown.
- Cool on Baking Sheets: Remove the baking sheets from the oven and let the cookies cool on the baking sheets for a few minutes before transferring them to a wire rack to cool completely.
- Dust with Powdered Sugar: Once the cookies are completely cool, dust them generously with powdered sugar.
- Serve and Enjoy: Serve the Christmas meltaway cookies immediately or store them in an airtight container at room temperature for up to 3 days.
Notes
- Use softened butter, but not melted.
- Don’t overmix the dough.
- Chilling the dough is essential.
- Bake until just set.
- Cool completely before dusting with powdered sugar.
- Experiment with different extracts for unique flavors.
- Add food coloring for a festive touch.
- The dough can be made ahead of time and stored in the refrigerator for up to 2 days or frozen for longer storage.
- Baked cookies can be frozen in an airtight container for up to 2 months. Thaw completely before serving.
- Prep Time: 20 minutes
- Cook Time: 8-10 minutes
Leave a Comment