
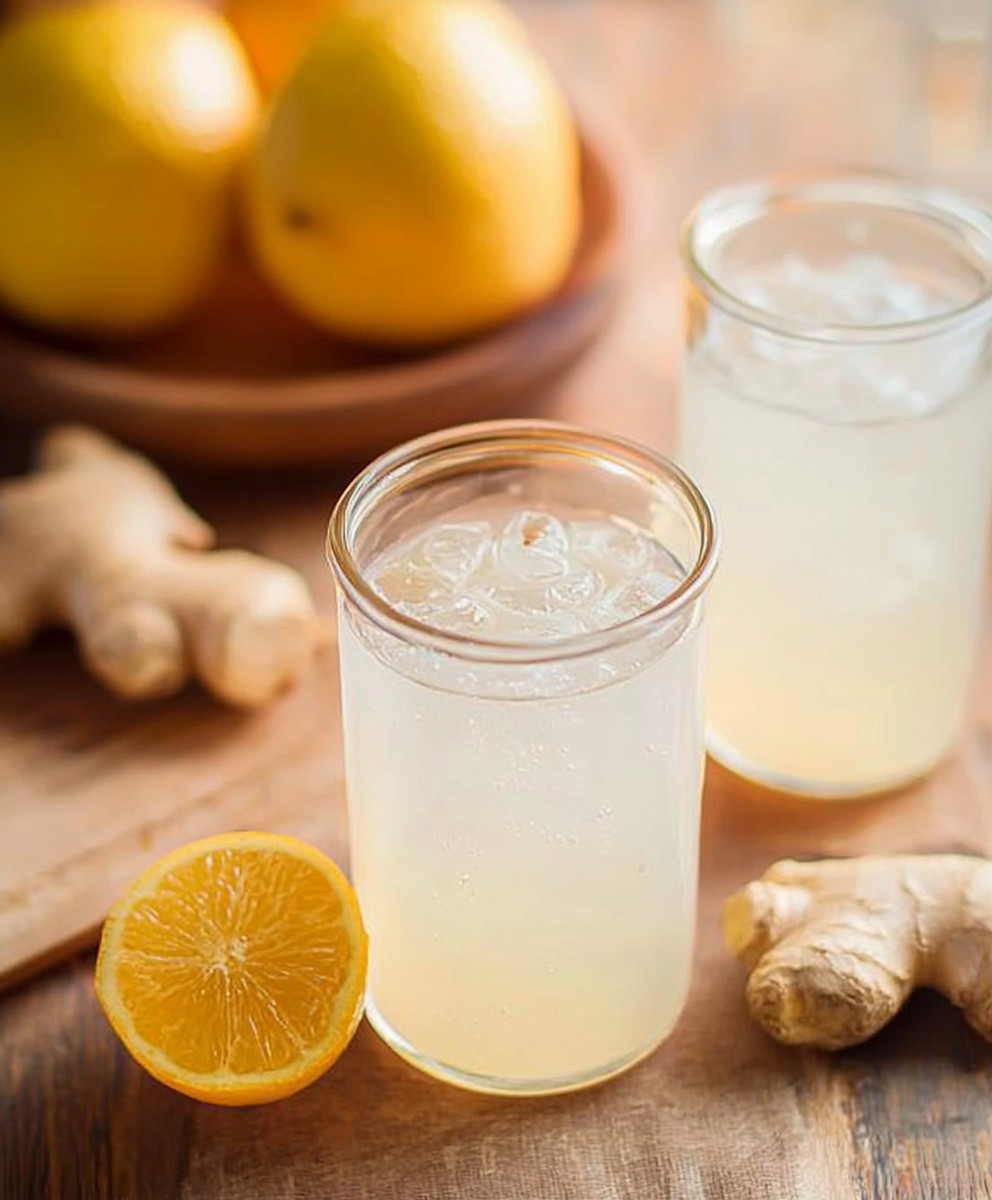
Homemade Ginger Ale: Prepare to ditch the store-bought stuff forever! Imagine the crisp, clean, and intensely gingery flavor of a truly authentic ginger ale, crafted right in your own kitchen. Forget the artificial sweeteners and questionable ingredients this recipe puts you in complete control, allowing you to customize the spice level and sweetness to your exact liking.
Ginger ale has a fascinating history, evolving from the darker, more robust ginger beer popular in 19th-century England and Ireland. As tastes shifted, a lighter, more refined version emerged, eventually becoming the refreshing beverage we know and love today. But even the best commercial brands often fall short of capturing the true essence of ginger.
What makes homemade ginger ale so irresistible? It’s the vibrant, zesty kick of fresh ginger, perfectly balanced with the sweetness of sugar and the fizz of carbonation. The result is a drink that’s both invigorating and soothing, perfect for sipping on a hot day, mixing into cocktails, or even settling an upset stomach. Plus, the satisfaction of creating something so delicious from scratch is simply unmatched. So, are you ready to embark on a flavorful adventure and discover the unparalleled taste of homemade ginger ale?

Ingredients:
- 1 large piece (about 4-6 inches) fresh ginger, peeled and roughly chopped
- 1 cup granulated sugar
- 8 cups water, divided
- 1/4 cup fresh lemon juice (from about 2 lemons)
- 1/4 teaspoon champagne yeast (or brewer’s yeast, but champagne yeast provides a cleaner flavor)
- Optional: 1/4 teaspoon cream of tartar (helps with carbonation)
Preparing the Ginger Syrup:
This is the heart of our ginger ale! We’re going to make a concentrated syrup that will give our drink that signature spicy-sweet flavor. Don’t skip this step; it’s what makes homemade ginger ale so much better than store-bought!
- Combine Ginger and Sugar: In a medium saucepan, combine the chopped ginger and sugar. The sugar will help draw out the moisture and flavor from the ginger.
- Muddle (Optional, but Recommended): Using a muddler or the back of a wooden spoon, gently crush the ginger and sugar together. This helps release even more of the ginger’s oils and flavor. Don’t overdo it; you just want to bruise the ginger a bit.
- Add Water and Simmer: Add 4 cups of water to the saucepan. Place the saucepan over medium-high heat and bring the mixture to a boil.
- Simmer and Infuse: Once boiling, reduce the heat to low and simmer gently for 30 minutes. This allows the ginger flavor to fully infuse into the water. Keep an eye on it to make sure it doesn’t boil over. The liquid should reduce slightly and become fragrant.
- Strain the Syrup: Remove the saucepan from the heat and let the syrup cool slightly (about 15-20 minutes). Place a fine-mesh sieve lined with cheesecloth (if you have it; otherwise, the sieve alone is fine) over a heat-proof bowl or jar. Pour the ginger syrup through the sieve, pressing down on the ginger solids with the back of a spoon to extract as much liquid as possible. Discard the ginger pulp. You should have about 3-4 cups of ginger syrup.
- Cool Completely: Let the ginger syrup cool completely to room temperature. This is crucial before adding the yeast, as heat will kill it. You can speed this up by placing the syrup in the refrigerator.
Preparing the Ginger Ale:
Now comes the fun part turning that delicious syrup into bubbly ginger ale! We’ll be using a simple fermentation process to create the carbonation. Don’t worry, it’s easier than it sounds!
- Sanitize Your Equipment: This is very important to prevent unwanted bacteria from spoiling your ginger ale. Thoroughly wash and sanitize a 2-liter plastic bottle (or multiple smaller bottles) with hot, soapy water. Rinse well. You can also use a sanitizing solution designed for brewing, following the manufacturer’s instructions.
- Combine Syrup, Lemon Juice, and Water: In a large pitcher or bowl, combine the cooled ginger syrup, lemon juice, and the remaining 4 cups of water. Stir well to combine.
- Activate the Yeast: In a small bowl, dissolve the champagne yeast in 1/4 cup of lukewarm (not hot!) water. Let it sit for about 5-10 minutes, until it starts to foam slightly. This indicates that the yeast is active.
- Add Yeast to the Mixture: Pour the activated yeast into the ginger ale mixture and stir gently to combine.
- Add Cream of Tartar (Optional): If using cream of tartar, add it to the mixture and stir well. Cream of tartar helps stabilize the carbonation and can result in a slightly fizzier ginger ale.
- Bottle the Ginger Ale: Carefully pour the ginger ale mixture into the sanitized plastic bottle(s), leaving about 1-2 inches of headspace at the top. This space is necessary for the carbon dioxide to build up.
Fermentation and Carbonation:
This is where the magic happens! The yeast will consume the sugar in the syrup and produce carbon dioxide, which will carbonate our ginger ale. It’s important to monitor the bottles carefully during this process to prevent them from exploding.
- First Fermentation (Room Temperature): Tightly cap the bottle(s) and leave them at room temperature (ideally around 70-75°F or 21-24°C) for 12-48 hours. The exact time will depend on the temperature and the activity of your yeast.
- Monitor the Bottles: This is crucial! Check the bottles frequently (at least every 12 hours) to gauge the pressure. You should be able to squeeze the bottle slightly, but it should feel firm. If the bottle feels rock hard, it’s time to release some of the pressure.
- Burp the Bottles (Release Pressure): Carefully open the bottle(s) slightly to release some of the carbon dioxide. Do this slowly and over a sink, as some of the ginger ale may foam up. Recap the bottle(s) tightly.
- Second Fermentation (Refrigeration): Once the ginger ale has reached your desired level of carbonation (usually after 12-48 hours at room temperature), transfer the bottle(s) to the refrigerator. The cold temperature will slow down the fermentation process and prevent the bottles from becoming over-carbonated and potentially exploding.
- Chill Thoroughly: Let the ginger ale chill in the refrigerator for at least 2-3 hours before serving. This will help the carbonation dissolve fully into the liquid and make it more refreshing.
Serving and Storage:
Finally, it’s time to enjoy your homemade ginger ale! Serve it chilled, over ice, with a slice of lemon or lime, if desired. Store any leftover ginger ale in the refrigerator.
- Serving Suggestions: Pour the chilled ginger ale into a glass filled with ice. Garnish with a lemon or lime wedge, or a sprig of mint. It’s also delicious mixed with other beverages, such as cranberry juice or vodka.
- Storage: Store the ginger ale in the refrigerator for up to a week. The carbonation will gradually decrease over time.
- Important Note: Because this ginger ale is naturally fermented, it will contain a very small amount of alcohol (less than 0.5% ABV). This is generally considered non-alcoholic, but it’s something to be aware of.
Troubleshooting:
Sometimes, things don’t go exactly as planned. Here are a few common issues and how to fix them:
- Ginger Ale Not Carbonated Enough:
- Possible Cause: Yeast was inactive, temperature was too low, fermentation time was too short, or not enough sugar.
- Solution: Make sure your yeast is fresh and active. Ensure the room temperature is warm enough (70-75°F). Allow the ginger ale to ferment for a longer period of time at room temperature, checking the pressure frequently. You can also try adding a small amount of sugar (1/4 teaspoon) to each bottle to give the yeast more food.
- Ginger Ale Too Carbonated (Bottle Feels Rock Hard):
- Possible Cause: Fermentation time was too long, temperature was too high, or too much sugar.
- Solution: Burp the bottles more frequently to release pressure. Reduce the fermentation time. Make sure the room temperature is not too high.
- Ginger Ale Tastes Yeasty:
- Possible Cause: Too much yeast was used, or the ginger ale was not chilled quickly enough.
- Solution: Use the recommended amount of yeast. Chill the ginger ale thoroughly in the refrigerator to slow down the fermentation process. You can also try letting the sediment settle to the bottom of the bottle before pouring.
- Ginger Ale Tastes Sour:
- Possible Cause: Unwanted bacteria contaminated the ginger ale.
- Solution: Unfortunately, there’s not much you can do to fix this. Discard the batch and start over, making sure to sanitize your equipment thoroughly.
Tips for Success:
- Use Fresh Ginger: Fresh ginger is essential for the best flavor. Avoid using powdered ginger, as it won’t provide the same depth of flavor.
- Don’t Overdo the Yeast: Using too much yeast can result in a yeasty-tasting ginger ale. Stick to the recommended amount.
- Monitor the Pressure:
Conclusion:
So there you have it! This Homemade Ginger Ale recipe is more than just a thirst quencher; it’s an experience. It’s about taking control of your ingredients, crafting something truly special, and enjoying the pure, unadulterated flavor of real ginger. I truly believe that once you taste the difference between this homemade version and the store-bought stuff, you’ll never go back. The vibrant spice, the refreshing fizz, and the subtle sweetness all combine to create a drink that’s both invigorating and comforting.
But why is this recipe a must-try? Well, beyond the superior taste, it’s incredibly versatile. You can adjust the sweetness to your liking, experiment with different types of ginger (young ginger will give you a milder flavor, while mature ginger packs a serious punch!), and even add other spices like cardamom, star anise, or cloves for a more complex flavor profile. It’s a blank canvas for your culinary creativity!
And the serving suggestions? Oh, the possibilities are endless! Of course, it’s fantastic on its own, served ice-cold on a hot day. But it also makes an incredible mixer for cocktails. Try it with your favorite rum or vodka for a refreshing twist on classic drinks. Or, for a non-alcoholic treat, mix it with a splash of cranberry juice and a squeeze of lime. For a truly decadent experience, use it as a base for a ginger ale float with a scoop of vanilla ice cream. Trust me, you won’t regret it!
Looking for variations? Consider adding a touch of citrus! A few slices of lemon or lime added during the simmering process will brighten the flavor and add a zesty kick. You could also try using honey instead of sugar for a more natural sweetness and a slightly different flavor profile. And for those who like a little extra heat, a pinch of cayenne pepper will add a subtle warmth that complements the ginger perfectly. Don’t be afraid to experiment and find your perfect Homemade Ginger Ale blend!
I’m so excited for you to try this recipe and experience the joy of making your own delicious ginger ale. It’s a rewarding process that will leave you feeling accomplished and refreshed. It’s also a fantastic way to impress your friends and family with your culinary skills. Imagine serving them a glass of your homemade ginger ale and watching their faces light up with delight!
So, what are you waiting for? Gather your ingredients, put on some music, and get ready to embark on a ginger ale adventure! I’m confident that you’ll love the results. And when you do, please, please, please share your experience with me! I’d love to hear about your variations, your serving suggestions, and any tips or tricks you discover along the way. Leave a comment below, tag me in your social media posts, or send me an email. I can’t wait to see what you create!
Happy brewing, and enjoy your delicious, homemade ginger ale!
Print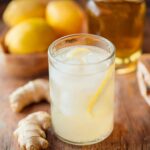
Homemade Ginger Ale: The Ultimate Guide to Making Your Own
- Total Time: 50 minutes
- Yield: Approximately 2 liters 1x
Description
Spicy-sweet homemade ginger ale! This naturally fermented recipe creates a bubbly, refreshing drink that’s far superior to store-bought versions.
Ingredients
- 1 large piece (about 4–6 inches) fresh ginger, peeled and roughly chopped
- 1 cup granulated sugar
- 8 cups water, divided
- 1/4 cup fresh lemon juice (from about 2 lemons)
- 1/4 teaspoon champagne yeast (or brewer’s yeast, but champagne yeast provides a cleaner flavor)
- Optional: 1/4 teaspoon cream of tartar (helps with carbonation)
Instructions
- Combine Ginger and Sugar: In a medium saucepan, combine the chopped ginger and sugar.
- Muddle (Optional, but Recommended): Using a muddler or the back of a wooden spoon, gently crush the ginger and sugar together.
- Add Water and Simmer: Add 4 cups of water to the saucepan. Place the saucepan over medium-high heat and bring the mixture to a boil.
- Simmer and Infuse: Once boiling, reduce the heat to low and simmer gently for 30 minutes.
- Strain the Syrup: Remove the saucepan from the heat and let the syrup cool slightly (about 15-20 minutes). Place a fine-mesh sieve lined with cheesecloth (if you have it; otherwise, the sieve alone is fine) over a heat-proof bowl or jar. Pour the ginger syrup through the sieve, pressing down on the ginger solids with the back of a spoon to extract as much liquid as possible. Discard the ginger pulp. You should have about 3-4 cups of ginger syrup.
- Cool Completely: Let the ginger syrup cool completely to room temperature.
- Sanitize Your Equipment: Thoroughly wash and sanitize a 2-liter plastic bottle (or multiple smaller bottles) with hot, soapy water. Rinse well.
- Combine Syrup, Lemon Juice, and Water: In a large pitcher or bowl, combine the cooled ginger syrup, lemon juice, and the remaining 4 cups of water. Stir well to combine.
- Activate the Yeast: In a small bowl, dissolve the champagne yeast in 1/4 cup of lukewarm (not hot!) water. Let it sit for about 5-10 minutes, until it starts to foam slightly.
- Add Yeast to the Mixture: Pour the activated yeast into the ginger ale mixture and stir gently to combine.
- Add Cream of Tartar (Optional): If using cream of tartar, add it to the mixture and stir well.
- Bottle the Ginger Ale: Carefully pour the ginger ale mixture into the sanitized plastic bottle(s), leaving about 1-2 inches of headspace at the top.
- First Fermentation (Room Temperature): Tightly cap the bottle(s) and leave them at room temperature (ideally around 70-75°F or 21-24°C) for 12-48 hours.
- Monitor the Bottles: Check the bottles frequently (at least every 12 hours) to gauge the pressure.
- Burp the Bottles (Release Pressure): Carefully open the bottle(s) slightly to release some of the carbon dioxide. Recap the bottle(s) tightly.
- Second Fermentation (Refrigeration): Once the ginger ale has reached your desired level of carbonation, transfer the bottle(s) to the refrigerator.
- Chill Thoroughly: Let the ginger ale chill in the refrigerator for at least 2-3 hours before serving.
Notes
- Important: Monitor the bottles carefully during fermentation to prevent them from exploding. Burp the bottles as needed to release excess pressure.
- Use fresh ginger for the best flavor.
- Sanitize your equipment thoroughly to prevent unwanted bacteria growth.
- The fermentation time will vary depending on the temperature and the activity of your yeast.
- This ginger ale contains a very small amount of alcohol (less than 0.5% ABV) due to natural fermentation.
- Store in the refrigerator for up to a week.
- Prep Time: 20 minutes
- Cook Time: 30 minutes
Leave a Comment