
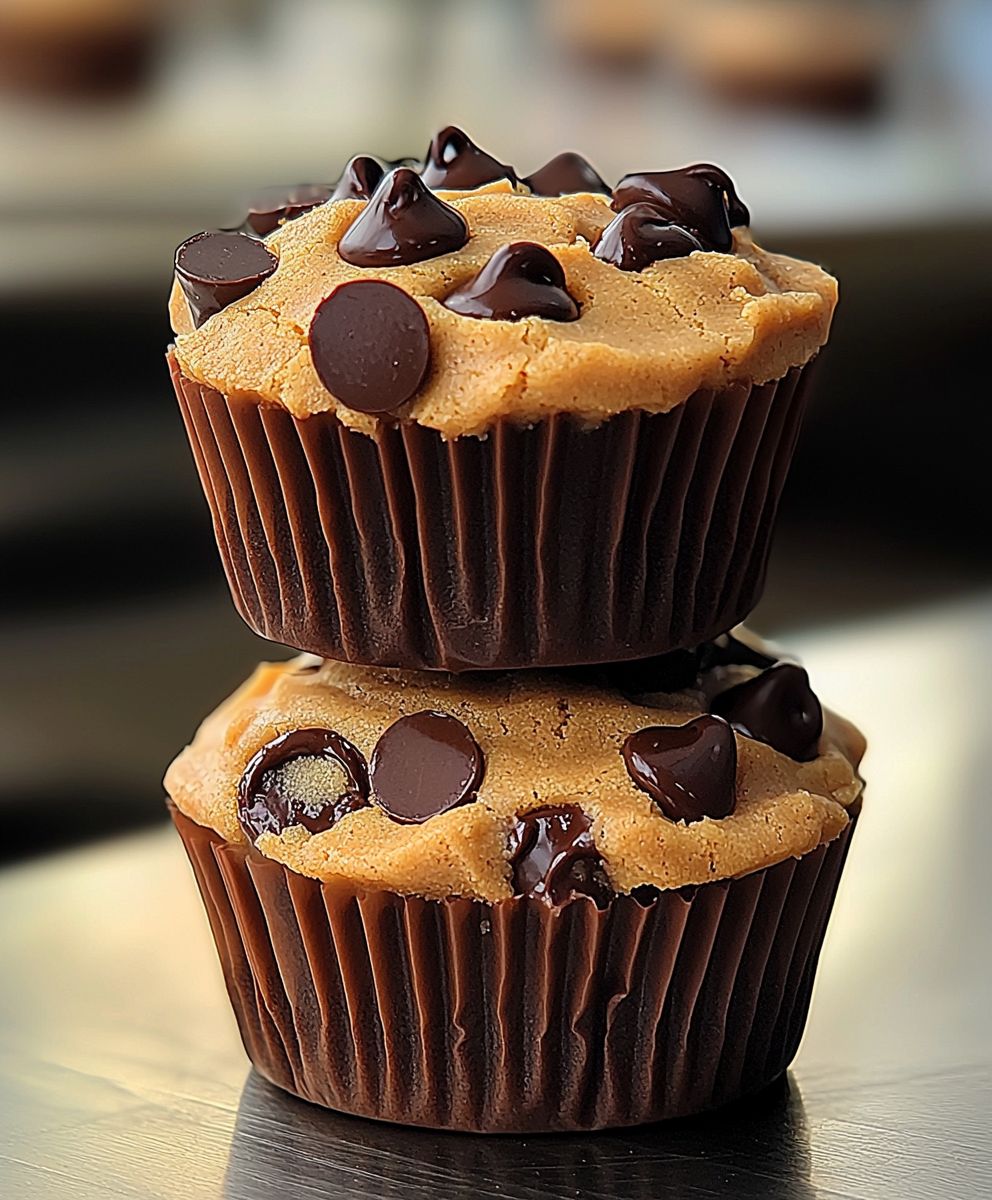
Peanut Butter Chocolate Cookie Cups: Prepare to enter a world where the irresistible combination of peanut butter and chocolate collides in a perfectly portioned, utterly delightful treat! These aren’t just cookies; they’re miniature masterpieces, each bite offering a symphony of flavors and textures that will leave you craving more. Forget complicated baking projects; these cookie cups are surprisingly simple to make, making them ideal for both seasoned bakers and kitchen novices alike.
The marriage of peanut butter and chocolate is a classic for a reason. Some say its origins trace back to the early 20th century, when resourceful cooks began experimenting with combining these readily available ingredients. The result? A flavor profile that’s both comforting and exciting, familiar yet always satisfying. Its a combination that transcends generations and cultures, finding its way into everything from candy bars to gourmet desserts.
What makes these Peanut Butter Chocolate Cookie Cups so universally loved? It’s the perfect balance of sweet and salty, the creamy peanut butter filling nestled inside a rich, chocolatey cookie shell. The soft, melt-in-your-mouth texture is simply divine. Plus, their individual size makes them perfect for parties, lunchboxes, or a simple after-dinner indulgence. They are incredibly convenient to make ahead of time and store, ensuring you always have a sweet treat on hand. So, let’s get baking and create these little bites of happiness together!

Ingredients:
- For the Peanut Butter Cookie Base:
- 1 cup (2 sticks) unsalted butter, softened
- 1 cup granulated sugar
- 1 cup packed brown sugar
- 2 large eggs
- 1 teaspoon vanilla extract
- 1 cup creamy peanut butter
- 2 1/2 cups all-purpose flour
- 1 teaspoon baking soda
- 1 teaspoon baking powder
- 1/2 teaspoon salt
- For the Chocolate Ganache Filling:
- 1 cup heavy cream
- 12 ounces semi-sweet chocolate chips
- 1 tablespoon unsalted butter
- Optional Toppings:
- Chopped peanuts
- Sea salt flakes
- Mini chocolate chips
- Reese’s Pieces
Preparing the Peanut Butter Cookie Dough:
- Cream the Butter and Sugars: In a large bowl (or the bowl of your stand mixer), cream together the softened butter, granulated sugar, and brown sugar until light and fluffy. This usually takes about 3-5 minutes. Make sure to scrape down the sides of the bowl occasionally to ensure everything is evenly mixed. The mixture should be pale and airy. This step is crucial for achieving a tender cookie base.
- Incorporate the Wet Ingredients: Beat in the eggs one at a time, followed by the vanilla extract and peanut butter. Mix until everything is well combined. Don’t overmix at this stage, just ensure the ingredients are fully incorporated. Overmixing can lead to a tougher cookie.
- Combine the Dry Ingredients: In a separate medium bowl, whisk together the flour, baking soda, baking powder, and salt. Whisking ensures that the baking soda and baking powder are evenly distributed throughout the flour, which is important for proper leavening.
- Gradually Add Dry Ingredients to Wet Ingredients: Gradually add the dry ingredients to the wet ingredients, mixing on low speed until just combined. Be careful not to overmix the dough. Overmixing develops the gluten in the flour, resulting in a tough cookie. Stop mixing as soon as the flour is incorporated.
- Chill the Dough (Important!): Cover the bowl with plastic wrap and chill the dough in the refrigerator for at least 30 minutes. Chilling the dough prevents the cookies from spreading too much during baking and allows the flavors to meld together. You can chill it for longer, even overnight, if needed. If chilling overnight, let the dough sit at room temperature for about 15-20 minutes before scooping to make it easier to work with.
Baking the Cookie Cups:
- Preheat the Oven and Prepare the Muffin Tin: Preheat your oven to 350°F (175°C). Grease a 24-cup mini muffin tin very well. Alternatively, you can use mini muffin liners. Greasing is essential to prevent the cookies from sticking.
- Scoop and Shape the Dough: Scoop rounded tablespoons of cookie dough and roll them into balls. Place one ball of dough into each mini muffin cup.
- Create the Cup Shape: Using a small tart tamper, the back of a teaspoon, or your fingers, gently press the dough down into each muffin cup, creating a well in the center. You want the dough to come up the sides of the muffin cup to form a cup shape. Be careful not to press too hard and create holes in the bottom.
- Bake the Cookie Cups: Bake for 10-12 minutes, or until the edges are lightly golden brown. The centers may still look slightly soft, but they will firm up as they cool.
- Cool and Remove from Tin: Let the cookie cups cool in the muffin tin for about 5 minutes before carefully transferring them to a wire rack to cool completely. This allows them to firm up enough to be handled without breaking. If they are sticking, you can use a thin knife or offset spatula to gently loosen them.
Making the Chocolate Ganache:
- Heat the Heavy Cream: In a small saucepan, heat the heavy cream over medium heat until it just begins to simmer. Do not boil the cream.
- Pour Over Chocolate: Remove the saucepan from the heat and pour the hot cream over the chocolate chips in a heatproof bowl.
- Let Sit and Stir: Let the mixture sit for 1 minute to allow the heat from the cream to melt the chocolate. Then, gently stir until the chocolate is completely melted and the ganache is smooth and glossy.
- Add Butter: Stir in the butter until it is melted and fully incorporated into the ganache. The butter adds richness and shine to the ganache.
- Cool Slightly (Optional): Let the ganache cool slightly for about 10-15 minutes before filling the cookie cups. This will help it thicken slightly and prevent it from running all over the place.
Assembling the Peanut Butter Chocolate Cookie Cups:
- Fill the Cookie Cups: Spoon or pipe the chocolate ganache into the cooled peanut butter cookie cups, filling them to the top.
- Add Toppings (Optional): While the ganache is still slightly wet, sprinkle with your desired toppings, such as chopped peanuts, sea salt flakes, mini chocolate chips, or Reese’s Pieces. The toppings will adhere better if the ganache is still slightly soft.
- Chill (Optional): For a firmer ganache, chill the cookie cups in the refrigerator for about 30 minutes before serving. This will also help the flavors meld together even more.
- Serve and Enjoy: Serve the peanut butter chocolate cookie cups and enjoy! They are best enjoyed within a few days, but they can be stored in an airtight container at room temperature or in the refrigerator.
Tips and Variations:
- Peanut Butter Swirl: For a peanut butter swirl effect, melt a small amount of peanut butter and drizzle it over the chocolate ganache before it sets. Use a toothpick or skewer to create a swirl pattern.
- Different Chocolate: Experiment with different types of chocolate for the ganache, such as dark chocolate, milk chocolate, or white chocolate.
- Add Espresso Powder: For a mocha flavor, add 1 teaspoon of espresso powder to the chocolate ganache.
- Salted Caramel: Drizzle salted caramel over the chocolate ganache for a decadent treat.
- Nutella Filling: Substitute the chocolate ganache with Nutella for a hazelnut chocolate flavor.
- Make it Vegan: Use vegan butter, plant-based milk for the ganache, and vegan chocolate chips to make this recipe vegan-friendly.
- Gluten-Free Option: Substitute the all-purpose flour with a gluten-free all-purpose flour blend.
- Storage: Store the cookie cups in an airtight container at room temperature for up to 3 days or in the refrigerator for up to 5 days.
- Freezing: You can freeze the cookie cups for up to 2 months. Thaw them in the refrigerator before serving.
Troubleshooting:
- Cookies Spreading Too Much: If your cookies are spreading too much, make sure your butter is not too soft and that you have chilled the dough adequately. You can also add a tablespoon or two of extra flour to the dough.
- Cookies Sticking to the Tin: Make sure you grease the muffin tin very well or use muffin liners.
- Ganache Too Thin: If your ganache is too thin, add a little more chocolate chips and stir until melted.
- Ganache Too Thick: If your ganache is too thick, add a little more heavy cream, one tablespoon at a time, until you reach the desired consistency.
Enjoy Baking!
Conclusion:
And there you have it! These Peanut Butter Chocolate Cookie Cups are truly a must-try for anyone who loves the classic combination of peanut butter and chocolate. They’re incredibly easy to make, require minimal ingredients, and deliver a satisfyingly sweet and salty treat that’s perfect for any occasion. From a quick weeknight dessert to a crowd-pleasing party snack, these little cups are guaranteed to be a hit. But what makes them so special? It’s the perfect balance of textures and flavors. The soft, chewy cookie base provides a comforting foundation for the rich, creamy peanut butter filling. And then, that decadent chocolate ganache on top? Pure bliss! It’s a symphony of sweetness that will have you reaching for another one before you even realize it. Plus, the individual cup format makes them ideal for portion control (although, let’s be honest, who can stop at just one?). Beyond their deliciousness and ease of preparation, these cookie cups are also incredibly versatile. Feel free to get creative with your serving suggestions and variations! For a truly indulgent experience, try serving them warm with a scoop of vanilla ice cream. The contrast between the warm cookie and the cold ice cream is simply divine. Or, if you’re looking for a lighter option, you can serve them with a dollop of whipped cream and a sprinkle of sea salt. The sea salt will enhance the sweetness of the chocolate and peanut butter, creating a more complex and satisfying flavor profile. Looking for variations? The possibilities are endless! You could add chopped nuts to the cookie dough for extra crunch, or swirl a little caramel into the peanut butter filling for an even richer flavor. For a festive twist, try using different colored sprinkles on top of the chocolate ganache. And if you’re feeling adventurous, you could even experiment with different types of chocolate, such as dark chocolate or white chocolate. Here are a few more ideas to spark your creativity:Serving Suggestions:
- Serve with a glass of cold milk for a classic pairing.
- Pack them in lunchboxes for a sweet treat.
- Bring them to potlucks and parties they’re always a crowd-pleaser!
- Gift them to friends and family homemade treats are always appreciated.
Variations:
- Add chopped Reese’s Pieces to the cookie dough or on top of the ganache.
- Use a different type of nut butter, such as almond butter or cashew butter.
- Drizzle the tops with melted white chocolate for a beautiful contrast.
- Add a pinch of espresso powder to the cookie dough for a mocha flavor.

Peanut Butter Chocolate Cookie Cups: The Ultimate Recipe Guide
- Total Time: 60 minutes
- Yield: 24 cookie cups 1x
Description
Decadent peanut butter cookie cups filled with rich chocolate ganache and topped with your favorite goodies! These are the perfect bite-sized treat.
Ingredients
- 1 cup (2 sticks) unsalted butter, softened
- 1 cup granulated sugar
- 1 cup packed brown sugar
- 2 large eggs
- 1 teaspoon vanilla extract
- 1 cup creamy peanut butter
- 2 1/2 cups all-purpose flour
- 1 teaspoon baking soda
- 1 teaspoon baking powder
- 1/2 teaspoon salt
- 1 cup heavy cream
- 12 ounces semi-sweet chocolate chips
- 1 tablespoon unsalted butter
- Chopped peanuts
- Sea salt flakes
- Mini chocolate chips
- Reese’s Pieces
Instructions
- Cream the Butter and Sugars: In a large bowl (or the bowl of your stand mixer), cream together the softened butter, granulated sugar, and brown sugar until light and fluffy (3-5 minutes). Scrape down the sides of the bowl occasionally.
- Incorporate the Wet Ingredients: Beat in the eggs one at a time, followed by the vanilla extract and peanut butter. Mix until well combined.
- Combine the Dry Ingredients: In a separate medium bowl, whisk together the flour, baking soda, baking powder, and salt.
- Gradually Add Dry Ingredients to Wet Ingredients: Gradually add the dry ingredients to the wet ingredients, mixing on low speed until just combined. Be careful not to overmix.
- Chill the Dough: Cover the bowl with plastic wrap and chill the dough in the refrigerator for at least 30 minutes (or longer, even overnight). If chilling overnight, let the dough sit at room temperature for about 15-20 minutes before scooping.
- Preheat the Oven and Prepare the Muffin Tin: Preheat your oven to 350°F (175°C). Grease a 24-cup mini muffin tin very well or use mini muffin liners.
- Scoop and Shape the Dough: Scoop rounded tablespoons of cookie dough and roll them into balls. Place one ball of dough into each mini muffin cup.
- Create the Cup Shape: Using a small tart tamper, the back of a teaspoon, or your fingers, gently press the dough down into each muffin cup, creating a well in the center.
- Bake the Cookie Cups: Bake for 10-12 minutes, or until the edges are lightly golden brown.
- Cool and Remove from Tin: Let the cookie cups cool in the muffin tin for about 5 minutes before carefully transferring them to a wire rack to cool completely.
- Heat the Heavy Cream: In a small saucepan, heat the heavy cream over medium heat until it just begins to simmer. Do not boil the cream.
- Pour Over Chocolate: Remove the saucepan from the heat and pour the hot cream over the chocolate chips in a heatproof bowl.
- Let Sit and Stir: Let the mixture sit for 1 minute, then gently stir until the chocolate is completely melted and the ganache is smooth and glossy.
- Add Butter: Stir in the butter until it is melted and fully incorporated into the ganache.
- Cool Slightly (Optional): Let the ganache cool slightly for about 10-15 minutes before filling the cookie cups.
- Fill the Cookie Cups: Spoon or pipe the chocolate ganache into the cooled peanut butter cookie cups, filling them to the top.
- Add Toppings (Optional): While the ganache is still slightly wet, sprinkle with your desired toppings.
- Chill (Optional): For a firmer ganache, chill the cookie cups in the refrigerator for about 30 minutes before serving.
- Serve and Enjoy: Serve the peanut butter chocolate cookie cups and enjoy!
Notes
- Peanut Butter Swirl: For a peanut butter swirl effect, melt a small amount of peanut butter and drizzle it over the chocolate ganache before it sets. Use a toothpick or skewer to create a swirl pattern.
- Different Chocolate: Experiment with different types of chocolate for the ganache, such as dark chocolate, milk chocolate, or white chocolate.
- Add Espresso Powder: For a mocha flavor, add 1 teaspoon of espresso powder to the chocolate ganache.
- Salted Caramel: Drizzle salted caramel over the chocolate ganache for a decadent treat.
- Nutella Filling: Substitute the chocolate ganache with Nutella for a hazelnut chocolate flavor.
- Make it Vegan: Use vegan butter, plant-based milk for the ganache, and vegan chocolate chips to make this recipe vegan-friendly.
- Gluten-Free Option: Substitute the all-purpose flour with a gluten-free all-purpose flour blend.
- Storage: Store the cookie cups in an airtight container at room temperature for up to 3 days or in the refrigerator for up to 5 days.
- Freezing: You can freeze the cookie cups for up to 2 months. Thaw them in the refrigerator before serving.
- Cookies Spreading Too Much: If your cookies are spreading too much, make sure your butter is not too soft and that you have chilled the dough adequately. You can also add a tablespoon or two of extra flour to the dough.
- Cookies Sticking to the Tin: Make sure you grease the muffin tin very well or use muffin liners.
- Ganache Too Thin: If your ganache is too thin, add a little more chocolate chips and stir until melted.
- Ganache Too Thick: If your ganache is too thick, add a little more heavy cream, one tablespoon at a time, until you reach the desired consistency.
- Prep Time: 30 minutes
- Cook Time: 11 minutes

Leave a Comment