
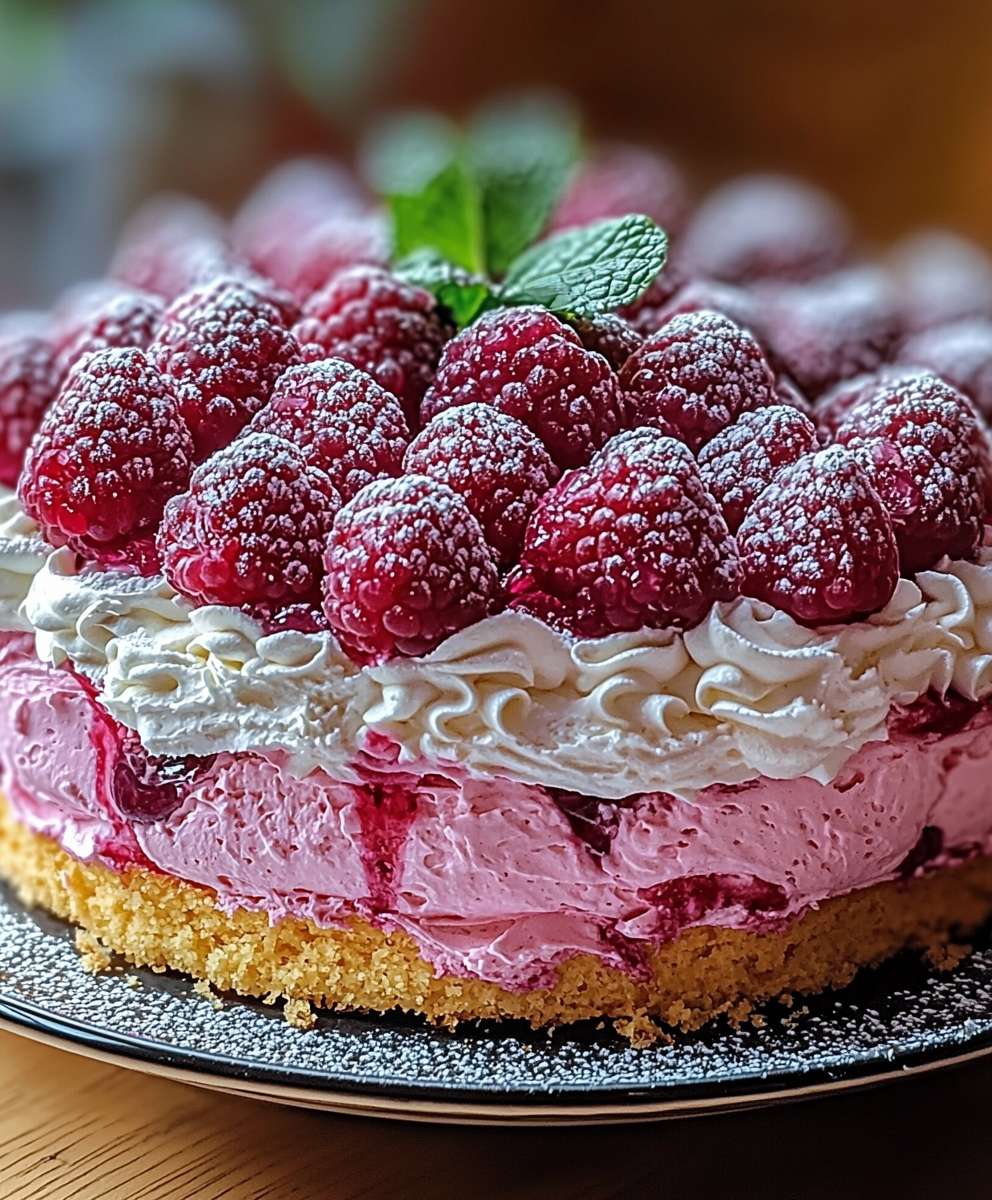
Pink Biscuit Cake: Just the name conjures up images of delightful, pastel-hued sweetness, doesn’t it? This isn’t just any cake; it’s a nostalgic trip down memory lane, a simple yet stunning dessert that’s surprisingly easy to create. Forget complicated baking techniques and hours spent in the kitchen. This no-bake wonder is ready in a flash, making it the perfect treat for busy weeknights or impromptu celebrations.
While the exact origins of Pink Biscuit Cake are a little hazy, similar no-bake biscuit cakes have been enjoyed for generations across various cultures. They represent resourcefulness and ingenuity, transforming humble ingredients into something truly special. Think of it as the ultimate comfort food, a sweet hug on a plate.
So, why do people adore this charming dessert? It’s the perfect combination of textures the slightly softened biscuits, the creamy filling, and that beautiful pink hue that makes it irresistible. The taste is equally captivating: a delicate sweetness that isn’t overpowering, making it a crowd-pleaser for all ages. Plus, the sheer convenience of a no-bake recipe is a major win! Who can resist a delicious, visually appealing cake that requires minimal effort? Let’s dive into this easy and delicious recipe!

Ingredients:
- For the Pink Biscuits:
- 2 1/2 cups all-purpose flour, plus more for dusting
- 1 tablespoon baking powder
- 1/2 teaspoon baking soda
- 1 teaspoon salt
- 1 cup (2 sticks) cold unsalted butter, cut into cubes
- 1 cup buttermilk, cold
- 1/4 cup granulated sugar
- 1 teaspoon vanilla extract
- 1/4 cup pink food coloring (gel or liquid) – adjust for desired shade
- For the Cream Cheese Frosting:
- 8 ounces cream cheese, softened
- 1 cup (2 sticks) unsalted butter, softened
- 4 cups powdered sugar, sifted
- 2 teaspoons vanilla extract
- 2-4 tablespoons milk or heavy cream, to adjust consistency
- For the Strawberry Filling:
- 1 pound fresh strawberries, hulled and sliced
- 1/4 cup granulated sugar
- 1 tablespoon lemon juice
- 1 tablespoon cornstarch
- Optional Garnishes:
- Fresh strawberries
- Sprinkles
- Edible glitter
Making the Pink Biscuits
- Prepare the Dry Ingredients: In a large bowl, whisk together the flour, baking powder, baking soda, and salt. Make sure everything is evenly distributed. This ensures a consistent rise and flavor in your biscuits.
- Cut in the Butter: Add the cold, cubed butter to the dry ingredients. Using a pastry blender or your fingertips (work quickly to keep the butter cold!), cut the butter into the flour mixture until it resembles coarse crumbs. You should still see small pieces of butter, about the size of peas. These little pockets of butter are what create those flaky layers we all love in a biscuit.
- Combine Wet Ingredients: In a separate bowl, whisk together the buttermilk, sugar, vanilla extract, and pink food coloring. Start with 1/4 cup of food coloring and add more, a few drops at a time, until you reach your desired shade of pink. Remember, the color will lighten slightly during baking.
- Combine Wet and Dry: Gradually pour the wet ingredients into the dry ingredients, mixing gently with a fork or spatula until just combined. Be careful not to overmix! Overmixing develops the gluten in the flour, resulting in tough biscuits. The dough will be shaggy and slightly sticky, and that’s perfectly fine.
- Turn Out and Knead (Lightly!): Lightly flour a clean work surface. Turn the dough out onto the floured surface. Gently pat the dough into a rectangle about 1 inch thick. Fold the dough in thirds, like a letter. This creates layers. Repeat this folding process 2-3 times. This is a very gentle kneading process, not like bread making. The goal is to create layers, not to develop gluten.
- Cut Out the Biscuits: Pat the dough to about 3/4 inch thickness. Use a 2-3 inch biscuit cutter (or a sharp knife) to cut out the biscuits. Press straight down; avoid twisting the cutter, as this seals the edges and prevents them from rising properly.
- Bake the Biscuits: Preheat your oven to 425°F (220°C). Place the biscuits on a baking sheet lined with parchment paper. For softer-sided biscuits, place them close together on the baking sheet. For crispier sides, space them a little further apart. Bake for 12-15 minutes, or until the biscuits are golden brown on top.
- Cool the Biscuits: Let the biscuits cool on a wire rack before assembling the cake.
Making the Strawberry Filling
- Prepare the Strawberries: Wash, hull, and slice the strawberries. I like to slice them about 1/4 inch thick.
- Combine Ingredients: In a medium saucepan, combine the sliced strawberries, sugar, lemon juice, and cornstarch. The lemon juice helps to brighten the flavor of the strawberries and the cornstarch will thicken the filling.
- Cook the Filling: Cook over medium heat, stirring constantly, until the strawberries release their juices and the mixture thickens. This usually takes about 5-7 minutes. The filling should be thick enough to coat the back of a spoon.
- Cool the Filling: Remove the saucepan from the heat and let the strawberry filling cool completely before assembling the cake. This prevents the frosting from melting.
Making the Cream Cheese Frosting
- Cream the Butter and Cream Cheese: In a large bowl, beat the softened cream cheese and butter together with an electric mixer until smooth and creamy. Make sure both the butter and cream cheese are at room temperature for the best results. This will ensure a smooth, lump-free frosting.
- Add the Powdered Sugar: Gradually add the sifted powdered sugar to the cream cheese mixture, beating on low speed until combined. Sifting the powdered sugar is important to prevent lumps in your frosting.
- Add Vanilla and Adjust Consistency: Add the vanilla extract and mix well. If the frosting is too thick, add milk or heavy cream, one tablespoon at a time, until you reach your desired consistency. You want the frosting to be spreadable but not too runny.
- Chill the Frosting (Optional): If the frosting is too soft, you can chill it in the refrigerator for 30 minutes to an hour to firm it up before using.
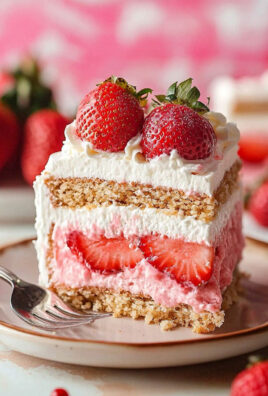
Assembling the Pink Biscuit Cake
- Prepare the Biscuits: Once the biscuits have cooled, use a serrated knife to slice each biscuit horizontally in half.
- First Layer: Place the bottom halves of several biscuits on a serving plate or cake stand, arranging them in a circle or desired shape. You can trim the edges of the biscuits if needed to create a more uniform shape.
- Add Frosting and Filling: Spread a generous layer of cream cheese frosting over the biscuit layer. Then, spoon a layer of the cooled strawberry filling over the frosting.
- Repeat Layers: Repeat the layers, using the top halves of the biscuits, frosting, and strawberry filling, until all the biscuits are used. I usually aim for 3-4 layers.
- Frost the Cake: Frost the entire cake with the remaining cream cheese frosting. You can create a smooth finish or a more rustic, textured look.
- Garnish (Optional): Garnish the cake with fresh strawberries, sprinkles, edible glitter, or any other decorations you like.
- Chill and Serve: Chill the cake in the refrigerator for at least 30 minutes before serving. This allows the frosting to set and the flavors to meld together.
- Enjoy! Slice and serve your delicious Pink Biscuit Cake! This cake is best enjoyed within a day or two, as the biscuits can become slightly soggy over time.
Conclusion:
This Pink Biscuit Cake isn’t just a dessert; it’s a delightful trip down memory lane with a modern, vibrant twist. It’s the kind of recipe that becomes a family favorite, requested time and time again. The ease of preparation combined with the stunning visual appeal makes it a winner for any occasion, from casual weeknight treats to celebratory gatherings. Honestly, what’s not to love? I truly believe this recipe is a must-try because it perfectly balances simplicity and deliciousness. You don’t need to be a seasoned baker to achieve impressive results. The ingredients are readily available, the steps are straightforward, and the final product is a showstopper. The creamy, dreamy filling complements the slightly crisp biscuits beautifully, creating a textural symphony in every bite. Plus, that gorgeous pink hue? It’s guaranteed to brighten anyone’s day! But the beauty of this Pink Biscuit Cake lies not only in its simplicity but also in its versatility. Feel free to experiment with different variations to suit your taste. For a richer, more decadent experience, try using a mascarpone cheese in the filling instead of whipped cream. A splash of vanilla extract or a hint of almond extract can also elevate the flavor profile. If you’re feeling adventurous, consider adding a layer of fresh berries between the biscuit layers for a burst of fruity freshness. Strawberries, raspberries, or even blueberries would work wonderfully. Serving suggestions are endless! This cake is fantastic on its own, but it also pairs perfectly with a scoop of vanilla ice cream or a dollop of whipped cream. A drizzle of chocolate sauce or a sprinkle of chopped nuts can add an extra touch of elegance. For a more sophisticated presentation, try cutting the cake into individual slices and arranging them on a platter with a garnish of fresh mint. It’s also a fantastic make-ahead dessert, as the flavors meld together beautifully over time. In fact, I often find it tastes even better the next day! Don’t be intimidated by the “cake” label; this is truly one of the easiest desserts you’ll ever make. It’s perfect for those times when you need a quick and impressive treat but don’t have hours to spend in the kitchen. It’s also a great recipe to get the kids involved in, as they’ll love helping to assemble the layers and decorate the finished product. Imagine the smiles on their faces when they see the beautiful pink creation they helped to make! So, what are you waiting for? Gather your ingredients, put on your apron, and get ready to create a Pink Biscuit Cake that will impress your family and friends. I’m confident that you’ll love this recipe as much as I do. I’m incredibly excited for you to try this recipe and would absolutely love to hear about your experience. Did you make any variations? What did your family think? Share your photos and stories in the comments below! Let’s create a community of Pink Biscuit Cake enthusiasts and inspire each other with our delicious creations. Happy baking! I can’t wait to see what you come up with! Print
Pink Biscuit Cake: A Deliciously Easy Recipe
- Total Time: 65 minutes
- Yield: 8–10 servings 1x
Description
Flaky pink biscuits layered with sweet strawberry filling and creamy cream cheese frosting make this whimsical cake perfect for celebrations!
Ingredients
- 2 1/2 cups all-purpose flour, plus more for dusting
- 1 tablespoon baking powder
- 1/2 teaspoon baking soda
- 1 teaspoon salt
- 1 cup (2 sticks) cold unsalted butter, cut into cubes
- 1 cup buttermilk, cold
- 1/4 cup granulated sugar
- 1 teaspoon vanilla extract
- 1/4 cup pink food coloring (gel or liquid) – adjust for desired shade
- 8 ounces cream cheese, softened
- 1 cup (2 sticks) unsalted butter, softened
- 4 cups powdered sugar, sifted
- 2 teaspoons vanilla extract
- 2–4 tablespoons milk or heavy cream, to adjust consistency
- 1 pound fresh strawberries, hulled and sliced
- 1/4 cup granulated sugar
- 1 tablespoon lemon juice
- 1 tablespoon cornstarch
- Fresh strawberries
- Sprinkles
- Edible glitter
Instructions
- Prepare the Dry Ingredients: In a large bowl, whisk together the flour, baking powder, baking soda, and salt.
- Cut in the Butter: Add the cold, cubed butter to the dry ingredients. Using a pastry blender or your fingertips (work quickly to keep the butter cold!), cut the butter into the flour mixture until it resembles coarse crumbs. You should still see small pieces of butter, about the size of peas.
- Combine Wet Ingredients: In a separate bowl, whisk together the buttermilk, sugar, vanilla extract, and pink food coloring. Start with 1/4 cup of food coloring and add more, a few drops at a time, until you reach your desired shade of pink.
- Combine Wet and Dry: Gradually pour the wet ingredients into the dry ingredients, mixing gently with a fork or spatula until just combined. Be careful not to overmix! The dough will be shaggy and slightly sticky.
- Turn Out and Knead (Lightly!): Lightly flour a clean work surface. Turn the dough out onto the floured surface. Gently pat the dough into a rectangle about 1 inch thick. Fold the dough in thirds, like a letter. Repeat this folding process 2-3 times.
- Cut Out the Biscuits: Pat the dough to about 3/4 inch thickness. Use a 2-3 inch biscuit cutter (or a sharp knife) to cut out the biscuits. Press straight down; avoid twisting the cutter.
- Bake the Biscuits: Preheat your oven to 425°F (220°C). Place the biscuits on a baking sheet lined with parchment paper. For softer-sided biscuits, place them close together on the baking sheet. For crispier sides, space them a little further apart. Bake for 12-15 minutes, or until the biscuits are golden brown on top.
- Cool the Biscuits: Let the biscuits cool on a wire rack before assembling the cake.
- Prepare the Strawberries: Wash, hull, and slice the strawberries.
- Combine Ingredients: In a medium saucepan, combine the sliced strawberries, sugar, lemon juice, and cornstarch.
- Cook the Filling: Cook over medium heat, stirring constantly, until the strawberries release their juices and the mixture thickens. This usually takes about 5-7 minutes. The filling should be thick enough to coat the back of a spoon.
- Cool the Filling: Remove the saucepan from the heat and let the strawberry filling cool completely before assembling the cake.
- Cream the Butter and Cream Cheese: In a large bowl, beat the softened cream cheese and butter together with an electric mixer until smooth and creamy.
- Add the Powdered Sugar: Gradually add the sifted powdered sugar to the cream cheese mixture, beating on low speed until combined.
- Add Vanilla and Adjust Consistency: Add the vanilla extract and mix well. If the frosting is too thick, add milk or heavy cream, one tablespoon at a time, until you reach your desired consistency.
- Chill the Frosting (Optional): If the frosting is too soft, you can chill it in the refrigerator for 30 minutes to an hour to firm it up before using.
- Prepare the Biscuits: Once the biscuits have cooled, use a serrated knife to slice each biscuit horizontally in half.
- First Layer: Place the bottom halves of several biscuits on a serving plate or cake stand, arranging them in a circle or desired shape. You can trim the edges of the biscuits if needed to create a more uniform shape.
- Add Frosting and Filling: Spread a generous layer of cream cheese frosting over the biscuit layer. Then, spoon a layer of the cooled strawberry filling over the frosting.
- Repeat Layers: Repeat the layers, using the top halves of the biscuits, frosting, and strawberry filling, until all the biscuits are used. I usually aim for 3-4 layers.
- Frost the Cake: Frost the entire cake with the remaining cream cheese frosting. You can create a smooth finish or a more rustic, textured look.
- Garnish (Optional): Garnish the cake with fresh strawberries, sprinkles, edible glitter, or any other decorations you like.
- Chill and Serve: Chill the cake in the refrigerator for at least 30 minutes before serving. This allows the frosting to set and the flavors to meld together.
- Enjoy! Slice and serve your delicious Pink Biscuit Cake! This cake is best enjoyed within a day or two, as the biscuits can become slightly soggy over time.
Notes
- Keep your butter cold for the flakiest biscuits.
- Don’t overmix the biscuit dough.
- Sift the powdered sugar for a smooth frosting.
- Adjust the amount of pink food coloring to your preference.
- Cool the strawberry filling completely before assembling the cake to prevent the frosting from melting.
- For softer-sided biscuits, place them close together on the baking sheet. For crispier sides, space them a little further apart.
- Prep Time: 45 minutes
- Cook Time: 20 minutes


Leave a Comment