
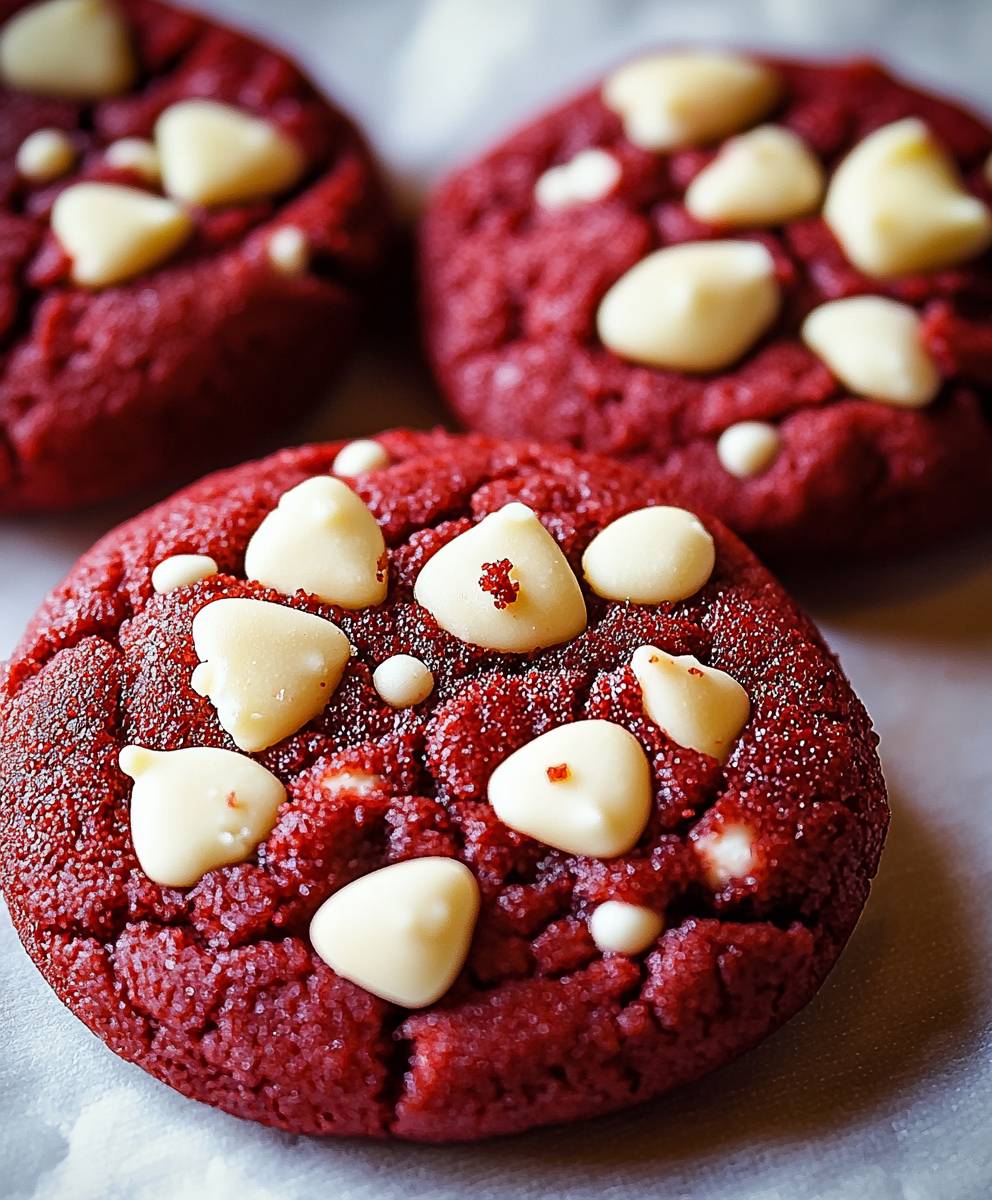
Red Velvet Cookies: Prepare to fall in love with the most decadent, melt-in-your-mouth cookies you’ve ever tasted! Imagine biting into a soft, chewy cookie with a subtle cocoa flavor, a vibrant red hue, and a tangy cream cheese frosting that perfectly balances the sweetness. These aren’t just cookies; they’re an experience.
The allure of red velvet extends beyond cakes and cupcakes, finding its perfect expression in these delightful cookies. While the exact origins of red velvet are debated, its popularity soared in the early 20th century, often associated with upscale hotels and restaurants. The distinctive red color was originally achieved through a chemical reaction between cocoa powder and acidic ingredients, but today, we often rely on food coloring to achieve that iconic look.
What makes red velvet cookies so irresistible? It’s the delightful combination of flavors and textures. The slight tang from the buttermilk and cream cheese creates a complex flavor profile that keeps you coming back for more. Plus, the soft, almost cake-like texture of the cookie itself is simply divine. Whether you’re baking for a holiday gathering, a special occasion, or simply craving a sweet treat, these cookies are guaranteed to be a crowd-pleaser. Get ready to bake up a batch of pure happiness!

Ingredients:
- 2 1/4 cups all-purpose flour
- 1 teaspoon baking soda
- 1 teaspoon salt
- 1 cup (2 sticks) unsalted butter, softened
- 1 1/2 cups granulated sugar
- 1/2 cup packed light brown sugar
- 2 large eggs
- 1 teaspoon vanilla extract
- 1 ounce (2 tablespoons) red food coloring
- 1 tablespoon unsweetened cocoa powder
- 1 teaspoon white vinegar
- 1 cup buttermilk
- 1 cup white chocolate chips
Preparing the Dough:
- Combine the dry ingredients: In a medium bowl, whisk together the flour, baking soda, and salt. This ensures that the baking soda and salt are evenly distributed throughout the flour, which is crucial for proper leavening and flavor. Set this bowl aside for later.
- Cream the butter and sugars: In a large bowl (or the bowl of a stand mixer), cream together the softened butter, granulated sugar, and brown sugar until light and fluffy. This process incorporates air into the butter and sugar mixture, which will contribute to the cookies’ soft and chewy texture. This usually takes about 3-5 minutes on medium speed. Scrape down the sides of the bowl occasionally to ensure everything is evenly mixed.
- Add the eggs and vanilla: Beat in the eggs one at a time, mixing well after each addition. Then, stir in the vanilla extract. The eggs provide structure and richness to the cookies, while the vanilla extract enhances the overall flavor.
- Prepare the red velvet mixture: In a small bowl, whisk together the red food coloring, cocoa powder, and white vinegar. This mixture creates the signature red velvet color and adds a slight tang to the cookies. The vinegar helps to activate the red food coloring and intensifies the color.
- Add the red velvet mixture to the batter: Add the red velvet mixture to the creamed butter and sugar mixture and beat until well combined. The batter should be a vibrant red color.
- Alternate adding the dry and wet ingredients: Gradually add the dry ingredients to the wet ingredients, alternating with the buttermilk, beginning and ending with the dry ingredients. Mix until just combined. Be careful not to overmix the dough, as this can result in tough cookies. Overmixing develops the gluten in the flour, which can make the cookies dense and chewy in a bad way. Start by adding about 1/3 of the dry ingredients, then 1/2 of the buttermilk, then another 1/3 of the dry ingredients, the remaining buttermilk, and finally the last 1/3 of the dry ingredients.
- Stir in the white chocolate chips: Gently fold in the white chocolate chips. The white chocolate chips add a touch of sweetness and creaminess to the cookies, complementing the red velvet flavor.
- Chill the dough: Cover the bowl with plastic wrap and chill the dough in the refrigerator for at least 30 minutes, or up to 2 hours. Chilling the dough helps to prevent the cookies from spreading too much during baking and allows the flavors to meld together. This step is crucial for achieving the desired texture and shape of the cookies.
Baking the Cookies:
- Preheat the oven: Preheat your oven to 350°F (175°C). Line baking sheets with parchment paper or silicone baking mats. Parchment paper prevents the cookies from sticking to the baking sheets and makes cleanup easier.
- Scoop the dough: Use a cookie scoop or spoon to drop rounded tablespoons of dough onto the prepared baking sheets, leaving about 2 inches between each cookie. This allows the cookies to spread evenly during baking without running into each other.
- Bake the cookies: Bake for 9-11 minutes, or until the edges are set and the centers are still slightly soft. The baking time may vary depending on your oven, so keep a close eye on the cookies.
- Cool the cookies: Remove the baking sheets from the oven and let the cookies cool on the baking sheets for a few minutes before transferring them to a wire rack to cool completely. This allows the cookies to firm up slightly and prevents them from breaking when you transfer them.
Tips for Perfect Red Velvet Cookies:
- Use high-quality red food coloring: Gel food coloring is recommended for a more vibrant red color. Liquid food coloring can sometimes make the batter too thin.
- Don’t overbake: Overbaked cookies will be dry and crumbly. The cookies should be slightly soft in the center when you remove them from the oven.
- Adjust the sweetness: If you prefer a less sweet cookie, you can reduce the amount of sugar slightly.
- Add cream cheese frosting: For an extra decadent treat, frost the cooled cookies with cream cheese frosting. This is a classic pairing with red velvet flavor.
- Store properly: Store the cooled cookies in an airtight container at room temperature for up to 3 days.
- Freezing: You can freeze the cookie dough for up to 2 months. Scoop the dough onto a baking sheet and freeze until solid, then transfer to a freezer bag. Bake from frozen, adding a few extra minutes to the baking time. You can also freeze the baked cookies for up to 2 months.
- Buttermilk Substitute: If you don’t have buttermilk on hand, you can make a quick substitute by adding 1 tablespoon of white vinegar or lemon juice to 1 cup of milk. Let it sit for 5 minutes before using.
- Cocoa Powder Type: Dutch-processed cocoa powder will give a richer, darker color and a milder flavor. Natural cocoa powder will have a more acidic flavor. Either will work, but the results will be slightly different.
- Softened Butter is Key: Make sure your butter is properly softened, but not melted. It should be soft enough to easily press a finger into, but still hold its shape. This is crucial for creaming the butter and sugar properly.
- Even Baking: To ensure even baking, rotate the baking sheets halfway through the baking time. This helps to prevent hot spots in the oven from causing some cookies to bake faster than others.
Variations:
- Red Velvet Crinkle Cookies: Roll the cookie dough balls in powdered sugar before baking for a classic crinkle cookie look.
- Red Velvet Chocolate Chip Cookies: Use semi-sweet chocolate chips instead of white chocolate chips for a different flavor combination.
- Red Velvet Oreo Cookies: Press a mini Oreo cookie into the center of each cookie dough ball before baking.
- Red Velvet Peanut Butter Chip Cookies: Substitute some of the white chocolate chips with peanut butter chips for a salty-sweet twist.
- Red Velvet Cream Cheese Swirl Cookies: Swirl a small amount of cream cheese frosting into the top of each cookie dough ball before baking.
Troubleshooting:
- Cookies are too flat: This could be due to using melted butter, not chilling the dough, or overmixing the dough. Make sure to use softened butter, chill the dough for at least 30 minutes, and avoid overmixing.
- Cookies are too dry: This could be due to overbaking or using too much flour. Make sure to bake the cookies for the correct amount of time and measure the flour accurately.
- Cookies are too hard: This could be due to overbaking or using too much sugar. Make sure to bake the cookies for the correct amount of time and measure the sugar accurately.
- Cookies are not red enough: This could be due to using low-quality red food coloring or not using enough food coloring. Use gel food coloring for a more vibrant red color and add more food coloring as needed.
Enjoy your delicious homemade Red Velvet Cookies!
Conclusion:
So there you have it! These Red Velvet Cookies are more than just a treat; they’re an experience. The perfect balance of that signature red velvet tang, the melt-in-your-mouth texture, and the delightful cream cheese frosting swirl makes them utterly irresistible. I truly believe this recipe is a must-try for anyone who loves baking, or simply enjoys a delicious cookie. Why is it a must-try, you ask? Well, beyond the incredible flavor profile, it’s surprisingly simple to make. I’ve broken down each step to ensure success, even for beginner bakers. Plus, the vibrant red color makes them perfect for holidays, parties, or just a special afternoon treat. They’re guaranteed to impress! But the fun doesn’t stop there! Feel free to get creative with your serving suggestions and variations. For a truly decadent experience, try serving these cookies warm with a scoop of vanilla ice cream. The contrast of the warm cookie and cold ice cream is simply divine. You could also crumble them over a cheesecake for an extra layer of red velvet goodness.Serving Suggestions and Variations:
* Ice Cream Sandwich: Use two cookies to sandwich a scoop of your favorite ice cream. * Cookie Crumble Topping: Crumble the cookies over yogurt, pudding, or even waffles. * Red Velvet Cookie Milkshake: Blend a few cookies with milk and ice cream for a creamy, dreamy milkshake. * Different Frosting Flavors: While cream cheese frosting is classic, try experimenting with vanilla buttercream, chocolate ganache, or even a tangy lemon frosting. * Add-Ins: Mix in white chocolate chips, chopped pecans, or even a sprinkle of sea salt for added texture and flavor. * Holiday Twist: For Christmas, add a touch of peppermint extract to the dough and decorate with red and green sprinkles. For Valentine’s Day, use heart-shaped sprinkles and pink food coloring in the frosting. I’m confident that once you try this recipe, it will become a staple in your baking repertoire. The rich, velvety flavor and the beautiful presentation make these cookies a winner every time. They’re perfect for sharing with friends and family, or for indulging in a little self-care. I poured my heart into perfecting this Red Velvet Cookies recipe, and I’m so excited for you to try it. Don’t be afraid to experiment with the variations and make it your own. Baking is all about having fun and creating something delicious. So, what are you waiting for? Preheat your oven, gather your ingredients, and get ready to bake up a batch of these amazing cookies. I promise you won’t regret it! And most importantly, I’d love to hear about your experience! Did you try any of the variations? Did you make them for a special occasion? Share your photos and stories in the comments below. I can’t wait to see your creations and hear what you think. Happy baking! Let me know if you have any questions, I’m always happy to help. I hope you enjoy these cookies as much as I do! Print
Red Velvet Cookies: The Ultimate Guide to Baking Perfection
- Total Time: 60 minutes
- Yield: 24 cookies 1x
Description
Soft and chewy red velvet cookies loaded with white chocolate chips. These festive cookies are easy to make and perfect for any occasion!
Ingredients
- 2 1/4 cups all-purpose flour
- 1 teaspoon baking soda
- 1 teaspoon salt
- 1 cup (2 sticks) unsalted butter, softened
- 1 1/2 cups granulated sugar
- 1/2 cup packed light brown sugar
- 2 large eggs
- 1 teaspoon vanilla extract
- 1 ounce (2 tablespoons) red food coloring
- 1 tablespoon unsweetened cocoa powder
- 1 teaspoon white vinegar
- 1 cup buttermilk
- 1 cup white chocolate chips
Instructions
- Combine Dry Ingredients: In a medium bowl, whisk together the flour, baking soda, and salt. Set aside.
- Cream Butter and Sugars: In a large bowl (or stand mixer), cream together the softened butter, granulated sugar, and brown sugar until light and fluffy (3-5 minutes). Scrape down the sides of the bowl.
- Add Eggs and Vanilla: Beat in the eggs one at a time, mixing well after each addition. Stir in the vanilla extract.
- Prepare Red Velvet Mixture: In a small bowl, whisk together the red food coloring, cocoa powder, and white vinegar.
- Add Red Velvet Mixture to Batter: Add the red velvet mixture to the creamed butter and sugar mixture and beat until well combined.
- Alternate Dry and Wet Ingredients: Gradually add the dry ingredients to the wet ingredients, alternating with the buttermilk, beginning and ending with the dry ingredients. Mix until just combined. (1/3 dry, 1/2 buttermilk, 1/3 dry, remaining buttermilk, 1/3 dry).
- Stir in White Chocolate Chips: Gently fold in the white chocolate chips.
- Chill the Dough: Cover the bowl with plastic wrap and chill the dough in the refrigerator for at least 30 minutes, or up to 2 hours.
- Preheat Oven: Preheat your oven to 350°F (175°C). Line baking sheets with parchment paper or silicone baking mats.
- Scoop the Dough: Use a cookie scoop or spoon to drop rounded tablespoons of dough onto the prepared baking sheets, leaving about 2 inches between each cookie.
- Bake the Cookies: Bake for 9-11 minutes, or until the edges are set and the centers are still slightly soft.
- Cool the Cookies: Remove the baking sheets from the oven and let the cookies cool on the baking sheets for a few minutes before transferring them to a wire rack to cool completely.
Notes
- Use high-quality gel food coloring for a vibrant red color.
- Don’t overbake the cookies. They should be slightly soft in the center.
- Chill the dough to prevent excessive spreading.
- For a richer flavor, use Dutch-processed cocoa powder.
- If you don’t have buttermilk, substitute with 1 tablespoon of white vinegar or lemon juice to 1 cup of milk. Let it sit for 5 minutes before using.
- To ensure even baking, rotate the baking sheets halfway through the baking time.
- Store cooled cookies in an airtight container at room temperature for up to 3 days.
- Freeze cookie dough for up to 2 months. Scoop onto a baking sheet and freeze until solid, then transfer to a freezer bag. Bake from frozen, adding a few extra minutes to the baking time. You can also freeze the baked cookies for up to 2 months.
- Prep Time: 20 minutes
- Cook Time: 9 minutes
Leave a Comment