
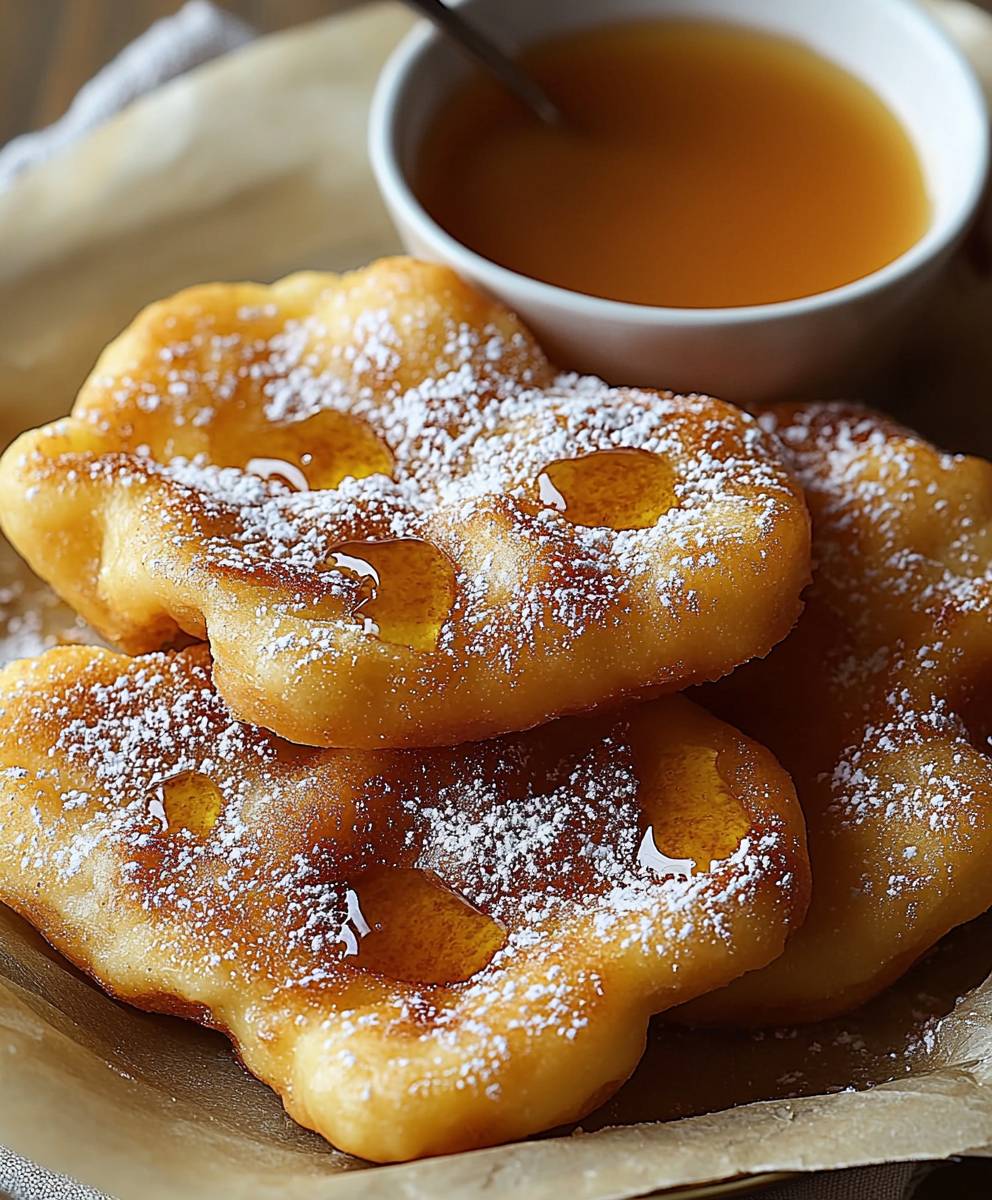
Maple Beaver Tails, those iconic Canadian pastries, are more than just a treat; they’re a warm, comforting hug on a cold day, a sweet symbol of national pride, and a downright delicious indulgence. Imagine sinking your teeth into a freshly fried, golden-brown pastry, its crispy exterior giving way to a soft, chewy interior, all slathered in rich, authentic maple syrup. Is your mouth watering yet? Mine is!
While the exact origins of the Beaver Tail are debated, its modern form was popularized in Ottawa in 1978, quickly becoming a beloved staple at festivals, fairs, and winter carnivals across the country. The name, of course, comes from its distinctive shape, resembling the tail of Canada’s national animal. But beyond its playful name and shape, the real magic lies in the taste. People adore Maple Beaver Tails for their delightful combination of textures and flavors. The crispy-on-the-outside, chewy-on-the-inside dough provides a satisfying bite, while the sweetness of the maple syrup perfectly complements the subtle warmth of the fried pastry. It’s a simple pleasure, but one that evokes feelings of nostalgia, comfort, and pure joy.
Ready to experience this Canadian classic for yourself? Let’s dive into this easy-to-follow recipe and bring the taste of Canada right to your kitchen!

Ingredients:
- For the Dough:
- 6 cups all-purpose flour, plus more for dusting
- 2 ¼ teaspoons (1 package) active dry yeast
- ¼ cup granulated sugar
- 1 teaspoon salt
- 2 cups warm milk (105-115°F)
- ¼ cup unsalted butter, melted
- 2 large eggs, lightly beaten
- For Frying:
- Vegetable oil, for frying (about 4-6 cups)
- For Topping:
- ½ cup unsalted butter, melted
- 1 cup granulated sugar
- ¼ cup ground cinnamon
- Maple syrup, for drizzling
Preparing the Dough:
- Activate the Yeast: In a large bowl, combine the warm milk, sugar, and yeast. Stir gently and let it sit for 5-10 minutes, or until the yeast is foamy. This indicates that the yeast is active and ready to use. If the yeast doesn’t foam, it might be old or the milk might be too hot or cold. Start again with fresh yeast.
- Combine Wet and Dry Ingredients: Add the melted butter and beaten eggs to the yeast mixture. Whisk to combine everything thoroughly.
- Add Flour and Salt: In a separate large bowl, whisk together the flour and salt. Gradually add the dry ingredients to the wet ingredients, mixing with a wooden spoon or a stand mixer fitted with a dough hook. Mix until a shaggy dough forms.
- Knead the Dough: Turn the dough out onto a lightly floured surface. Knead for 8-10 minutes, or until the dough is smooth and elastic. If using a stand mixer, knead with the dough hook for 6-8 minutes on medium speed. The dough should be slightly sticky but not overly so. If it’s too sticky, add a tablespoon of flour at a time until it reaches the right consistency.
- First Rise: Place the dough in a lightly oiled bowl, turning to coat all sides. Cover the bowl with plastic wrap or a clean kitchen towel. Let the dough rise in a warm place for 1-1.5 hours, or until doubled in size. This is a crucial step for developing the flavor and texture of the beaver tails. A warm environment helps the yeast work its magic.
- Punch Down the Dough: Once the dough has doubled, gently punch it down to release the air. This helps to redistribute the yeast and create a more even texture.
Shaping the Beaver Tails:
- Divide the Dough: Turn the dough out onto a lightly floured surface. Divide the dough into 12-16 equal pieces. The number of pieces will depend on how large you want your beaver tails to be.
- Roll Out Each Piece: Roll each piece of dough into an oval shape, about ¼ inch thick. Aim for a shape that resembles a beaver’s tail elongated and slightly wider at one end. Don’t worry about making them perfect; a little variation adds to their rustic charm.
- Let Rest: Place the shaped beaver tails on a baking sheet lined with parchment paper. Cover them loosely with plastic wrap or a clean kitchen towel and let them rest for 15-20 minutes. This allows the gluten to relax, making them more tender when fried.
Frying the Beaver Tails:
- Heat the Oil: Pour vegetable oil into a large, deep pot or Dutch oven. Heat the oil over medium heat to 350-375°F (175-190°C). Use a deep-fry thermometer to monitor the temperature. Maintaining the correct temperature is essential for achieving golden brown and evenly cooked beaver tails. If the oil is too hot, they will burn on the outside before cooking through. If it’s too cold, they will absorb too much oil and become greasy.
- Fry the Beaver Tails: Carefully place 2-3 beaver tails into the hot oil, being careful not to overcrowd the pot. Fry for 2-3 minutes per side, or until golden brown and puffed up. Use a slotted spoon or spider to flip them over.
- Drain Excess Oil: Remove the fried beaver tails from the oil and place them on a wire rack lined with paper towels to drain excess oil. This helps to keep them crispy and prevents them from becoming soggy.
Topping and Serving:
- Prepare the Cinnamon Sugar: In a shallow dish, combine the granulated sugar and ground cinnamon. Mix well.
- Butter and Coat: While the beaver tails are still warm, brush them generously with melted butter. Then, dredge them in the cinnamon sugar mixture, ensuring they are evenly coated on both sides. The melted butter helps the cinnamon sugar adhere to the beaver tails.
- Drizzle with Maple Syrup: Place the cinnamon-sugar coated beaver tails on serving plates. Drizzle generously with maple syrup. The maple syrup adds a touch of Canadian authenticity and complements the cinnamon sugar perfectly.
- Serve Immediately: Serve the beaver tails immediately while they are still warm and crispy. They are best enjoyed fresh.
Tips for Perfect Beaver Tails:
- Use Fresh Yeast: Ensure your yeast is fresh and active for the best results.
- Don’t Overcrowd the Pot: Frying too many beaver tails at once will lower the oil temperature and result in greasy beaver tails.
- Monitor the Oil Temperature: Use a deep-fry thermometer to maintain the correct oil temperature.
- Adjust Sweetness: Adjust the amount of cinnamon sugar and maple syrup to your liking.
- Get Creative with Toppings: While cinnamon sugar and maple syrup are classic toppings, feel free to experiment with other options like Nutella, chocolate sauce, whipped cream, or fruit.
Variations:
- Chocolate Beaver Tails: Dip the fried beaver tails in melted chocolate instead of butter and cinnamon sugar.
- Nutella Beaver Tails: Spread Nutella on the warm beaver tails and top with chopped hazelnuts.
- Fruit-Topped Beaver Tails: Top the beaver tails with fresh berries, sliced bananas, or other fruits.
- Savory Beaver Tails: Skip the cinnamon sugar and maple syrup and top the beaver tails with savory toppings like cheese, herbs, or garlic butter.
Troubleshooting:
- Dough Not Rising: If your dough isn’t rising, the yeast might be old, the milk might be too hot or cold, or the room might be too cold. Try using fresh yeast, ensuring the milk is at the correct temperature, and placing the dough in a warmer location.
- Beaver Tails Too Greasy: If your beaver tails are too greasy, the oil temperature might be too low. Make sure the oil is at 350-375°F (175-190°C) before frying. Also, be sure to drain the beaver tails on a wire rack lined with paper towels.
- Beaver Tails Burning: If your beaver tails are burning on the outside before cooking through, the oil temperature might be too high. Lower the heat and monitor the temperature closely.
- Beaver Tails Not Puffed Up: If your beaver tails aren’t puffing up, the dough might not have risen enough. Make sure to let the dough rise until doubled in size before shaping and frying.
Conclusion:
And there you have it! This isn’t just another dessert recipe; it’s a passport to pure, unadulterated joy. These Maple Beaver Tails are more than just fried dough; they are a warm, comforting hug on a plate, a sweet symphony of crispy edges and soft, pillowy interiors, all drenched in the irresistible allure of maple syrup. Trust me, once you take that first bite, you’ll understand why I’m so passionate about this recipe. It’s a guaranteed crowd-pleaser, perfect for everything from cozy family nights in to festive gatherings with friends. But what makes these Maple Beaver Tails a must-try? It’s the simplicity, the sheer deliciousness, and the nostalgic charm they evoke. They are surprisingly easy to make, requiring minimal ingredients and effort, yet delivering maximum flavor and satisfaction. Forget complicated desserts that take hours to prepare; this recipe is all about quick, easy, and utterly delightful indulgence. The combination of the warm, freshly fried dough with the sweet, sticky maple syrup is simply divine. It’s a taste of Canada that you can recreate in your own kitchen, no matter where you are in the world. Now, let’s talk about serving suggestions and variations, because the possibilities are endless! While the classic maple syrup topping is a timeless favorite, don’t be afraid to get creative. A dusting of powdered sugar adds a touch of elegance, while a sprinkle of cinnamon brings a warm, spicy note. For the chocolate lovers out there, a drizzle of melted chocolate or a generous dollop of Nutella is an absolute must. You could even try topping them with fresh berries and whipped cream for a more decadent treat. Looking for something a little different? Consider adding a pinch of cinnamon or nutmeg to the dough for a warm, spiced flavor. Or, for a truly indulgent experience, try stuffing the beaver tails with apple pie filling or a creamy custard before frying. The possibilities are truly endless, so feel free to experiment and find your own perfect combination. These Maple Beaver Tails are best served warm, straight from the fryer. The crispy exterior and soft interior are at their peak when they’re fresh, and the aroma of maple syrup will fill your kitchen with a comforting, inviting scent. Serve them with a cup of hot coffee or tea for the ultimate cozy experience. They’re also fantastic as a dessert after a hearty meal, or as a special treat for a weekend brunch. I truly believe that everyone should experience the joy of homemade Maple Beaver Tails at least once in their life. So, I urge you to give this recipe a try. Gather your ingredients, put on some music, and get ready to create a little bit of magic in your kitchen. And most importantly, don’t forget to share your experience! I would absolutely love to hear how your Maple Beaver Tails turned out. Did you stick to the classic recipe, or did you try any fun variations? What were your favorite toppings? Share your photos and stories in the comments below, and let’s spread the love for this amazing dessert! Happy baking! Print
Maple Beaver Tails: A Delicious Canadian Treat Recipe
- Total Time: 120 minutes
- Yield: 12–16 beaver tails 1x
Description
Crispy, golden-brown fried dough pastries shaped like beaver tails, coated in cinnamon sugar, and drizzled with maple syrup. A classic Canadian treat!
Ingredients
- 6 cups all-purpose flour, plus more for dusting
- 2 ¼ teaspoons (1 package) active dry yeast
- ¼ cup granulated sugar
- 1 teaspoon salt
- 2 cups warm milk (105-115°F)
- ¼ cup unsalted butter, melted
- 2 large eggs, lightly beaten
- Vegetable oil, for frying (about 4-6 cups)
- ½ cup unsalted butter, melted
- 1 cup granulated sugar
- ¼ cup ground cinnamon
- Maple syrup, for drizzling
Instructions
- Activate the Yeast: In a large bowl, combine the warm milk, sugar, and yeast. Stir gently and let it sit for 5-10 minutes, or until the yeast is foamy.
- Combine Wet and Dry Ingredients: Add the melted butter and beaten eggs to the yeast mixture. Whisk to combine.
- Add Flour and Salt: In a separate large bowl, whisk together the flour and salt. Gradually add the dry ingredients to the wet ingredients, mixing with a wooden spoon or a stand mixer fitted with a dough hook. Mix until a shaggy dough forms.
- Knead the Dough: Turn the dough out onto a lightly floured surface. Knead for 8-10 minutes, or until the dough is smooth and elastic. If using a stand mixer, knead with the dough hook for 6-8 minutes on medium speed.
- First Rise: Place the dough in a lightly oiled bowl, turning to coat all sides. Cover the bowl with plastic wrap or a clean kitchen towel. Let the dough rise in a warm place for 1-1.5 hours, or until doubled in size.
- Punch Down the Dough: Once the dough has doubled, gently punch it down to release the air.
- Divide the Dough: Turn the dough out onto a lightly floured surface. Divide the dough into 12-16 equal pieces.
- Roll Out Each Piece: Roll each piece of dough into an oval shape, about ¼ inch thick.
- Let Rest: Place the shaped beaver tails on a baking sheet lined with parchment paper. Cover them loosely with plastic wrap or a clean kitchen towel and let them rest for 15-20 minutes.
- Heat the Oil: Pour vegetable oil into a large, deep pot or Dutch oven. Heat the oil over medium heat to 350-375°F (175-190°C).
- Fry the Beaver Tails: Carefully place 2-3 beaver tails into the hot oil, being careful not to overcrowd the pot. Fry for 2-3 minutes per side, or until golden brown and puffed up. Use a slotted spoon or spider to flip them over.
- Drain Excess Oil: Remove the fried beaver tails from the oil and place them on a wire rack lined with paper towels to drain excess oil.
- Prepare the Cinnamon Sugar: In a shallow dish, combine the granulated sugar and ground cinnamon. Mix well.
- Butter and Coat: While the beaver tails are still warm, brush them generously with melted butter. Then, dredge them in the cinnamon sugar mixture, ensuring they are evenly coated on both sides.
- Drizzle with Maple Syrup: Place the cinnamon-sugar coated beaver tails on serving plates. Drizzle generously with maple syrup.
- Serve Immediately: Serve the beaver tails immediately while they are still warm and crispy.
Notes
- Use fresh yeast for the best results.
- Don’t overcrowd the pot when frying.
- Monitor the oil temperature with a deep-fry thermometer.
- Adjust the sweetness to your liking.
- Get creative with toppings! Try Nutella, chocolate sauce, whipped cream, or fruit.
- If the dough isn’t rising, the yeast might be old, the milk might be too hot or cold, or the room might be too cold.
- If the beaver tails are too greasy, the oil temperature might be too low.
- If the beaver tails are burning on the outside before cooking through, the oil temperature might be too high.
- If the beaver tails aren’t puffing up, the dough might not have risen enough.
- Prep Time: 30 minutes
- Cook Time: 30 minutes

Leave a Comment