
2 Ingredient Lemon Bars are a delightful treat that brings a burst of sunshine to any occasion. With just two simple ingredients, these bars are not only easy to make but also incredibly satisfying to eat. The tangy flavor of fresh lemons combined with a sweet base creates a perfect balance that tantalizes the taste buds. Historically, lemon bars have been a staple in American dessert culture, often enjoyed at picnics, potlucks, and family gatherings. What I love most about 2 Ingredient Lemon Bars is their versatility; they can be served as a refreshing dessert in the summer or a zesty pick-me-up during the colder months. The creamy texture paired with the bright citrus flavor makes them irresistible, and their convenience means you can whip them up in no time. Trust me, once you try these 2 Ingredient Lemon Bars, they will become a favorite in your dessert repertoire!

Ingredients:
- 1 cup of all-purpose flour
- 1 cup of granulated sugar
- 1/2 cup of unsalted butter, melted
- 2 large eggs
- 1/2 cup of freshly squeezed lemon juice (about 2-3 lemons)
- 1 teaspoon of lemon zest (optional, for extra flavor)
- Powdered sugar, for dusting (optional)
Preparing the Batter
1. **Preheat the Oven**: Start by preheating your oven to 350°F (175°C). This ensures that your lemon bars will bake evenly and come out perfectly set. 2. **Prepare the Baking Dish**: Grab an 8×8 inch (or 9×9 inch) baking dish and grease it lightly with butter or non-stick spray. You can also line it with parchment paper for easier removal later on. 3. **Mix the Dry Ingredients**: In a medium mixing bowl, combine the flour and granulated sugar. Whisk them together until they are well blended. This step is crucial as it helps to evenly distribute the sugar throughout the flour. 4. **Add the Wet Ingredients**: Pour in the melted butter and crack in the eggs. Use a whisk to mix everything together until you have a smooth batter. Make sure there are no lumps; this will help your lemon bars have a nice, even texture. 5. **Incorporate the Lemon Juice and Zest**: Squeeze the juice from your lemons until you have 1/2 cup. If you like a more intense lemon flavor, add the lemon zest at this stage. Whisk the lemon juice and zest into the batter until fully combined. The mixture should be glossy and slightly thick.Baking the Lemon Bars
6. **Pour the Batter into the Dish**: Carefully pour the batter into your prepared baking dish. Use a spatula to spread it evenly across the bottom. This will help ensure that your lemon bars bake uniformly. 7. **Bake**: Place the baking dish in the preheated oven and bake for about 20-25 minutes. Youll know theyre done when the edges are lightly golden and the center is set but still slightly jiggly. Keep an eye on them to avoid overbaking, as you want them to remain soft and chewy. 8. **Cool the Bars**: Once baked, remove the dish from the oven and let it cool on a wire rack for about 10-15 minutes. This cooling period allows the bars to firm up a bit more.Assembling and Serving
9. **Chill the Bars**: For the best flavor and texture, I recommend chilling the lemon bars in the refrigerator for at least 1 hour. This step is optional, but it helps the bars to set completely and makes them easier to cut. 10. **Cutting the Bars**: Once chilled, use a sharp knife to cut the lemon bars into squares or rectangles. If you lined the baking dish with parchment paper, you can lift the bars out easily for cleaner cuts. 11. **Dust with Powdered Sugar**: If you want to add a touch of sweetness and a beautiful presentation, dust the tops of the lemon bars with powdered sugar just before serving. This adds a lovely contrast to the bright yellow of the lemon filling. 12. **Serve and Enjoy**: Place the lemon bars on a serving platter and enjoy them with friends and family. Theyre perfect for a sunny day, a picnic, or just as a delightful treat after dinner.Storage Tips
13. **Storing Leftovers**: If you have any leftovers (which is rare because theyre so delicious!), store them in an airtight container in the refrigerator. They will keep well for up to a week. Just remember to dust with powdered sugar again before serving if you like. 14. **Freezing for Later**: You can also freeze these lemon bars! Just wrap them tightly in plastic wrap and then place them in a freezer-safe container. They can be frozen for up to 3 months. When youre ready to enjoy them, simply thaw them in the refrigerator overnight.Variations and Tips
15. **Experiment with Flavors**: While the classic lemon flavor is unbeatable, feel free to experiment! You can substitute lime juice for a lime version or even add a splash of orange juice for a citrus medley. 16. **Add a Twist**: For a fun twist, consider adding a layer of meringue on top before baking. Just whip up some egg whites with sugar until stiff peaks form, spread it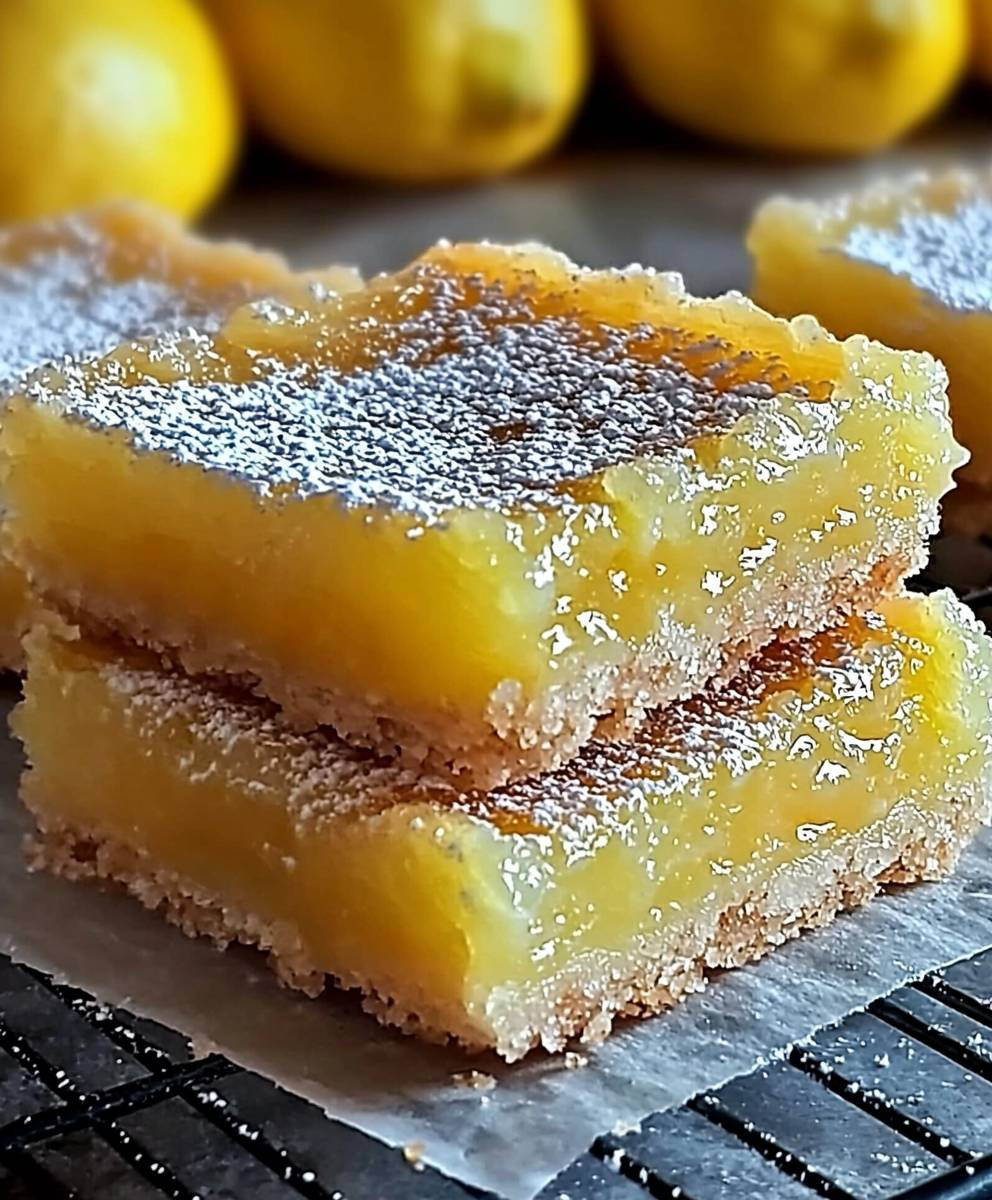
Conclusion:
In summary, these 2 Ingredient Lemon Bars are an absolute must-try for anyone who loves a burst of citrusy goodness in a simple, delightful dessert. The combination of just two ingredients creates a surprisingly rich and tangy flavor that will leave your taste buds dancing with joy. Whether you’re hosting a gathering, looking for a quick treat to satisfy your sweet tooth, or simply want to impress your friends and family with minimal effort, these lemon bars are the perfect solution. For serving suggestions, I recommend dusting the bars with a light sprinkle of powdered sugar for an elegant touch, or pairing them with a dollop of whipped cream or a scoop of vanilla ice cream for an extra indulgent experience. If you’re feeling adventurous, you can also experiment with variations by adding a hint of zest from the lemon peel or incorporating a splash of vanilla extract to enhance the flavor profile. I encourage you to give this recipe a try and experience the delightful simplicity of these 2 Ingredient Lemon Bars for yourself. Once you do, I would love to hear about your experience! Share your thoughts, any variations you tried, or even a photo of your delicious creation. Let’s spread the joy of baking together! Print
2 Ingredient Lemon Bars: Easy Recipe for a Refreshing Dessert
- Total Time: 135 minutes
- Yield: 16 servings 1x
Description
These lemon bars offer a delightful combination of tart and sweet flavors, featuring a creamy filling made from fresh lemon juice and sweetened condensed milk. Easy to prepare, they are perfect for any gathering and can be served chilled or at room temperature, making them a refreshing dessert option.
Ingredients
- 1 cup of lemon juice (freshly squeezed)
- 1 can (14 ounces) of sweetened condensed milk
- Powdered sugar (for dusting)
Instructions
- Gather your ingredients, including a measuring cup for the lemon juice and a mixing bowl.
- If using fresh lemons, cut them in half and juice them until you have one cup of lemon juice.
- In a medium-sized mixing bowl, pour in the sweetened condensed milk and slowly add the freshly squeezed lemon juice. Mix until fully combined.
- Preheat your oven to 350°F (175°C).
- Lightly grease an 8×8-inch baking dish with cooking spray or butter, or line it with parchment paper.
- Pour the mixture into the prepared baking dish and spread it evenly with a spatula.
- Place the baking dish in the preheated oven and bake for about 20-25 minutes until the edges are set and the center has a slight jiggle.
- Remove the dish from the oven and let it cool at room temperature for about 10-15 minutes, then transfer it to the refrigerator to chill for at least 2 hours.
- Once chilled, cut the lemon bars into squares or rectangles using a sharp knife.
- Dust the tops of the lemon bars with powdered sugar using a fine mesh sieve.
- Serve the lemon bars chilled or at room temperature, optionally garnished with a slice of lemon or a sprig of mint.
- Store any leftovers in an airtight container in the refrigerator for up to a week, separating layers with parchment paper.
- If freezing, cut the bars into squares, freeze in a single layer, then transfer to a freezer-safe container or bag for up to 3 months.
- Consider adding a teaspoon of lemon zest or a bit of vanilla extract for flavor variations.
Notes
- For a more intense lemon flavor, consider adding lemon zest to the filling.
- Ensure the lemon juice is freshly squeezed for the best taste.
- Prep Time: 15 minutes
- Cook Time: 20-25 minutes

Leave a Comment